![]()
by

Watch the Video An Overview of Stellar
Hint: Use Ctrl+ F to search for text on this page.
Help Page – Stellar Help Homepage
-
Getting Started
-
Logging In
-
Nebula and Stellar Explained
-
Starting Stellar on your Nebula Device
-
How To Section – Detailed descriptions of common workflows.
-
Hot Keys and Mouse Controls
-
Trouble shooting and FAQ
-
Glossary
-
Top Menu Bar
-
Help Menus
-
Context Menus
-
Project – Overview
-
Files – Summary
-
Import & Export
-
Layouts
-
Layouts – Create and modify using Layout Mode
-
Tasks – WARNING: The Task functions are currently in Alpha Release and subject to change
-
Profiles and Layers
-
Version number and version history
-
Rehearse Mode
-
Editing – Text
-
Editing – Time-codes
-
Protecting your work – Read only and other protected modes
-
Reading Speed Indicators
-
Comments
-
Splitting and Appending Text Files
-
Fonts
-
Spelling and Grammar checker and Thesaurus
-
Printing and Previewing
-
Widgets
-
Widgets – Video Display
-
Widgets – Script Overlay
-
Widgets – Media Controller
-
Widgets – Timed Text Editor
-
Widgets – Translation
-
Widgets – Time Display
-
Widgets – Timeline
-
Widgets – Audio Recorder
-
Widgets – Volume Manager
-
Widgets – Collaboration Tool and Intercom
-
Widgets – Audio Tools Plug-in
-
Widgets – Synthetic Voice Plug-in
-
Widgets – AI Tools
-
Widgets – Subtitle Tools
-
Widgets – Transcription Editor
-
Widgets – Web Search
-
Widgets – External Widget Container
-
Version History
-
Demo Videos
V6.0 Updated 28th July 2022
Nebula and Stellar Explained
Nebula and Stellar are the two systems provided by Yella Umbrella that work together to deliver a comprehensive set of media creation and processing tools.
Nebula
Nebula provides all the Processes you need to manipulate media files for subtitling, AD, captioning, voice over, dubbing and other formats. Nebula is an automated system that provides the backend tools and is Hands Off, so once it is set up it will process files based on either API calls from external systems, folder watching, or in response to things you do in Stellar.
When you sign up to use Stellar a new Nebula Device will be created along with a set of Nebula Process to run Stellar.
You will also get a Nebula login, you will need this to access your account to view you credit level and buy more credit vial PayPal (if you are a freelance user).
Most of the time, you will not need to interact with Nebula at all.
Stellar
Stellar is the user tool for authoring, editing, checking and viewing all types of timed text including subtitles, captions, Audio Description, voice over, and dubbing scripts and recording and transcripts.
Stellar runs on Nebula so you have to have a Nebula account and to be running a Nebula Device on your PC or Mac.
You need to have an active internet connection as the local Nebula Device must be in contact with the Nebula System. However none of your media files are ever stored on our servers, you are always in control of your own media.
Once you are up and running you will only need to access Nebula to view and update your account or possibly occasionally to edit some Stellar configurations. There is a full set of Nebula Help pages available should you need them.
NOTE: Projects in Nebula and Stella are not the same thing! See the Project Overview for more information on Stellar Projects and the Nebula help pages for information on Nebula Projects.
Starting Stellar on your Nebula Device
To be able to run Stellar you need to be running a Nebula Device on your PC or Mac. See the Getting Started page for full details on how to get this set up.
First you must Run the Nebula Device you have downloaded. You only need to do this once. See the Getting Started page for details.
In Windows the Device will by default start up every time you turn on your computer. On a Mac you can set this to auto run on start-up.
Stellar will automatically open a new tab in Chrome when the Device starts up. You can disable this in the Nebula settings.
Once you are running you can open the Devices control page by:

PC – Click on the Device Icon in the Windows tool tray
![]()
Mac – click on Status in the top bar
This will open the Device page in Chrome.
To start Stellar just Click on the Stellar xxxx Button.
(The number xxxxx is different for every copy of Stellar)
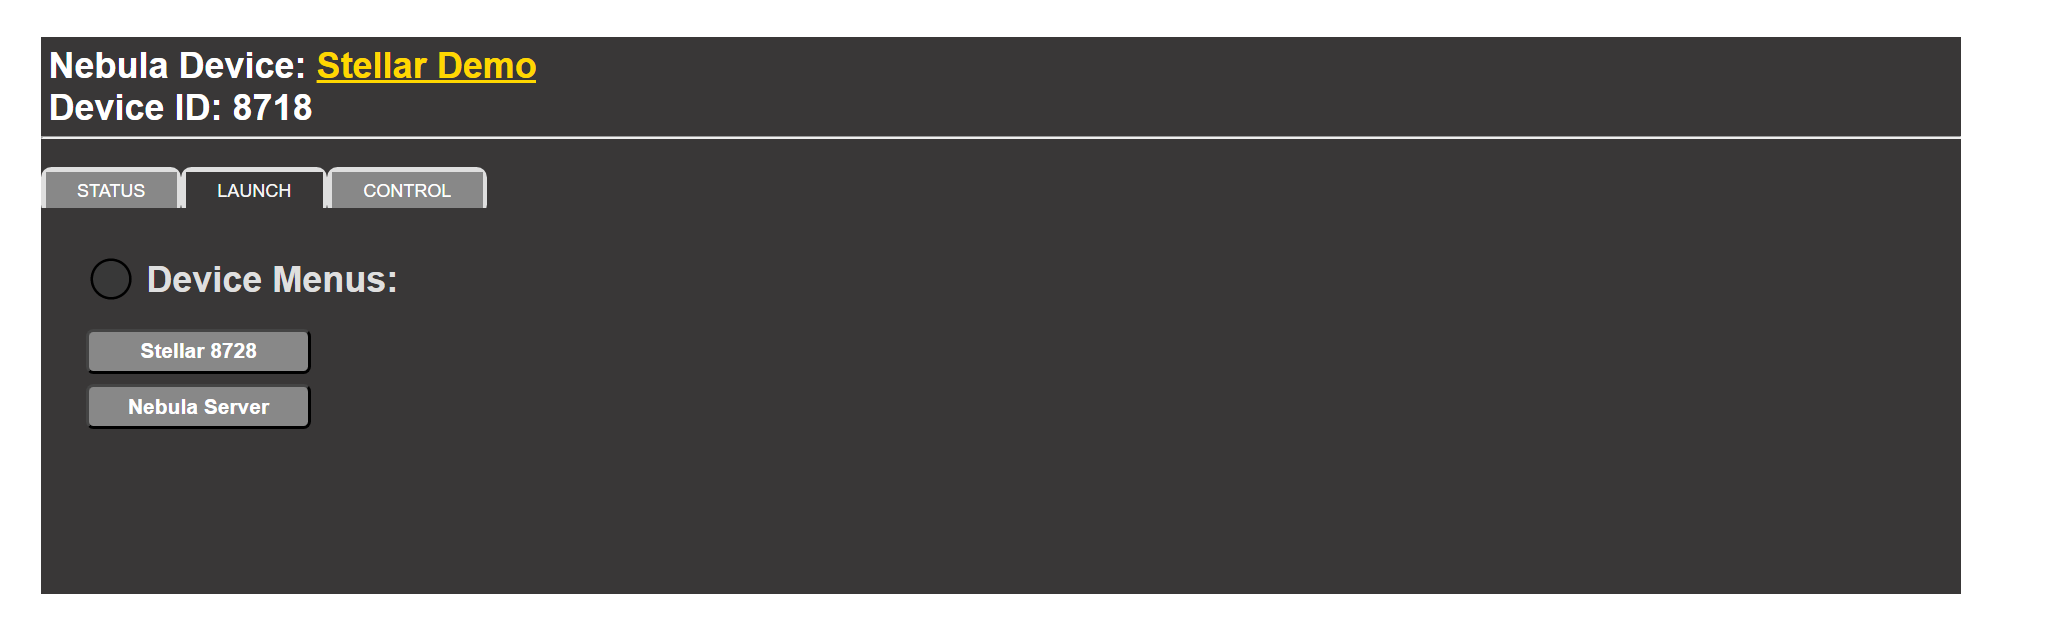
At the top of the page is a link to your Device in Nebula, this is useful if you need to check the Processes and change low level configurations.
The Device ID is your unique Device number.
The Flashing circle indicates that the Device is running and updating the status page. If this stops flashing you know this Device isn’t running.
The Device page has three tabs:
Launch Tab – is the default tab and will show a button to launch Stellar. Normally this is all you will need.
Status Tab – shows a list of all the Processes running on your device and their statuses.
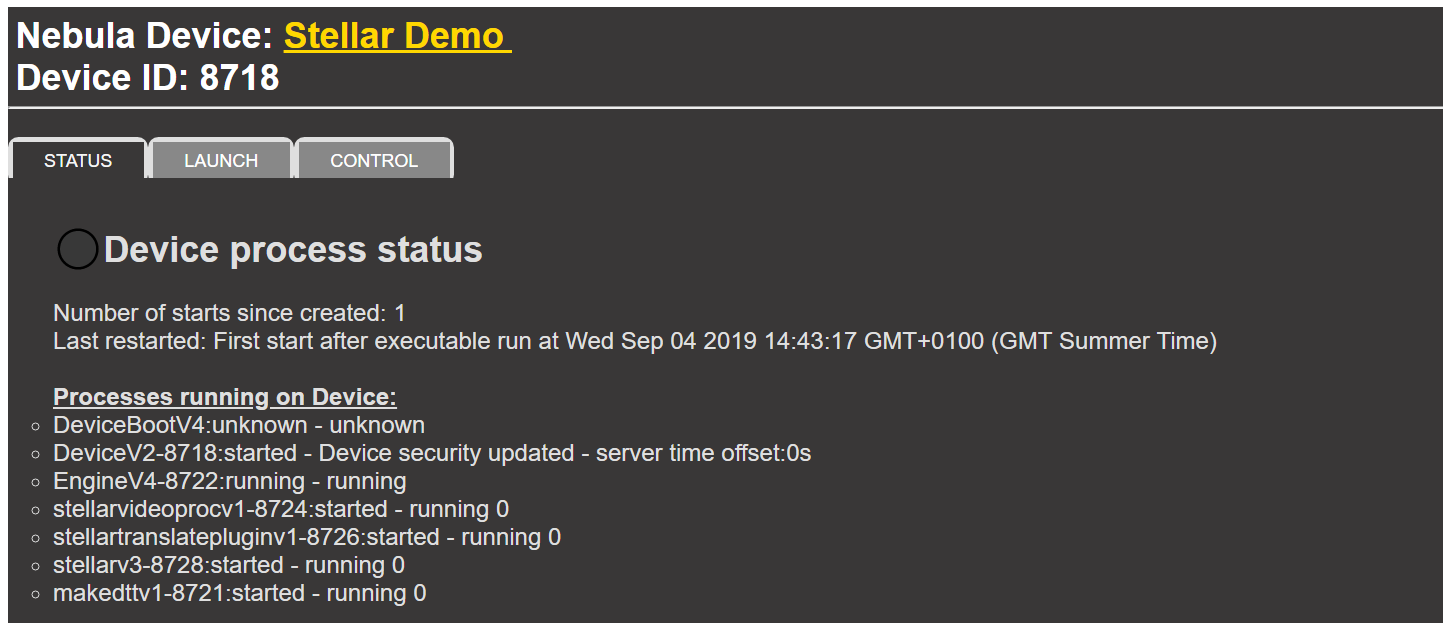
The list of Processes will be different depending on the type of task your Device has been set up for. Writing Subtitles will have different tools compared to recording AD audio.
Control Tab – provides controls to reset or shut down your Device.
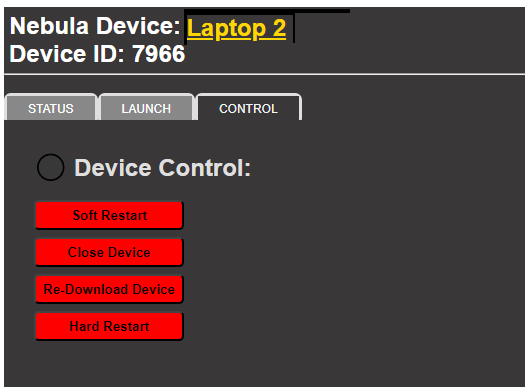
- Soft Restart – Restart all the Processes on the Device without restarting the Device itself. A good option to try if Stellar or functions within Stellar don’t seem to be working
- Close Device – Stops the Device and all Processes running on it. You will have to re-run the Device from within Windows or Mac if you want to start it up again.
- Re-Download – Get a new copy of the Device from the Nebula Server – Only required if your Device gets corrupted, lost or there’s a major upgrade.
- Hard Restart – Restart the Device and all the Processes on it. – Try this if a Soft Restart doesn’t get Stellar running.
Desktop Shortcuts
The first time you Nebula Device and Stellar start up they will automatically add four shortcuts to the Windows Desktop (Windows only)

- Device Start
- Run the Device on this machine.
- If the same device is already running on any machine the older copy will be removed.
- You may have several different Devices (different ID numbers) running on the same machine.
- Run the Device on this machine.

- Start Stellar
- Open Chrome and start new tab running Stellar
- If Stellar is already open in another tab this copy will be disabled
- The Device must already be running for this option to work.
- Note: You can also Bookmark your Stellar in Chrome – see how to Here
- Open Chrome and start new tab running Stellar

- Device Status Page
- Open the Status page for your Device in a new browser tab,
- Here you can control your Device.
- Launch Stellar.
- See all the Processes running on the Device.
- The Device must already be running for this option to work
- Open the Status page for your Device in a new browser tab,

- Nebula Home page
- Show the Nebula Home Page in a new browser tab
- You can control all your Nebula Devices and access you account via this link.
- Show the Nebula Home Page in a new browser tab
Top Menu Bar
![]()
The top menu bar provides the basic controls to use Stellar.
The exact combination of controls you see will vary depending on the type of work you’re doing, the tools loaded and the status of current processes.
Common Controls
![]()
These controls will be visible in most or all configurations of Stellar

- Status Sidebar
- Click on the three lines icon to open the side status bar
- This shows a range of status and version information about Stellar.
- Files
- The Files menu provides the basic functions of:
- Loading, saving and modifying Projects
- Loading saving and creating Layouts
- Importing and exporting
- Projects,
- Media,
- Text files of all types
- Audio Jobs
- The Files menu provides the basic functions of:
- Tasks
- If present the Task menu allows you to upload, manage and download tasks from a central server.
- This may be provided by your employer or by Yella Umbrella as a public server for all users
- The Task system allows users from different companies and freelancers to collaborate and pass work between them, quickly and simply.
- See Task System for more information.
- Tools
-
-
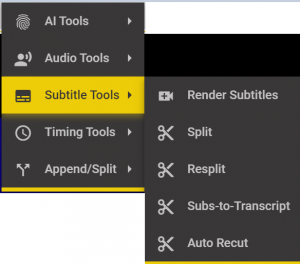
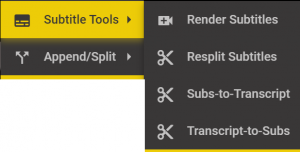
- Subtitle tools
-
- Render Subtitles – Create output files for Open (burnt in), DVB and Powerview subtitles.
- Transcript-to-subs – Takes an existing timed word list (From ASR or other source) and create a new subtitle file based on splitting rules in a Profile.
- Resplit – Takes an existing subtitle file and resplits the text into a new subtitle file based on splitting rules in a Profile.
- Subs-to-Transcript – Takes an existing subtitle file and creates a timed word list.
-
- Subtitle tools
-
-
-
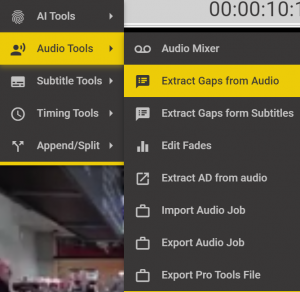
- AD Tools
-
- AD Mixer – Create an output mix of the recorded AD audio
- Extract Gaps – Use Automatic Speech Recognition (ASR) to find Gaps in the dialog where AD can be inserted.
- Extract Gaps – Use an existing subtitle file to find the Gaps in the dialog where AD can be inserted.
- Extract AD from Audio – convert an AD audio file back into an srtad file that can be edited in Stellar.
- Import and Export Audio Jobs – An Audio job is a zip file containing the script file and associated audio files for delivery to an other user.
-
- AD Tools
-
-
-
- Timing tools
-
- Intervals
- Align
- Recut
- Stretch
- Video Timecode
- Auto Recut – Uses ASR (Speech to text) technology to align an existing subtitle file to the dialog in the media file.
-
- Timing tools
-
Status Displays and Shortcuts
Depending on the layout and the Widgets loaded, you may not see all of these options.
![]()
The middle section of the top bar will display a range of status information.
![]()
- Layout Loaded
- Shows the name of the current Layout loaded
- A * next to the name indicates that changes to the settings or Layout have changed and not been saved
- Shortcuts
- Click on Layout name to open the Configuration screen
- Right Click on Layout name to open the Layout Save As screen so you can quickly save any changes
![]()
- Project or Task Loaded
- Shows the name of the current Project or Task loaded
- Shortcuts
- Projects
- Click on the Project name to open the Project Properties screen
- Right click on the Project name to open the Project Save As screen so you can make a copy of the Project
- Tasks
- Click on the Task name to open the Task Dialog
- Projects
![]()
The right hand section of the top bar can display a range of shortcuts or option buttons.
Exactly which buttons will be shown will vary depending on the current configuration and use of Stellar but common ones are:

![]()
- Undo and Redo
- Undo or redo (after undo) the last action
- Sort cuts Ctrl+ Z and Ctrl+ Y
![]()
- Save Status
- Shows the status of all changes to the current open text files
- If Yellow then there are saves outstanding
- If Green the all saves have been completed
- All saving of text and audio is automatic.
- You can force a Save by clicking on this icon or doing Ctrl+ S.

- Find and Replace
- Opens the Find and Replace tool
- Or do Ctrl+F or Ctrl+H

- Background Process Status
- Shows the progress of any background processes such as:
- Media Import
- Speech to Text conversion
- Synthetic voice rendering
- Auto Recut
- Hove the mouse pointer over to see the number of active processes.
- Shows the progress of any background processes such as:
To see the Status display at any time Click on the button.
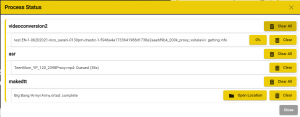
The Process Status screen will list all external processes, both those ongoing and those that have completed.
For ASR processes, once completed, there will be two buttons:
- + Project
- Click this to add the new SRT file to the current Project.
- Locate
- Click this to open your file browser and locate the file on disk
- This is useful if you want to move the file to a new location or share it with someone.
Clear and Clear all just clear the results from the status page. No files are deleted.

- Volume Controls – Visible if the Volume Manager Widget is enabled
-
- If the Speaker Icon is Red this indicates an error with one of the audio inputs.
-
- Click to open Volume Manager

- Rehearse Mode switch – Turn Rehearse Mode on and off.
- Or click F9
- Yellow when in Rehearse Mode
![]()
- My Account
- Open your Nebula account page in a new tab
- Only visible for PayGo users
- Open your Nebula account page in a new tab

- Login or Logout
- To use the Task list and some other centralised features you need to log into your Nebula account.
- Do this with the username and password in your original sign-up email.
- The Icon is green when you are logged in.
![]()
- Hotkey Map
- Hover over to see the current hotkey mapping loaded
- Hotkey Maps allow you to customise the keyboard and mouse controls to make Stellar work the way you want, or to emulate a software product you are already familiar with.
- Hover over to see the current hotkey mapping loaded
- Click to open the Hotkey Settings control.

- Layout Mode switch – Turn Layout Mode on and off.
- Yellow when Layout mode is on
- Tip: Pressing Esc will exit Layout mode and abandon any changes.

- Zoom Stellar window
- Click to zoom the Stellar window.
- Alternates between a 100% size of the loaded layout and a zoom to fit the available Chrome window size.
-
- Note: It’s a good idea to make sure your Browser zoom is set to 100%

- Click on the three Dots at the top right corner of the browser window
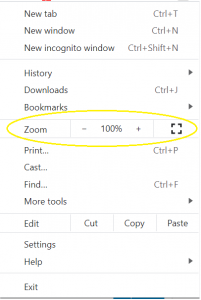
- Set Zoom 10 100%
- Tip: You can create more space for you Layout by running Chrome in Full Screen Mode.
- Either Press F11 to toggle Full Screen mode on and off
- Or
- Click on the three Dots at the top right corner of the browser window
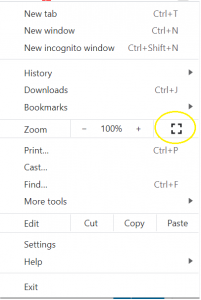
- Click on the Full Screen icon
- Note: It’s a good idea to make sure your Browser zoom is set to 100%
Occasional Controls
These controls will only be visible in some configurations of Stellar
- Tools Menu
- The tools menu will be visible whenever one or more specialist tools are enabled in the Settings section of Stellar
- These can include tools for handline speech to text, synthetic voices and AD mixing amongst others.
- The tools visible will be specific to the type of work you are doing.
Hot Keys and Mouse Controls
Stellar has a very comprehensive range of hotkeys and mouse controls to speed up your work. In most cases any function can be done via a mouse action and a hotkey.
For a full list see the Hot Keys and Mouse Controls table.
- Hint: This is is searchable so enter the function you want ( EG Insert) in the search box and you will then see a list of Insert functions with matching hotkeys and mouse action.
Hotkey Maps
By standard Stellar comes with a number of Hotkey Maps that define different sets of hotkeys. For example there is a Hotkey Map that provides hotkeys that are similar to the EZTitles and WinCaps subtitle software.
Hint:- Combine the Hotkey Map with one of the Classic style layouts to make Stellar feel like you old subtitling software.
You can also create you own Hotkey Maps if you want to customise the key and mouse operations to your own preferences.
Loading a Hotkey Map
-
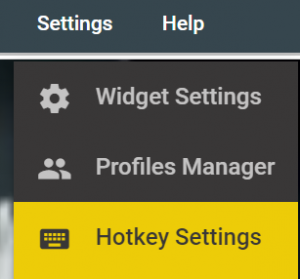
- Select Hotkey Settings from the Settings menu
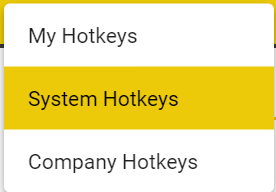
- Make sure the Load tab is selected and the selector is set to System Hotkeys
- You will then see the list of all available System Hotkeys
- These are available to all users and can’t be edited.
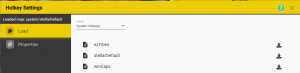
- Select the Hotkey Map you want and click on the Download button
- You now have the new Hotkey Map Loaded


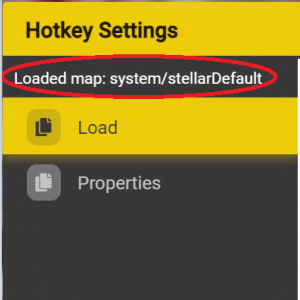
You can see which Hotkey Map is loaded by:
- Looking at the top of the side bar in the Hotkey Settings
-
- Or by hovering over the Keyboard icon in the top bar:

You can review the settings in the new Hotkey Map
- For the System Hotkey Maps all of the key and mouse functions are listed in the Hotkeys Help page.
- Hint: You can select a view to match the different System Hotkey Maps.
- For the Current Hotkey Map click on the Properties tab
- This will list all of the Widgets, expand each one to see the list of functions and hotkey settings
-
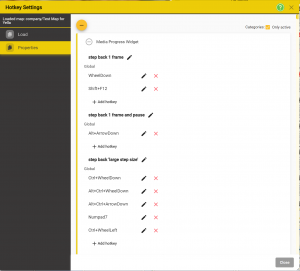
- Or use the Expand All button at the top of the page to expand all the sections
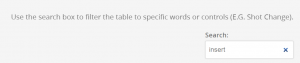
- Hint: Use the standard Chrome Find (Ctrl+F) to seatch by either function (Merger) or hotkey combination (Alt+ArrowUp)
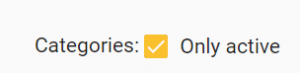
Filter the Hotkey list to show only active Widgets
- By default the list of Widgets and hotkeys will be filtered to show only those active in the current Layout
- If you want to see all possible hotkeys uncheck this Categories filter.
- Hint: You will want to see all the functions when you are editing a custom Hotkey map
Hotkey Scope
- Each Widget has a set of hotkeys and mouse actions assigned to functions. Some for the Text Editor widget, others for the media control widget.
- Within a Widget each hotkey may be Global, Focus or Hover
- Global hotkeys, from any Widget, will be usable at all times
- Focus hotkeys will only be active when the focus is on the specific Widget
- Hover hotkeys and mouse actions will only be active while the mouse pointer is over a specific region of a Widget
Creating a custom Hotkey Map
You can create a new Hotkey Map by making a copy of an existing Map and then editing it. You never create a Hotkey Map from scratch.
- Open the Hotkey Settings and select the Load tab.
- Select either the My Hotkeys or Company Hotkeys.
- This will set where the new Hotkey Map is created
- Now click on the New Map control
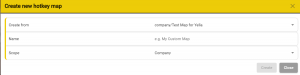
- This will open the New Map dialog
-
- Create From: – Use the dropdown to select the source Map to base your new Map upon – the list will show all System, Company and Local maps.
- Name: – Give your new Map a suitable Name
- Scope: – This defines if you are creating a new person local (My Hotkeys) or Company map – it will default to the selection above.
- My Hotkeys are only available on the local computer it is created on.
- Useful for maps configured for a specific Laptop’s keyboard
- A Company map is stored centrally and is available to anyone logged in with an account for the same Company.
- Useful for maps you want to make available to everyone in your Company
- My Hotkeys are only available on the local computer it is created on.
- Click Create
- A new Map, identical to the source map, has been created.

Editing a Hotkey Map
- You can edit the settings in any Company or Local Hotkey Maps that you have access right to.
- First Load the Map
- Note: You must be Logged In to access or edit the Company Hotkey Maps
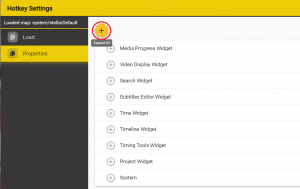
- Select the Properties Tab
- Find the function you want to change the key or mouse action for
- Use the + icon on a Widget to show the functions for that Widget
- Or use the Expand All button at the top of the dialog.
- Hint: You can use the standard Chrome search function (Ctrl+ F) to find either a function (Insert) or an existing hotkey (Alt+ArrowUp).
- You can Add, Edit or Remove a hotkey for each function and change the function name
- Add a new Hotkey
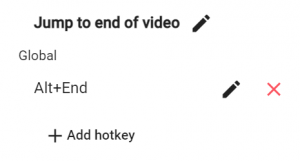
- Click on + Add hotkey
- This will add a new entry for the selected function
- Now just press the key combination you want to assign to the function – EG Shift+ F12
- The Red dot will go Green to confirm the setting
- After a few seconds the dot will start flashing again and will accept an alternative key combination
- Once you have the correct combination just click on the Save icon
- Or click on Cancel to abandon the new setting.
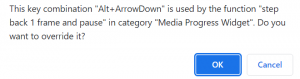
- Conflicting Keystrokes
- If you try and assign a hotkey that is already in use then you will see a warning message
- If you click OK then the new assignment will be added but with a conflict.
- Both of the functions assigned the same hotkey will be shown with a warning
- Remove or replace one of the conflicting keys to correct this.
- Failure to correct this may lead to unexpected behaviour.
- If you try and assign a hotkey that is already in use then you will see a warning message
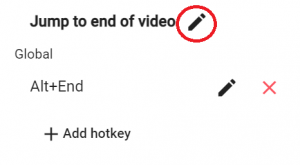
- Edit a Hotkey
- Find the function and the hotkey you want to edit
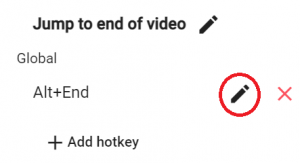
- Click on the edit Pencil for that hotkey
- Now you can add a new hotkey, see above.
- Remove a hotkey.
- You can remove a key or mouse action from a function.
- Find the function and the hotkey you want to remove
- Click o the red X to remove the assigned key or moue action.

Edit a function description
-
- When you are creating a custom Hotkey Map you may find that the default function descriptions use different terminology to yours, or you may even want to translate them.
- You can edit the individual function descriptions by clicking on the function title edit pencil.

- Edit the description and click Save
- To return to the default description, just delete your description and press save.
Context Menus
Many Widgets in Stellar support context menus. These are accessed by right clicking on the mouse when the mouse pointer is over a specific area of a widget.
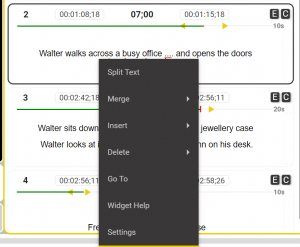
For example right clicking in the text area of the Timed Text Widget will provide options for Split, Merge, Insert and Delete. All of these functions have dedicated Hotkeys but sometimes it’s more convenient to use the mouse.
Full details of specific context menus are contained in the Hotkeys and Mouse Controls table.
NOTE: Normal Google context menu options such as spell checker can now be accessed by using Ctrl+ Right Click.
For Mac users with a standard single button mouse the following options are useful:
- Ctrl+ Click is the same as a Right Click on a two button mouse
- Cmd+ Click will show the Chrome default right click options, such as spell check, in most areas.
Google Chrome supports a range of enhanced spell check, grammar check, auto correct, short form dictionaries, dictionary, and thesaurus extensions.
See: the Spelling, Grammar and Thesaurus Section for more details.
Project – Overview
In Stellar a Project is the collection of files and configurations you need to do a task, such as write some new subtitles or to record an AD script.
Normally a Project will consist of a video file, shot change file, audio waveforms and other audio file(s) and one or more text files (subtitles, captions, AD scripts etc.).
There are several ways you may start a new Project:
- Import a Project that has been created for you
- Use the Import Media file option and this can auto create the new project
- Create a new Project by selecting all the files
- Configure the Nebula Video Processing Process to create a Project for you
- Download a Task that has been created for you.
- A Task is made up of a Project that is assigned to one or more users and some other data fields like customer, date required etc.
NOTE: A Project in Stellar is separate and different from a Nebula Project, see this explanation of the two.
Project – Open
Watch the Video: Loading a Project
A Project is the collection of files and configurations you need to do a task. This can include a whole range of file types depending on the type of Project but would normally include a media file and one or more text files or empty templates. Optionally it may include shot changes, waveforms, additional audio tracks and other metadata.
Use the Files menu item on the top menu,
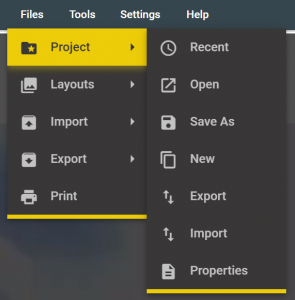
and select Project the Load/Save
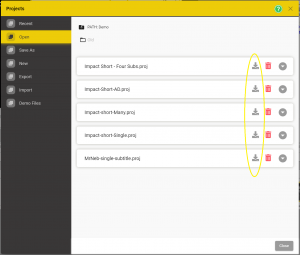
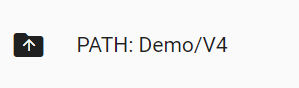
You can browse to sub directories if present and move back up to the parent directory by clicking on the Path Icon.
Decide which Project you want to open and click on the Load Project button for that Project.
A message box will pop up if there are any files missing from the Project. Click Close to remove the message box, the Project is now loaded.
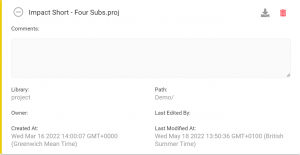
You can view, and in some cases edit, add additional information about the Project by clicking on the Plus icon for that Project

to open or close the information view.
Project – Save As
Open the Project dialog as above,
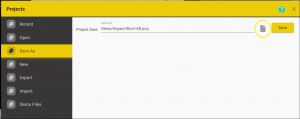
Then select Save As on the left hand menu.
Enter a file name and click Save.
NOTE: Save As only makes a copy of the Project file. All text, audio and media files referenced by the original Project are unchanged, and the new project references the same files
Click Close to remove the dialogue.
Project – New
Open the Project dialog as above,
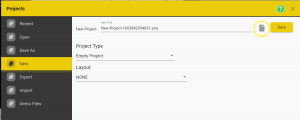
then select New on the left hand menu.
Enter a file name, or accept the default or browse to select a different folder by clicking on the Browse button.
Optionally:
- Set the Project Type – this will add an empty file of the selected type (Subtitle, Audio Description …)
- Set the Layout for the new Project.
- The Layout name will be stored as part of the Project.
- Every time the Project is loaded the Layout will also be selected.
Click Create.
A new blank Project is created and loaded.
Click Close to remove the dialogue.
Hint: See the Project Overview for more ways to create a new Project.
Files – Summary
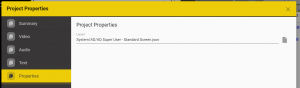
Use the Files item on the top menu bar, then select Project then Properties.
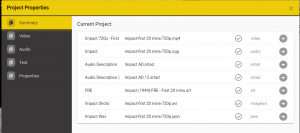
The dialogue shows a summary of all files of all types contained in the Project.
Files – File Types
Files are divided into three categories Video, Audio and Text and each of these categories can contain files of different types.
Video
- Video file – one per Project – MP4 format – transcoded from all other video formats by a Nebula Process.
- Shot Change file – one per Project – .avi format – created by a Nebula Process.
- OCR Image file – .avi format – contains images of the OCR (text detection) process that is used to find text in the video images.
Audio
- Audio file – any number per Project – .ogg format – created by a Nebula Process – used for second audio tracks or for audio scrubbing.
- Waveform file – any number per project – .json format – created by a Nebula Process – used to display an audio waveform on the Timeline.
Text
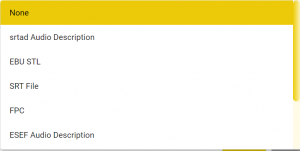
- Subtitle files – any number per Project – a range of subtitle and caption formats supported (srt, stl, pac, fpc for full editing, other types for read only or limited editing) See Importing Text Files for more information.
- Transcription files – any number per Project – .json format containing a timed word list – created by a Nebula Process.
- Audio Description files – any number per Project – .ESF or .srtad formats – Associated .wav files are loaded automatically if present.
- Dubbing Scripts – any number per project. – .srtdub file format only. – Associates multiple audio files to each Line in the script. Supports multiple Roles, multiple audio Takes and individual word timing for audio adaptation (lip sync).
- Pain timed text any number per Project – .srt format- timed text without subtitle formatting.
- Timed word list files (transcripts) – .json format – often the output of ASR (Speech to Text).
Text files are grouped into two types
- Internal
- Internal files are formats that are supported directly in Stellar. You can open and edit these formats without any conversion.
- This is a large benefit when editing existing files as it removes all risks that the input and output conversion may make unexpected changes to the file.
- These are the types that can be edited within Stellar.
- Subtitles – STL, SRT, PAC, FPC & IMSC-Rosetta
- Audio Description – ESF or SRTAD
- Dubbing – SRTDUB & TTAL
- Internal files are formats that are supported directly in Stellar. You can open and edit these formats without any conversion.
- External
- All other file types can be convert to and from one of the internal file formats
- External formats include:
- DXFO, VTT, CAP, SIF, .890, XML, TTML, TDS, SMI, SUB, ULY, ITT and others
- For a full list see File Formats Supported
Files – File Locations
There are Two configurable File Locations for Stellar:
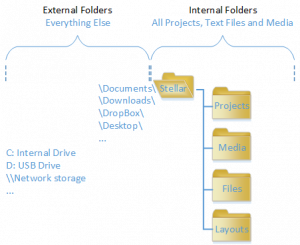
- Stellar Internal Folders
- All files, Projects, media and configurations are stored in a specific location on you PC or Mac.
- All media (video, audio etc.) MUST be in the Stellar/Media folder or a sub folder
- All text (subtitles, captions, transcripts etc.) and AD files MUST be in the Stellar/Files folder or a subfolder
- Each AD or dubbing file (srtad, srtdub or esf) MUST be in a separate subfolder to keep all the associated audio wav files in the same place and separate from other AD files. Otherwise it’s very easy to get the wav files from different AD Projects mixed up.
- The location is set as part of the Stellar Process in Nebula and is fixed, the default is your Documents folder: Documents/Stellar.
- When Opening a Project or adding a file to a Project you are limited to this Stellar folder and to sub folders of it.
- We do this to keep the files all in one place and help you organise your work.
- For example, if some files were stored on external drives or pen drives then if these were removed a Project would be broken.
- WARNING: Do not move or rename files or Folders within the Stellar folder or its subfolders. Doing so may Break any Projects containing those files or folders.
- All files, Projects, media and configurations are stored in a specific location on you PC or Mac.
- External Folders
- External Folders are used when you are Importing and Exporting files, audio jobs and Projects.
- In these cases you will be able to browse to the External Location configured.
- External can include any location on your PC or Mac, any network drives accessible from your machine and file sharing systems like OneDrive and Dropbox.
- Note: It is possible that the range of External locations you can access has been restricted by your System Administrator.
- Creating new folders.
- Whenever you are setting the location for a new file in Stellar (Save As) then in the top of the file browse screen you will see a New Folder icon.

-
- Click on this to create a new subfolder of the current folder.
Folder Shortcuts
You can create Shortcuts to any folder on any storage location accessible to your computer.
Using Shortcuts
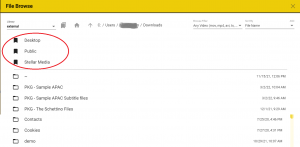
Whenever you open the File Browser you will see any existing shortcuts at the top of the dialog
-
- Click on the Shortcut to jump to the folder location set by the Shortcut
Creating a Shortcut
The quick method of creating a new Shortcut is:
- Create a new Shortcut by browsing to the location you want and clicking on the
 button to open the New Shortcut dialog
-
- The Name will default to the folder name
- Click on Save Shortcut
- The new Shortcut will now appear on the file browse dialog.
-

Or you can open Shortcuts manager dialog to add, edit and remove shortcuts.
Managing Shortcuts
Use the Shortcuts dialog to Add, Edit or remove Shortcuts.
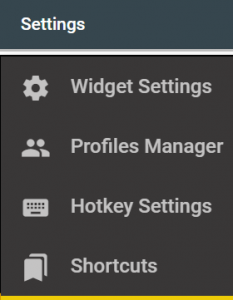
- Either select the Shortcuts option from the Settings Menu
- Or when you open the File Browser, select the External Library
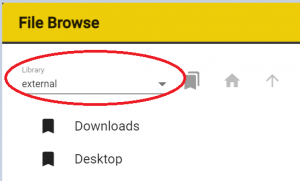
- And click on the Shortcuts button
- Note: You must be in the Home directory for this to open the Manage Shortcuts dialog
- This will open the Manage Shortcuts dialog
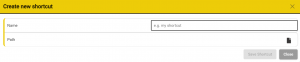
- To add a Shortcut
- Click on Add New Shortcut to Open the New Shortcut dialog
- Click on the folder browse button to select the folder for the new Shortcut
- Note: You can only browse folders via the External Library
- If you want to create a shortcut to a sub folder of the Stellar\Files folder then browse to the location where this is on your computer
- EG: C:\Users\JohnSmith\Documents\Stellar\Files
- If you want to create a shortcut to a sub folder of the Stellar\Files folder then browse to the location where this is on your computer
- Note: You can only browse folders via the External Library
- Set the Shortcut name
- Click Save Shortcut
- Click on Add New Shortcut to Open the New Shortcut dialog
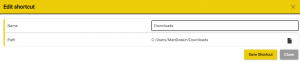
- To Edit a Shortcut
- Click on the Pencil button next to the Shortcut you want to edit
- This will open the Edit Shortcut dialog
-
- You can edit the Shortcut name
- Or the Shortcut location – Click on the folder browse button.
- Click Save Shortcut
- Delete a Shortcut
- Click on the Bin button
 next to the Shortcut you want to delete.
- You will se a confirmation pop-up to confirm the deletion.
- Click on the Bin button

Changing File Locations
To change the path for either the Stellar Folders or the External Folders you will need to change the Settings for your copy of Stellar. This is a systems level setting and would normally be set for you. Changing either of these settings could mean that folders and work you have been using are no longer visible to you so proceed with caution!
The Default locations are:
Stellar Folders: ~/documents/Stellar – this will put all your Stellar files in a subfolder called Stellar within your normal Document section.
External Folders:
- The default setting for External Folders is blank, this allows access to all folders and external devices attached to your computer
- If set to ~/ – this makes all of the User folders on your Mac or PC visible but not the systems area.
- If set to specific location, this prevents you accessing any other locations when browsing in the External library
To change the Locations:
- Open the Device page.
- Click on the Nebula Device Link at the top of the page (the name will be different)
- This will open Nebula to show your device.
- You may need to log in to Nebula first using the credentials supplied in your original email (unless you have changed them since)
- Expand the Device and the Project sections using the + icon on the left of the name
- Locate the Stellar Application (the name may be different)

- Click on the Pencil icon to open the configurations for this copy of Stellar

- You can now update the two file paths
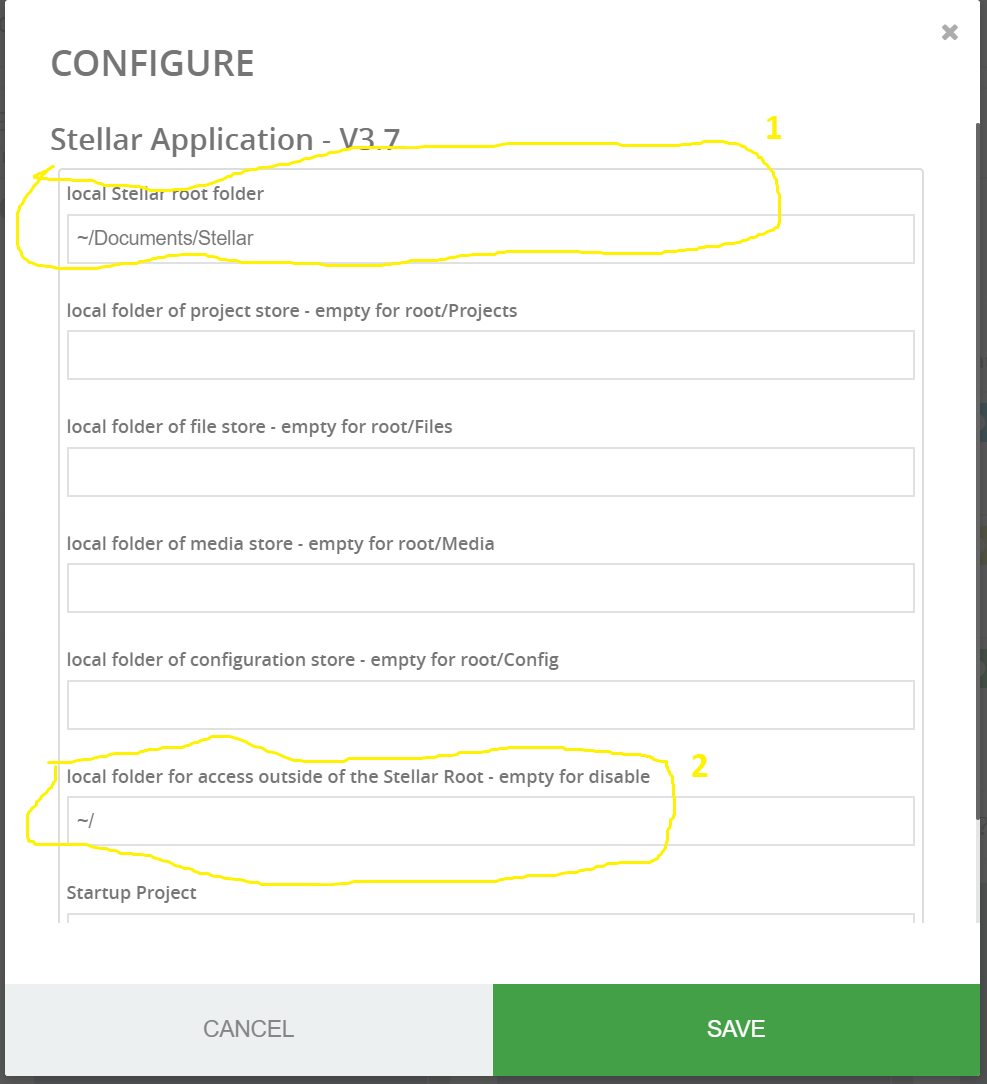
- Number 1 sets the Stellar Folders path
- All other sub folders (Media, Projects, Files etc.) will be subfolders of this.
- Other entries can be left blank unless you want to customise the subfolders
- Number 2 sets the External Folders path and can be any valid path visible to your PC or Mac.
- EG D:/
- Click Save
- The paths visible within your version of Stellar have now been changed.
Note: In file paths use / not \ as this is compatible with all operating systems.
Files – Adding and Removing
Drag and Drop a File or Files.
You can Drag and Drop any supported text file format into a Project, or create a new blank Project.
Add to current Project.
- Drag the file and drop it into the text editor (text column) area.
- A new copy of the file will be added to the folder used by the Project for text files
- The file will be added to the current Project
- The title of the new file in the column tab will be the source file name
- You can edit this by clicking on the name in the top tab.
Open the text file in a new blank Project – Ideal for quickly viewing or editing a text file on it’s own.
- Shift+ Drag and Drop the text file into the text editor (text column) area.
- A new copy of the file will be created in the Stellar\Files folder
- A new blank Project will be created and a the text file added to it.
Note: You can Drag and Drop multiple files in one go.
Selecting a File
To add a Text (subtitle, caption, script or transcript) file to your project use the Text option on the Files menu.
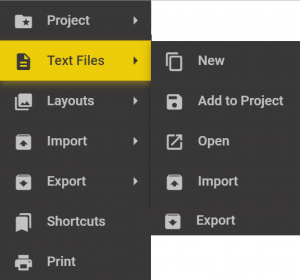
- New – Create a new Text file in one of the supported formats and add it to the current Project
- Add to Project – add an existing Text file from the Stellar\files folders to the current Project
- Open – Open an existing Text file from the Stellar folders in a new blank Project.
- This is useful if you just want to take a quick look at a number of text files.
- Import – Bring in a Text file from outside of the Stellar folders, convert to a different file format (optional) and add it to the current Project
- Note: a new copy of the file will be made inside the Stellar Folders
- Export – Create a copy of a Text file in a new External location – optionally, convert to a different file format.
- Note: a new copy of the file will be created in the specified location. The original file remains in the Internal file location and is unchanged.
For more details see below:
An Alternative way of adding and removing files is to:
Open the Project Properties dialog as above,
and select Video, Audio or Text on the left hand list depending on which category of file you want to Add, Edit, Remove or Duplicate.
Text Tab
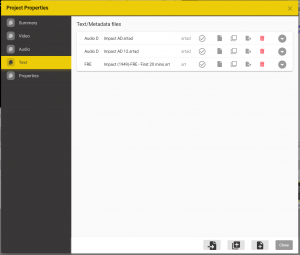
All the files in the chosen category currently in the Project will be listed.
To create a new empty file and add it to the Project
Click on the Add New button.
![]()
This will open the New File browser:
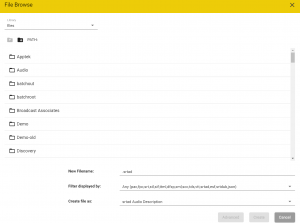
- Either enter an new name or select an existing file name and modify it
- You can use the Filter Display to limit the display to files of a specific type or types.
- Use the Create File As selector to define what type of subtitle, caption, AD or Dubbing file you want to create.
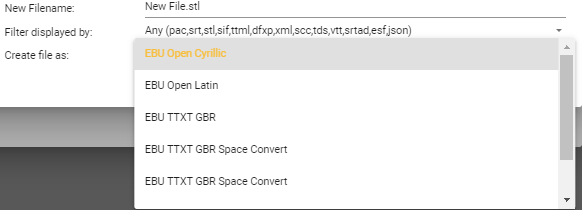
For some File Types the Advanced Button will be active. This allows you to change the default template configuration each file type.
- Click Create
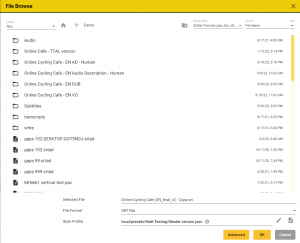
To Add an existing file to the Project
Click on the Add Existing button
![]()
This will open the File browser:
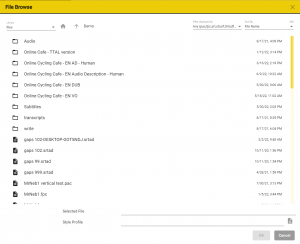
- Browse to find the file you want to add to the Project

- You can use the Filter Display to limit the display to files of a specific type or types.
- And the Sort control to sort the files by name or modified date
- When you add a text file to a Project you can also select a Style Profile – this sets the editing and QC rules for the file, including line length, reading speed etc.

- Click on the browse button to select a Style Profile
- Click Ok
To Import an existing file to the Project
When Importing there are two main differences to just adding an existing file:
- You can access files outside of the Stellar internal folder area.
- You can convert between file formats.
See Importing Text Files for full details.
To Replace an Existing File
Click on the browse button next to the file you want to replace then browse to the required location and select the file to use instead and click OK.
The file is now added to the current Project in place of the previous file. (See above to add an additional file to the Project)
- other details like comments and the Style Profile selected are unchanged.
To Remove a File from the Project
There is a red Bin button on every file line. Clicking on the button will remove the file from the Project.
This will pop up a dialog with the options to either:
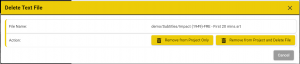
- Remove the file from the Project but leave it on disk
- Remove the file from the Project and delete it from disk
- Cancel to not delete the file.
- HINT: Use Shift and click on the Bin button to remove from the project without the confirmation pop-up.
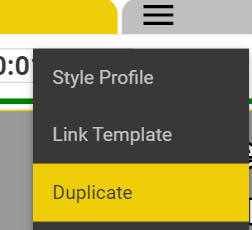
To Duplicate a Text File
To duplicate an existing file text file click on the blue Duplicate button on the line for the file you wish to duplicate.
-
-
- Or right click in the tab of the subtitle editor and select Duplicate
-

This will open the Duplicate Text File dialog.
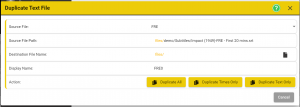
Click on the browse button to set the Destination file name, location, type and Style Profile.
- By default the location, type and Style Profile will be the same as the source file and the file name will have ‘-copy’ appended.
This will open a New File browse dialog:
- Use the Create File As selector to define what time of subtitle, caption or AD file you want to create as the clone
- Select a different type to create a converted file. EG From Pac to EBU STL.
- Either enter an new name or select an existing file name and modify it
- You can use the Filter Display to limit the display to files of a specific type or types.
- Use the Style Profile browse to change the Profile for the new file.
- Click OK
Edit the Display Name for the new file.
- This is the name shown in the Tab at the top of the text column and on the Timeline track.
Duplicate
Select one of the three options by clicking on a blue button:
- Duplicate All – The new file contains all the text, style (if supported by the new file format) and timing of the source file
- Duplicate Times only – The new file contains blank subtitles (captions or AD Script sections) with the source files times but no text.
- Duplicate Text Only – The new file contains all the text and style (if supported by the new file format) of the source file but no times.
Click Cancel to abandon the duplication.
To Export a Text file
Click on the Export icon:

- Or right click in the tab of the subtitle editor and select Export
When Exporting a text file there are two main differences to just saving an existing file:
- You can save the file outside of the Stellar folder area.
- You can convert between file formats.
This is the simplest way to save a file that is part of the Project in a different format.
See Exporting Text Files for full details
Auto Selecting Media Files
To help you set up a new Project when you select the Video file Stellar will look in the same folder and try and find all the associated shot-change, audio and waveform files based on the video file’s filename.
You will be prompted with a list of matching files:
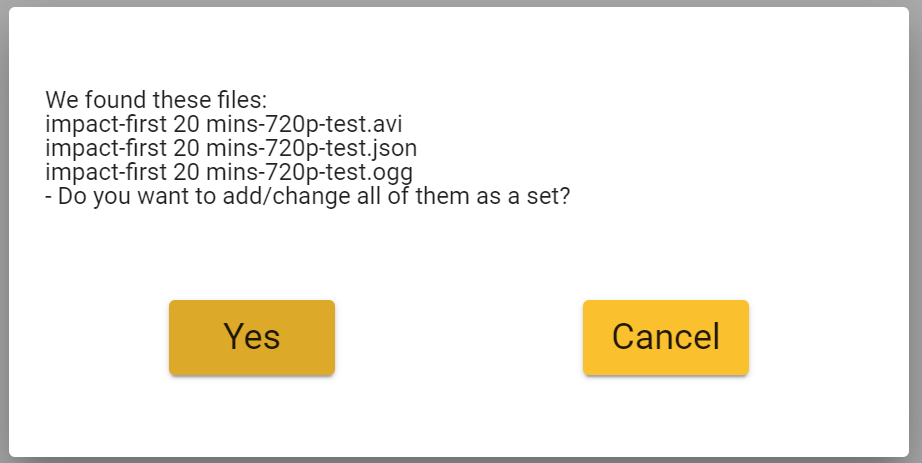
Select Yes to add these files (replacing any existing files) or Cancel to load just the Video file.
Files – Properties
Open the Project Properties dialog as above,
and select Video, Audio or Text on the left hand list depending on which category of file you want to view.
Or right click on the column tab and select Project Properties.
All the files in the chosen category will be listed.
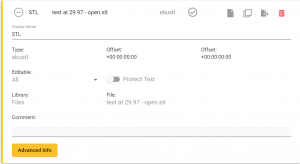
Click on a file item and the line will expand to show the Properties for the selected file type. The Properties shown will vary depending on the file type but most include:
- Display Name – the description displayed in Stellar at the top of the text column and on the timeline.
- Comments – a user comment section for your notes about a file, this can be expanded if required.
- Editable – Sets the level of editing permitted for this file.
- Default All
- Options:
- All – Full editing allowed
- Times only – use when adjusting the timing or conforming a file so the user can’t edit the text by mistake
- Text – Only text content and comments (but not Insert, Delete, Split or Merge) – ideal for translators working from a template
- Times and Text (but not Insert, Delete, Split or Merge) – limits the level of editing available
- Text, Style and Position – allows more control over text styling and position but still prevents other edits (but not Insert, Delete, Split or Merge).
- Comments Only – Great for getting feedback from clients.
- Read Only – no editing at all.
- NOTE: This control interacts with the Subtitle Widget editability setting – The most restrictive setting applies.
- Protect Text
- You can additionally set the Protect Text switch to On.
- If text editing is allowed by the Editable setting, then the Protect Text option ads an edit pencil to the text editor box. This is useful if you want to prevent accidental text edits, but still make edits possible. Ideal for protecting a Template subtitle file, or a dubbing script during recording.
- If text editing is allowed by the Editable setting, then the Protect Text option ads an edit pencil to the text editor box. This is useful if you want to prevent accidental text edits, but still make edits possible. Ideal for protecting a Template subtitle file, or a dubbing script during recording.
- You can additionally set the Protect Text switch to On.
- Type – a type for the file that tells Stellar how to handle the data in the file
- Library – The Library location for this file.
- File – the path and name of the File.
- Offsets – time offsets for aligning the start time of different files. – See Set Video Timecode for more information.

Import and Export
Importing and exporting are used to:
- Convert a media file and create a new Project
- Add text files to a Project with a format conversion
- Output text files from a Project in a different format
- Open a Project from an external file delivery service (EG Dropbox) and add it to the current set of Projects
- Output a complete Project with some or all associated files to a file delivery service or external drive.
- Import or export an Audio Job (Script file plus all audio files) as a single Zip
- Export a subtitle, AD or Dubbing Script file as a spreadsheet in csv format.
- Export an Audio Job as a Pro Tools Project (.ptx)
Import Media File
This is the normal method of creating a new Project.
Media (Video and audio) files of most formats can be imported into Stellar.
First open the Import Media Control:
Select Import Media from the Files Menu
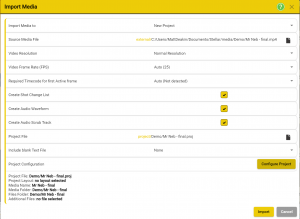
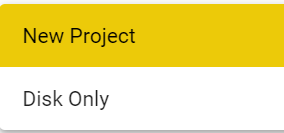
- Decide if you want to create a new Project based on the new Media, or just to store the media files to disk for later use.
- Use the file browse button to find the media file to import.
- This would normally in an External location such as your Downloads folder, Dropbox etc.
- Set the video resolution
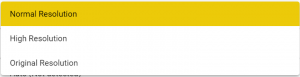
- Normal Resolution – quarter SD resolution – suitable for most uses
- High Resolution – SD resolution – use this if you need to see the picture content in more detail, for AD where you are describing fine details.
- Original Resolution – uses the resolution of the original file. If this is HD or higher it will have an impact on the speed of response of the video controls in Stellar.
- Video Frame Rate
- Stellar will try and detect the frame rate from the original file
- You can override this if required.
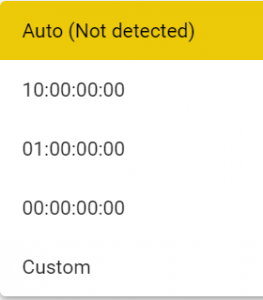
- Timecode for first active frame
- Stellar will try and detect the timecode from the original file
- If this is not present (Not Detected) then set the timecode from the dropdown
- Select any options:
- Create Shot Change List – A list of shot changes will be created automatically and added to the new Project
- Create Shot Audio Waveform – A graphical image of the audio waveform will be created automatically and added to the new Project
- Create Audio Scrub Track – A additional audio track will be created for to provide audio scrubbing during cueing will be created automatically and added to the new Project
- Create New Project – A new Project will be created containing all the elements (Video, Shot Change, Audio Scrub).
- Project File – Set the location and name of the new Project – Defaults to the same name as the media file but can be edited
- Use the file browse button to set the location

- If you set a sub folder below Stellar\Projects\ then the new path will be used for the media and any text files that are included in the Project
- EG. If the Project file is in Stellar\Projects\Netflix\Stranger Things Series 10\
- then the media and text files will be created in:
- Stellar\media\Netflix\Stranger Things Series 10\
- and
- Stellar\files\Netflix\Stranger Things Series 10\
- These will become the default locations for all files added to the Project (EG Import Text file or New Text file)
- Use the file browse button to set the location
- Include blank text File
- You have the option to create the new Project with a blank file of any of the Internal types
- Select the file type from the dropdown
- The file name and location will default to the Project file path and the project name
Project Summary
- At the bottom of the dialog is a summary of the new Project and all associated files.
- Click Create to start the Import
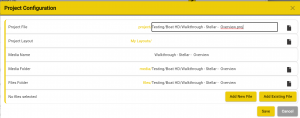
You have the option to add existing Text files and other settings by clicking on the Configure project button
-
- This will open the Project Configuration dialog
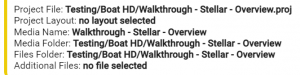
- Project File – This is the same control as on the Import Media dialog
- Any changes here will reflect in the whole Project
- Project Layout – You have the option to select a Layout that will be loaded when the Project is opened
- Useful if you want to force the Layout for a new user or for a special Project with custom requirements
- Media Name – read only
- Media Folder – allows you to change the default location for all media in this Project
- Files Folder – allows you to override the default location for all Text files in this Project
- Add New File – Allows you to add one or more new (blank) files of any Internal type to the Project
- Add Existing File – Allows you to add one or more existing Text files of any Internal type to the Project
- Note: These files must already be in the Stellar\Files folder or subfolders
Import a Project
A complete Project can be delivered to you as a compressed Zip file and then Imported into Stellar.
The Zip file can contain all the media, audio elements and text files (Subtitles, captions, transcripts etc.).
To Import a Project you need to have access to the Zip file and know where it’s located.
Select the Import Project option on the Files menu

Then use the Browse button to locate the Project ZIP file.

For example in your Downloads folder or Dropbox.
- Click on the Import button to start the import
- The status display will show the progress of the import process.
Once completed the Load Project button will be enabled.
- You can now either:
- Click on the Load Project button to start working on it now
- Close the screen and open the Project later.
Export a Project
You can Export a Project so it can be delivered to someone else as a compressed Zip file.
The Zip file can contain all the media, audio elements and text files (Subtitles, captions, transcripts etc.), or a subset of these.
To Export a Project you must first load it into Stellar, so open the Project in the normal way.
Select the Export Project option on the Files menu
Then use the Browse button to set the destination folder and file name for the Project ZIP file.
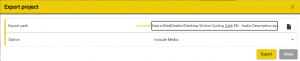
For example in your Dropbox folder.
You now have three options on how much of the Project to include in the Export.
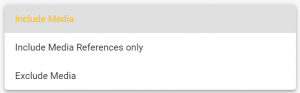
- Include Media – This is the default is to include all the files that make up the Project. – This will create the largest Zip file.
- Include Media References only – This will include links to the media file(s) but not the files themselves- This will be a smaller Zip file and still maintain references to the media file(s).
- Exclude Media – This will include just the text files and AD audio files and their settings. This will be small and all links to the video and other media files will be lost.
Click on the Export button to start the export
- The status display will show the progress of the export process.
Once completed the Open File Location button will be enabled.
- You can now either:
- Click on the Open File Location button to see the new Zip file in your Windows File Explorer or Mac Finder.
- Close the screen.
Import a Text File
You can add a text file to the current Project with or without a format conversion.
Text files include subtitle, caption, AD and dubbing Scripts and other timed text file formats.
You can Import a file from any location visible on your PC or Mac and a new file (in the selected format) will be stored under the \Stellar\Files folder.
- See File Locations for more information on how and where files are stored in Stellar.
The new file will become part of the current Project.
You can select to import all the contents of the file, the timing information without the text or just the text without the time stamps.
In the case of AD and Dubbing files you can import with or without the associated audio files.
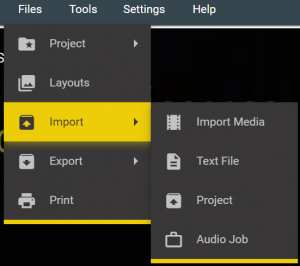
- Select the Import Text File option from the Files – Import menu in the top bar.
- Note: You can also Import text files in the Files, Properties, Text Files screen by using the Import button.
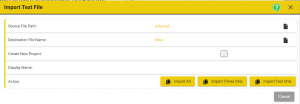
- Source File – find the file you want to import.
- Destination file name – use the Browse button to set a file name, location and file type for the new copy of the file.
- The file name will default to be the same as the source file
- The file type will default to be the same as the source file
- If you want to convert the file to a different type you can select between the standard Internal file types. These are the types that can be edited within Stellar.
- Subtitles – STL, SRT, PAC, FPC & IMSC-Rosetta
- Audio Description – ESF or SRTAD
- Dubbing – SRTDUB & TTAL
- NOTE: for AD and Dubbing files you MUST create a new sub folder for each file. This is to keep the audio WAV files for this Audio Job separate from other wav files for other jobs.
- If you want to convert the file to a different type you can select between the standard Internal file types. These are the types that can be edited within Stellar.
- Set a display name for the new file – this is the name that appears at the top of the text column and on the timeline track.
- If the Source file is an AD or Dubbing file a new option will be visible:

- If selected any associated audio files will be imported
- If not selected only the script file (srtad, esf or srtad) will be imported.
- Click one of:
- Import All – the new file contains all the text and timing information from the source file.
- Import Times Only – The new file only contains blank subtitles. This is useful for creating a blank template when translating between languages
- Import text only – the new file contains text subtitles but no times. – this is useful if a file needs to be retimed.
- The new file will be added as the last column in the current Project.
- It is possible you will need to use the drop down selector in the last tab to see the new file, depending on the number of files in your Project.
Export a Text File
You can Export a text file from the current Project with or without a format conversion.
Text files include subtitle, caption, AD and Dubbing Scripts and other timed text file formats.
You can Export a file to any location visible on your PC or Mac.
You can select to Export all the contents of the file, then timing information without the text or just the text without the times stamps.
In the case of AD and Dubbing files you can export with or without the associated audio files.
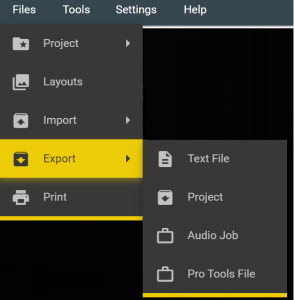
- Select the Export Text File option from the Files – Export menu in the top bar.
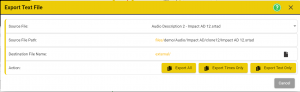
- Source File – Select from one of the Text Files currently in the Project. Defaults to the currently selected column
- Source File Path – Displays the path and filename of the file being exported. – This field is read only.
- Destination file name – use the Browse button to set a file name, location and file type for the new file.
- The file name will default to be the same as the source file with ‘-copy’ appended
- The file type will default to be the same as the source file
- If you want to convert the file to a different type you can select between any of the supported file types.
- Note: Not all file types support all styles and content types.
- Caption files don’t support italics.
- Many file types don’t support comments
- It is possible data will be lost in the conversion process.
- Note: Not all file types support all styles and content types.
- If you want to convert the file to a different type you can select between any of the supported file types.
- If the Source file is an AD or Dubbing file a new option will be visible:
- If selected any associated audio files will be exported
- If not selected only the script file (srtad, esf or srtad) will be exported.
- Export Mode:
- Times and Text – the new file contains all the text and timing information from the source file.
- Times Only – The new file only contains blank subtitles. This is useful for creating a blank template when translating between languages
- Text only – the new file contains text subtitles but no times. – this is useful if a file needs to be retimed.
- The new file will be stored in the selected location.
Import an Audio Job
An Audio Job consists of the script file (srtad, esf or srtdub) and any associated audio files (wav) combined in a single Zip file.
- Select the Audio Job option from the Files Import menu.
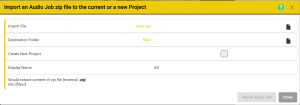
- Import File – find the Audio Job Zip file you want to import.
- Destination Folder name – use the Browse button to set the folder location.
- The file name will be the same as the file contained in the zip.
- NOTE: for AD and Dubbing files you MUST create a new sub folder for each file. This is to keep the audio WAV files for this Audio Job separate from other wav files for other jobs.
- Create New Project – normally not set and the Audio Job will be added to the current Project.
- Click to create a new Project containing just the Audio Job.
- If selected a new option will appear to allow you to enter the name of the new Project.

- Display Name – This sets the text shown at the top of the text column and on the timeline track for this AD or Dubbing file.
- Click the Import Audio Job button.
Import a Script File
A Script is a text document that contains timing, text and possibly other information. Scripts come in a huge range of styles and file formats from text files, Word documents or spreadsheets, each with a different layout.
To Import a Script, first it must be edited and saved as a CSV file in a set format. This is best done with text and spreadsheet editing tools such as Word, Excel, Google Docs and Google Sheets, or any other editing tool.
Save the Script as a .csv file (from Excel or Google Sheets) in this format:
-

- Column A – Serial Number 1,2,3… Optional
- Column B – In Timecode
- Stellar will interpret the time as best it can.
- See below for timecode format details
- Stellar will interpret the time as best it can.
- Column C – Out Timecode – Optional
- If missing Stellar will use the set Reading/Speaking speed and the In time to calculate an out time
- Column D – Main Text – used for the subtitle or AD/Dubbing script
- Column E – Role – only used for Dubbing Scripts.
- Sets the Role or Character for each Title.
- Columns F-H – Additional Text – Stored as Comments for each title
- This can include speaking directions etc.
Timecode Formats
- The script editor supports a range of timecode formats and these are interpreted as follows:
- Blank – a basic sequential timecode will be calculated from the Start Timecode set and with in and out cues calculated based on the word count and reading speed set.
- 0000000 = Frame count
- 0000000.000 = Seconds and milliseconds (1 to 3 decimal places and dot and comma separators supported.
- 00:00:00:00 = hh:mm:ss:ff at 25 Fps
- 00:00:00;00 = hh:mm:ss;ff at 29.976 Fps
- 00:00:00 = mm:ss:ff at 25 Fps
- 00:00;00 or 000:00;00= mm:ss;ff at 29.976 Fps
- 00:00 or 000:00 = ss:ff at 25 Fps
- 00;00 or 000;00 = ss;ff at 29.976 Fps

- From the Files menu Select Import Script.
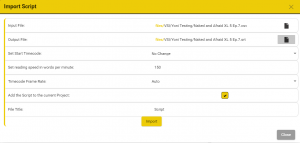
- Input File – Selects the source file, must be in the .csv format set out above.
- Output File – Set the new file to be created from the script.
- Select the location and set the file name
- Select the file type
- Subtitle .srt – Subtitle File – No Role information will be stored and the file can’t be used to record audio.
- AD .srtad – Audio Description file – No Role information will be stored but can used to record audio.
- Dub .srtdub – Dubbing script file – Role information will be stored, Text adaptation is supported, audio can be recorded.
- Set start Time – Force the time of the first subtitle to be in the range selected.
- Set Reading Speed – Used to calculate Out timecodes if there are one in the file.
- Timecodes can be easily edited on the timeline after the script has been imported.
- Timecode Frame Rate – Stellar will attempt to work out the timecode frame rate from the file. You can override this by setting a frame rate here.
- Add Script to Current Project – If set the new file (srt, srtad or sdtdub) will be added to the current Project. If not the file will be stored to disk only.
- File Title: the text Title that will be displayed on the timeline and in the subtitle editor for the new file.
- Import – Click to start the import.
Export an Audio Job
An Audio Job consists of the script file (srtad, esf or srtdub) and any associated audio files (wav) combined in a single Zip file.
You can Export one of these from the current Project. This is an ideal way of passing Audio Jobs between users as there may be hundreds of individual audio files as a single zip file.
- Select the Audio Job option from the Files Export menu.
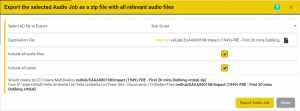
- Select AD File to Export – This will default to the first AD or Dubbing file in the current Project (normally there would only be one).
- Destination File – use the Browse button to set the folder location and file name for the output Zip.
- The Zip file name will default to the same as the file script file name.
- Include all Audio Files – normally set and all audio files will be included in the Zip.
- If not set a new option will be shown.

- Include only audio files after: – set a date and time
- Only files recorded after this time will be included on the Zip file
- This is useful for sending Updates but not the whole set of files.
- Include all takes. – If set all Takes, even those muted/disabled will be included.
- If not set then only the active/unmuted takes will be included in the zip file.
- Click the Export Audio Job button.
- Progress will be shown in the status area
Export a Script File
Create a copy of a subtitle file, AD or Dubbing script in a spreadsheet format.
The default format is compatible with Netflix requirements.
All Spreadsheets are output in CSV format that is compatible with all spreadsheet an other text editing systems.
To convert to a specific spreadsheet format (E.G. xls or xlsx) open the csv file in Excel and Save As the required format..
- This is often required as an extra deliverable in addition to the main text file.

- Select the Export Script option on the Files menu
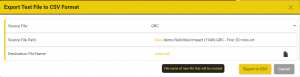
- Source File – select which file in the current Project to export as a spreadsheet.
- Defaults to the current file if more than one present in the Project.
- Source file name – shows the file name of the selected file – read only.
- Destination file name – set the output file name and location.
- use the browse button to find the right folder.
- Export to CVS button – complete the output.
- A confirmation box will pop up with the option to open the output file location.
- Source File – select which file in the current Project to export as a spreadsheet.
Export a Pro Tools Project
A Pro Tools Project consists of the the audio files (wav) and associated metadata combined in a single .ptx file.
You can Export one of these from the current Project. This is the best way of moving the audio and timing information from Stellar into Pro Tools.
- Select the Pro Tools File option from the Files Export menu.
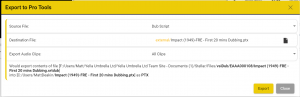
- Select AD or Dubbing File to Export – This will default to the first AD or Dubbing file in the current Project (normally there would only be one).
- Destination File – use the Browse button to set the folder location and file name for the output ptx.
- The ptx file name will default to the same as the file script file name.
- Export Audio Clips. – Select either All Clips or Active Clips.
- All Clips – will include both enabled and disabled/muted Takes
- Active Clips will only include active/unmuted Takes
- Click the Export button.
- Progress will be shown in the status area
Layouts
Stellar comes with a set of predefined Layouts for Subtitling, Audio Description and Dubbing. Start with one of these and then customise it to your requirements if you need to.
Loading a Layout
Click on the Files item on the top menu bar,
and then on Layouts > Load.
You can browse to sub directories if present to see more Layouts and move back up to the parent directory by clicking on the Path Icon.
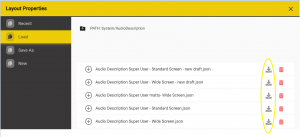
Find the Layout you want and click on the Load button on that row.
Saving a Layout
Once you have configured all the Widgets to give you the look you want you either resave it to the current Layout name or you can can save it as a new Layout to keep it for future use.

Click on the Files item on the top menu bar and then on Layouts > Save As to open the dialog.
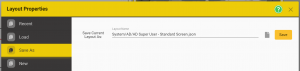
You can browse to sub directories if present and move back up to the parent directory by clicking on the Path Icon.
Enter a File name and press Save.
Tip: To update the current Layout right click on the layout name in the list of layouts in the Load tab, this will populate the Layout Name and then select the Save As tab and click Save.
Hint: Right click on the Layout name in the top bar to jump straight to the Save As dialog.
Deleting a Layout
Click on the Layouts item on the top menu bar to open the Layouts dialogue and select Open.
You can browse to sub directories if present to see more Layouts and move back up to the parent directory by clicking on the Path Icon.

Find the Layout you want and click on the Delete (Bin) button on that row.
- A confirmation message box will pop up to confirm the deletion, click Yes or Cancel.
Layout Templates
A Layout Template is a Layout that is protected from being updated or overwritten.
To see all of a Layouts details expand the details section in the Layouts Load dialog.
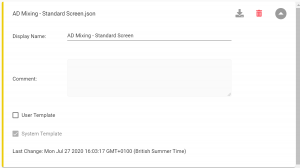
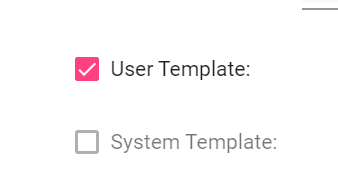
For each Layout there are two Template Flags:
-
- System Template
- The System Template flag is set for Layouts that are supplied either by Yella Umbrella or by your company.
- These are fixed and can’t be changed or overwritten.
- If you load a System Template you can always Save As a different layout name and the use it as the basis for a new custom Layout.
- You can’t change the System Template flag.
- User Template
- You can set the User Template flag on any of your Layouts.
- This will stop you overwriting them by accident
- If you want to update a user Template just turn off the flag, save the changes and then turn the flag back on to protect your Layout
Assigning a Layout to a Project
You can assign a specific stored Layout to a Project so every time you open that Project you always get the correct Layout.
Load the Project.
Select Files and then Project then Properties,
and then the Properties tab..
From the Layout selector on the configuration page select the Layout you want associated with the current project.
Click Save.
This Layout will be loaded every time the Project is loaded, you can always then select a different Layout once the Project is loaded, if required.
Layouts – Create and modify using Layout Mode
Watch the VideosLoading a Layout
In Stellar the controls you see are made up of a number of Widgets; for example the Video Display Widget, The Media Controller Widget and a Timed Text Editor Widget. You can store and retrieve any number of Layouts, each with different Widgets in different positions on the screen. So for example you could have a Layout for Subtitle authoring with just the basic Widgets (Video and a single text column) and another one for multi language QC with Video, Multi columns of text, timelines and translation Widgets. Stellar comes with a number of default Layouts but you can create you own or modify the defaults and save these as new versions.
A Layout defines what Widgets are visible in the Stellar Browser window, how they are laid out and their configuration (settings).
To create the Layout you want there are three steps:
- Select the Widgets you want.
- Position the Widgets in the browser window.
- Configure the Widget settings.
- Save the layout
You can also:
- Hide the instance of a Widget – A hidden Widget can be re-enabled in the future. A hidden Widget retains its configuration settings.
- Delete the instance of a Widget – A deleted Widget is gone for good and any configuration information is lost.
Selecting Widgets
To choose the widgets either:
- Click on Settings in the top menu.
- Alt+ Right Click on any Widget.
- Right click in a Widget and select Settings from the context menu.
This will open the Settings dialogue.
Down the left hand side are listed all the available Widgets. The Widgets available to you may be different from the list shown here.
Items highlighted in Yellow are present and enabled in the Current Layout.
Select the Widget to add and then click the yellow + button in the top right corner.

This will add another instance of the Widget to your current layout. For some Widgets you can have more than one copy on screen, for example two time-code displays showing the time-code in different formats could be useful.
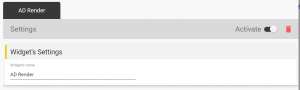
The new instance of the Widget will show in the tabs above the Settings bar, if you enter a Name in the Widget’s Name field this will be displayed in the tab to help you identify the different copies.
Configuring Widgets
The Settings for each instance of a Widget are shown in each Widget Tab.
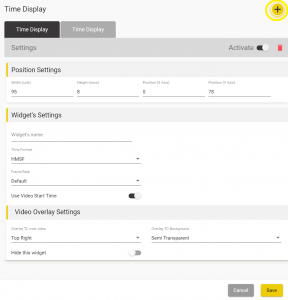
Time-code Widget settings example:
Set the values you want and click Save to exit the Settings Dialogue.
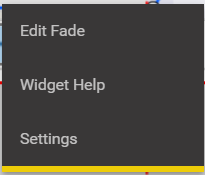
You can always change the Widget settings later, either via the Widgets menu or by Right Clicking in the Widget and selecting Settings from the context menu that will pop up.
Positioning Widgets
Turn on the Layout mode in the main screen by clicking the Layout button in the top menu bar.
- The view will zoom to show all active Widgets with space to move them about.
- There will be a darker grey area, this represents the size of your browser window at normal 100% zoom.
- If you fit all of your Widgets inside this area you will get the best result when you Zoom to Fit.
- The zoom will change to fit the layout to the browser window when you turn off layout Mode, so make sure you have the browser window at full size.
- Hint: You can run the Browser in Full screen mode – Press F11 in Chrome
- The main screen area will grey out and new icons will appear in the top left corner of each Widget.
You can position Widgets by dragging (Click and hold left mouse button) or resize widgets by dragging either and edge or a corner.
Widgets will move out of the way as you drag, so take some time to experiment with this function.
Note: When new Widgets are added they may appear out of view to the right or below, so scroll or zoom the browser window to make sure you see all your Widgets.
- Or turn Layout Mode off then on again, to auto zoom all Widgets into view.
Tip: You may want to create different versions of a Layout for different screen sizes. e.g. one for a laptop size screen and another for a larger desktop screen.
Hint: If you want to abandon the changes while you are editing a Layout, just press Esc.
Hiding a Widget
You can hide an instance of a Widget, without losing it’s configuration by clicking the Activate switch at the right hand end of the Settings bar. Make sure you have the right Widget instance selected before you do this.
You can always re-activate this Widget at any time while the Layout is loaded by reversing this step.
Hint:
In Layout Mode two Icons appear in the top left corner of each Widget.
Clicking on the circle Icon will hide the Widget.
Tip: In the main screen Alt+Right clicking on a Widget will open the correct settings tab for that Widget.
Deleting a Widget
You can Delete an instance of a Widget, by clicking on the red Bin icon at the right hand end of the Settings bar. Make sure you have the right Widget instance selected before you do this as it’s not reversible.
You can also use the Bin symbol in the Widget when in Layout Mode.
Hint:
t.
Tip: In the main screen Alt+Right clicking on a Widget will open the correct settings tab for that Widget.
Help Menus

The Help menu on the top bar offers a number of options to make it easier to use Stellar
Stellar Help
- ‘How To’ section
- This will open a list of How To topics showing a step by step guide to common actions in a new tab.
- Help Manual
- This will open the main help pages in a new tab.
- These pages explain the function of all controls and displays in Stellar
- Glossary – A list of terms, as used in Stellar
- Hotkeys Help Page – A table of all the hotkeys and mouse actions available in the standard Hotkey maps
- Note: If you have modified the standard hotkey maps to create a custom version (our you company has) then this page will not reflect the hotkeys available to you.
- See the Hotkeys section for more information
- Hint: Use the Search box on the Hotkeys page to filter the information shown
-
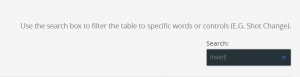
- Entering ‘Insert’ in the search box will filter the rows shown to only include those relating to insertion.
-
Forum
- Stellar User Forum
- This will open the Stellar User forum in a new tab
- This is a private forum so you need to be invited to join. All users of Nebula and Stellar will be added automatically but if you can’t access it please contact ‘Support at yellaumbrella.tv’
- Stellar Forum Wiki
- This will open the Wiki section of the User Forum directly
- Here you will find user generated help and tops. Please add your own section if you want to contribute.
Stellar Tech Wiki
- This option will take you straight to Tech Wiki section of the User Forum
- Here you can see, and contribute to, the technical help pages.
- These pages contain user generated help and ideas on using Stellar and will help you find answers to questions and to get the most out of Stellar.
- If you have a great way of getting the best out of Stellar, please tell everyone all about it.
- If you think you can explain how to use parts of Stellar better than these help pages – please do so here!
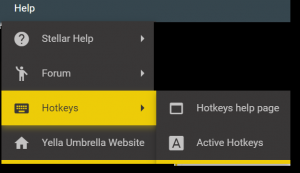
Hotkeys
- Hotkeys help page
- This will display the Hotkeys and mouse functions for all Widgets
- Hint: Use the Search box on the Hotkeys page to filter the information shown
-
- Entering ‘Insert’ in the search box will filter the rows shown to only include those relating to insertion.
-
- Active Hotkeys
- For any layout with a specific set of Widgets loaded only some of the Hotkeys will be active. This screen lists all currently active Hotkeys
Yella Umbrella Website
- Opens the main Yella Umbrella website in a new tab.
Troubleshooting
- If you have any trouble running Stellar or any of the nebula tools, look here first for an answer.
Version History
- Details on the latest updates and changes to Stellar.
Tasks – WARNING: The Task functions are currently in Alpha Release and subject to change
This Section describes the use of the Task screen within Stellar.
Note: The Task screen is only available if you have loaded a layout that contains the Task Manager Widget
- You can either use the Yella PUBLIC Task Server to share Tasks with other users (both inside and outside your organisation) or you may have been given access to a specific Company’s Task Server
- If you expect this to work for you and you experience problems please contact your in house IT support team first.
- It requires access to a Google Sheet or other data source to supply the list of Tasks.
The Task List System allows Tasks to be assigned to one or more users and distributed anywhere in the world.
- A Task contains all the media and subtitle or script files required to do a specific task.
- Any changes to the task files (edits, additions deletions etc.) are automatically synchronized to the central store.
- For Dubbing and AD recording multiple users can open the same Task at the same time to collaborate on a recording session.
Opening the Task Screen

- Click on the Task option on the top menu.
- This will pop up the Task Screen
- If the Task option is not visible you need to Add the Task Widget to your Layout.
- See Here
- And Here
- Note: The Task screen is only available for use if it is configured for you.
- By default you will have access to the Yella PUBLIC task Server – unless this has been disabled by your company.
- It requires access to a Google Sheet, Blue Lucy BLAM system or other workflow system data source to supply the list of Tasks.
- If you expect this to work for you and you experience problems please contact your in house IT support team first.
Logging In.
Before you can load any Stellar or the Tasks you must first Log In.
When you start Stellar you will be presented with a Log In dialog.
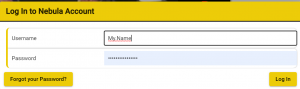
- Enter the Username and Password you were sent when you first registered.
- You can use you email address or your username
In the Task Manager you will see your login status
- If you have more than one Nebula account, you can log out as one user and log back in as another
- This will allow you to see Tasks owned by both accounts.
-
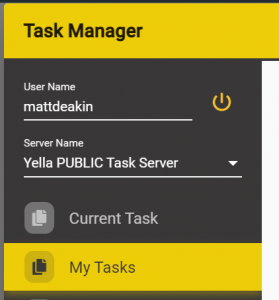
- Before you can see the Task assigned to you you’ll need to Log In to the Task List server.
- Click on the Log In button on the Task manager dialog.
- This will show the login dialog.
- Enter you User name.
- Enter you password, Google Chrome will store this automatically if you allow it to.
- Click Login.
- Use the Forgot Your Password option if required – this will reset you Nebula Login Password.
- Click on the Log In button on the Task manager dialog.
- Once you enter your name any tasks assigned to you will appear on one of the Task Screen tabs, Started & Ready, Pending or Completed.
- Select the Server you want to log into from the dropdown list
-
- You will probably have access to the Yella PUBLIC Task Server
- Other servers are run by the company or companies that you are working for and used to assign tasks to you.
- There may only be one server or you may have access to more than one.
-
- If you are using the Yella PUBLIC Task Server you may see Tasks assigned to you by more than one company.
- You can always click on the Refresh button to reload the list of Tasks to make sure it’s up to date.
- Any Tasks assigned to you will pop up on this screen.
- Select the Server you want to log into from the dropdown list
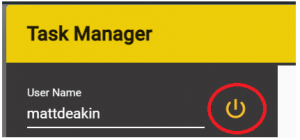
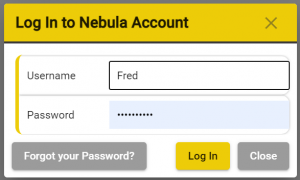
You can see which Task Server you are currently signed into on the Server Name line.

- To change servers (if more than one is available to you) with the Dropdown and then clcik the Connect to Server button next to the name.
To Log Out click on the Log Out button.
Second Factor Authentication.
In some cases you may need to use Second Factor Authentication (2FA) before you can load a Task.
This is an additional level of security and is set by the owner of the Task Server you are accessing.
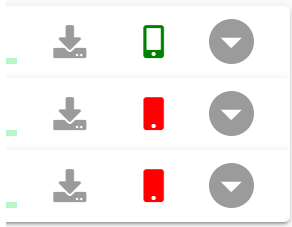
- Next to each task there may be a small Smart Phone Icon.
- No Icon – this means that the task doesn’t need any additional security

- A Red Icon – This means the task requires 2FA and is still locked

- A Green Icon – This means the task requires 2FA and has already been unlocked.
When you try and download a Task with a Red icon you will see a screen asking you to Select how you want to receive Authentication Link; the either via an SMS text message or via email.
The email address or phone number must already be set in the workflow system of the company assigning you work. If this has not been done you need to contact the company supplying you with the Tasks.
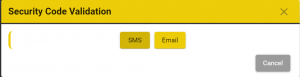
- Click on either SMS or email
- The Awaiting Confirmation dialog will be shown.
- At this point check you email or SMS texts for the message.
- This will consist of a link, just click on the Link
- This will show a simple web page with Accept and Reject buttons
- Click on Accept
- The Awaiting Confirmation dialog will close and the Icon will change to Green.
- Now you can download the Task
- If the SMS or email doesn’t arrive:
- Close the Awaiting Confirmation dialog and try again
- If you continue to have problems contact the company providing you with the Tasks to check you have the correct phone number and second email address configured in Nebula.
- Go to https://nebula.yella.tv/my-account/ and Edit Profile to update your details
Task Screen Layout

- The Task Screen has two or three Tabs:
- Current Task
- My Tasks
- Manage Resources – only visible to users with manager or Admin or manager privileges.
My Tasks
- The My Tasks tab lists all Task assigned to you.
- There are three sub tabs on the page:
- Active Tasks – Lists all Tasks assigned to the logged in user that are in state Ready or Started
- Pending Tasks – Lists all Tasks assigned to the logged in user that are in state Planned or Preparing
- Completed Tasks – Lists all Tasks assigned to the logged in user that are in state Completed, Checked or Delivered
- Note: Status names and sequence may vary between companies.
- You can sort or filter the list by using the controls at the top of the page
- Sort
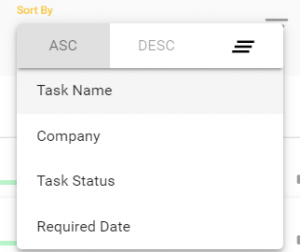
- Select what field to sort by
- Select Ascending or Descending order
- Filter
- Click on the filter button
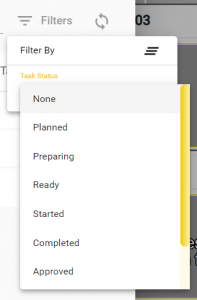
- Click on task Status and select which status to filter by
- Note: The Filter icon will be red if a filter is active
- Click on the three lines button to clear any Filter
- Sort
- There are three sub tabs on the page:
- You can see more information on the Task by clicking on the Left hand + control on each line.
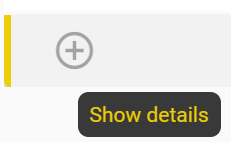
- This will open the Task Information section.
- Click again to close.
Current Tasks
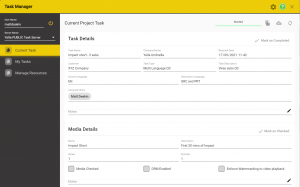
- The Current Task Tab will only be populated once you have loaded a Task.
- This tab shows all the data about the current task based on the Task management system or spreadsheet.
- The top section provides a number of controls:
- Change Status
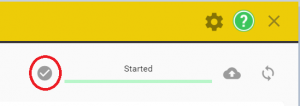
- The Tick icon – moves the Task Status onto the next stage
- Hover over the control to see the statuses
- The progress bar will show how much of the Task has been completed
- Note: this is not applicable for all Task types.
- The Current Task Status is shown above the progress bar.
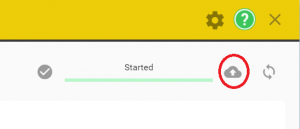
- The upload Icon – forces all files to be uploaded and synchronised with the Task Server.
- Note that if the Automatic Upload option is On then you don’t need to use this control and it will be inactive.
- The Refresh button – updates the current Task information to match the Task Server
- Use this if you expect a change has been made by someone else.
Loading a Tasks
- Before you can work on a Task you must download it.
- On the Tasks Started & Ready Tab select the task you want and click on the corresponding Download button.
-
- You will be asked if you want to download the required files – Click Yes
- You may be asked if you want to download additional media files. Unless you know you already have these on your machine click Yes.
- You will be asked if you want to open the Project for the selected Task.
- Click Yes to start work immediately
- Click No if you’re just downloading the files for later use.
- Note: A Project within Stellar is the collection of media, script and audio files for a single Task.
-
Adding Subtitle or Script Files
- Once the media has been checked the next step is to add the Subtitle or Script file(s).
- To add the subtitle or script files
- First download the Task as above.
- Once you have the Task open with the media visible you need to add one or more subtitle or scrip files.
- Use the Add Existing text files option. See Here.
- After you have added the files you need to check them to see that they are correct, match the media, have the correct timecodes and all the required Roles are present in any Script file.
Working on a Task
- Once a Task is in the state Ready you can start working on it.
- Depending on the Task this can be creating new subtitles, QC, editing the script, translating, adapting, recording, reviewing or mixing.
- First load the Task
- This will load all the files you need to do the task and may include video, additional audios, shot change list, subtitle or script file(s) and other settings.
Saving a Task part way through
- At any point when working on a Task you can stop and resume later.
- All changes you make are stored automatically, there’s no Save button in Stellar.
- Provided you are connected to the Internet and Upload Mode is set to Automatic all changes will be saved as you do them.
- You can, optionally, click on the Publish button on the Current Task tab.
- This will force a synchronization with the server.
Editing or changing the Status of a Task
- To upload a media file you must have Manager or Admin level access for the Company you want to change the Status of a Task not assigned to you..
- Click on the Manage Resources – Tasks Tab
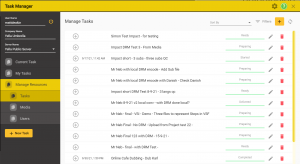
- Scroll to find the Task you want to change
- To Edit the Task
- Click on the Pencil Button
- You can now edit all the Task settings
- Click Update to save
- To quickly change the Status
- Click directly on the Status text above the green progress bar,
- This will show a dropdown of the available Statuses.
- Click on the new Status
- This will be saved automatically
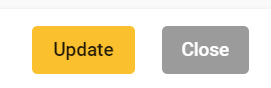
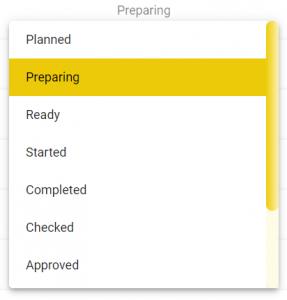
How to Create a New Task.
- To create a New Task you must have Manager or Admin level access for the Company you want to create a Task for.
- If you have an Admin or Manager level of Access you will see the Manage Recourses option on the Task screen.
- Click on Tasks
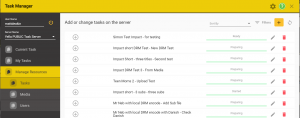
- Select the Tasks option under Manage Resources
- Click on the New Task button
- There are three ways to create a New Task – This is the simplest option.
- Create a normal Stellar Project with the media and any existing subtitle or script files
-
- Upload the whole set to the server as a single Task
- You can set DRM encoding on the media if required
-
- Create a normal Stellar Project with the media and any existing subtitle or script files
- Create a Task based on the current Task – This is useful for creating multiple Tasks based on the same media.
- EG Subtitle into multiple languages so you can create one task per language.
-
- The media is already assigned to the Task
- You can’t add DRM encryption, but it might have been applied to the media when the initial Task was created.
-
- EG Subtitle into multiple languages so you can create one task per language.
- Create a Task based on Remote Media (Media already stored on the server) – Useful if you want to re-use the same media in multiple task.
-
-
- You can then optionally download the Task and add additional subtitle or script files
- These will be automatically published to the server.
- You can then optionally download the Task and add additional subtitle or script files
-
-
Select which method by selecting the appropriate tab:
-
-
- From Local Project
-
-
-
- Project
- This defaults to the current Project
- You can select a different Project by clicking on the document icon
- This defaults to the current Project
- Task Details
- Enter as many details as you want, most entries are for information only.
- Task Name – Required
- Task Status – Default is Preparing
- Two Factor Authentication – If selected all users will have to authenticate by email or SMS when downloading this Task
- Assigned users – The current user is added by default – Click in the blank area to select users from all available
- Start typing to see a filtered list of users
- You can assign any User who has been added to your Companies user list.
- Notes – enter free form text instructions for this Task
- Media Details
- Enter a name for the new Media associated with the Project
- This Media then be available on the Server and could be assigned to other Tasks
- DRM Enabled
- Forces DRM encoding of the media prior to uploading
- Watermarking Required
- Forces watermarking of the media on playback.
- Media Checked
- Used to indicate that the Media has been checked and is correct for this Task.
- Notes – enter free text notes for this media item.
- Enter a name for the new Media associated with the Project
- Click on the Upload button to create the new task.
-
-

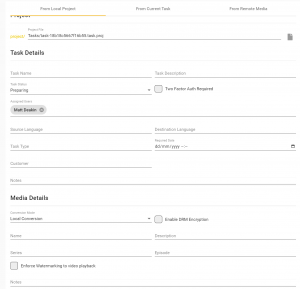
- From Current Task –
- Only available if a Task is loaded.
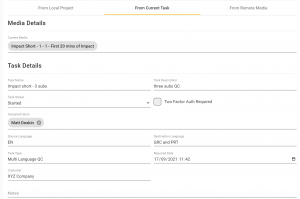
- Media Details
- This is the media assigned to the current Task
- You can change it but then the new Task won’t be the same as the current Task.
- This is the media assigned to the current Task
- Task Details
- Enter as many details as you want, most entries are for information only.
- Task Name – Required
- Task Status – Default is Preparing
- Two Factor Authentication – If selected all users will have to authenticate by email or SMS when downloading this Task
- Assigned users – The current user is added by default – Click in the blank area to select users from all available
- Start typing to see a filtered list of users
- You can assign any User who has been added to your Companies user list.
- Notes – enter free form text instructions for this Task
- You can’t set DRM encryption – but the media may have had DRM set when it was first uploaded.
- Only available if a Task is loaded.
- From Remote Media.
-
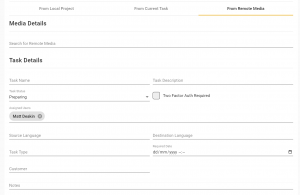
- Media Details
- Click in the Search for Remote Media area and you will see a list of all available media
- Start typing to get a filtered list
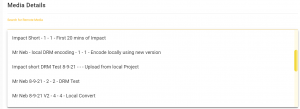
- Click in the Search for Remote Media area and you will see a list of all available media
- Task Details
- Task Name – Required
- Task Status – Default is Preparing
- Two Factor Authentication – If selected all users will have to authenticate by email or SMS when downloading this Task
- Assigned users – The current user is added by default – Click in the blank area to select users from all available
- Start typing to see a filtered list of users
- You can assign any User who has been added to your Companies user list.
- Notes – enter free form text instructions for this Task
- You can’t set DRM encryption – but the media may have had DRM set when it was first uploaded.
- Click on the Upload button to create the new Task.
- Hint: To add subtitle or script files to the Task Download it and add the new files.
- Changes will be uploaded automatically.
-

How to add a new User
- To add a New User you must have Admin level access for the Company you want to add the User for.
- New Users must already have access to Stellar
- Users can either be:
- Members of your own company and already have a nebula login
- Free lancers with their own Nebula account.
- You must use the same email address as that used for the Nebula account.
- This is the unique identifier for that user within the Nebula system.
- If you have Admin access you will see the Users tab under Manage Resources on the Task dialog
- Click on Users
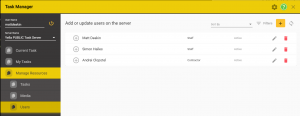
- Users can either be:
-
- Click on the New User button
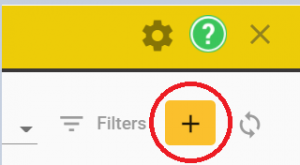
- This will show the new User form
- Enter the Email address for the new User
- If this is a valid emails in Nebula the User Name will be filled in automatically.
- If it is not valid a warning will pop up.
- User Status – Active or Inactive
- You can keep users on your system but set them inactive to prevent them being assigned tasks while not available
- Preferred Layout – Sets the default Stellar Layout for this User – Optional.
- Manager permissions – Set if you want this user to be able to add new Tasks and Media
- Admin Permission – Set if you want this user to be ale to add new Users
- Send email notifications – Set if you want this user to receive emails when a Task is assigned to them.
- Notes – enter free form text instructions for this User
- Note: You can’t enter mobile phone numbers or second email addresses here
- These are used for Second Factor Authentication and must be added by the use in their Nebula Accounts.
- If this is a valid emails in Nebula the User Name will be filled in automatically.
- Click on Create
- Click on the New User button
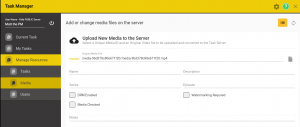
How to upload a media file.
- To upload a media file you must have Manager or Admin level access for the Company you want to add the media for.
- By Uploading a media file you are making it available to any other user in the same company via the Task Server.
- Uploading a media file will automatically trigger the creation of shot change, proxy video and audio files and audio waveform files.
-
- Click on the Manage Resources – Media tab
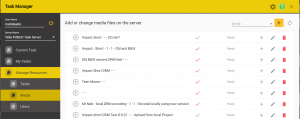
- Click on the Add new media button
- This will show the New Media controls:
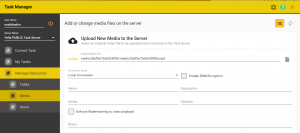
- Select the Conversion Mode
-
- Local Conversion
- The video file will be converted, and DRM added is selected, by your own PC or Mac.
- This may take some time.
- The video file will be converted, and DRM added is selected, by your own PC or Mac.
- Remote Conversion
- This is an option and will only be available if configured by your company
- The Original media file that you select will be uploaded to the cloud server and converted, and DRM added if selected, there.
- This has the advantage of freeing up you PC or Mac for other work.
- This is an option and will only be available if configured by your company
-
- Select the Original media File
- Use the document browse button to find the media file you want to convert and upload
- By default the currently loaded media file is selected.
- Use the document browse button to find the media file you want to convert and upload
- Enter the Media Name – this is used for sorting and searching
- Enter text for the description, series and episode.
- These are used for information only
- Optionally
- Mark the media for DRM
- This will cause the media to be encrypted with Widevine DRM and will require second factor authentication by each user that downloads a Task containing this media.
- Default – Off
- Mark the media for Watermarking
- This will cause the media to be watermarked when displayed in Stellar
- Default = Off
- Mark the media for DRM
- Notes – enter free form text instructions for this media file
- Click on the Upload button.
-
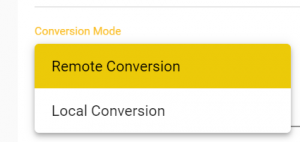
Delete a Task
-
- To Delete a Task you must have Manager or Admin level access for the Company you want to delete the task from.
-
- Click on the Manage Resources – Tasks tab
- Find the Task you want to delete
- Click on the red Bin button for that Task
- The Task will be marked as Deleted and won’t show in the Task list.
- The actual files won’t be deleted until the next scheduled Clean-up process
- Media Files won’t be deleted
- See the Media tab for Delete Media controls
- Click on the Manage Resources – Tasks tab
-
- To Delete a Task you must have Manager or Admin level access for the Company you want to delete the task from.
Profiles and Layers
Profiles and Layers are used in Stellar to control the style and Quality Control rules for a specific subtitle, AD or Dubbing file.
Each file created in Stellar will need to conform to specific rules. For Example an English language file for Netflix will have a reading speed of 20 CPS if the target audience is adults and italic characters will be allowed. However a Hebrew language file for children would have a reading speed of 13 CPS and in Hebrew italics is not allowed. For Audio Description files the rules will include audio specific settings such as program audio fade depth and speed.
This is just one example of potentially hundreds of style and QC rules that need to be applied to subtitle and script files. To make creating and managing these rules as easy and comprehensive as possible Stellar provides a system of Profiles and Layers.
Profiles and Layers are stored centrally and can be used in many Projects at the same time. If a Layer or Profile is edited then the changes will be reflected in all Projects or Tasks using that Profile. Layers and Profiles do not need to be distributed to Users as they are automatically accessed from a central server.
- See the Glossary for a full definition of the terms used in this section.
A Layer is a subset rules of a specific type, EG Timing rules or Reading Speed rules.
- Layers are only used inside Profiles
A Profile is a set of one or more Layers combined to give all the settings required for a specific output file, EG Netflix English subtitles for Children.
- A Profile can be assigned to each Text File (subtitles, scripts or transcriptions) in a Project
- Note: Subtitle and script files are only linked to a Profile when they are inside a Project or Task
Profiles and Layers are stored centrally and are available to all users
- System Layers and Profiles – available to all users but can’t be edited
- Company Layers and Profiles – available to all users within a Company – can be edited by those with Company Manager or Company Admin privileges.
Most users will be given a Project or Task with the correct Profile set and will never have to configure or assign Profiles or Layers.
Selecting and Assigning a Profile.
Each Text File (subtitles, scripts or transcriptions) in a Project can have a Profile assigned.
There are multiple ways to assign a Profile to a file within a Project
- When you add either an existing or new text file to a Project you will have the option to select a Profile.

- The Profile will default to the last one used for that file type
- Either:
- Click on the small X icon on the existing Profile and you will be list of Profiles
- The Profiles available will be filtered to show those suitable for the selected file type.
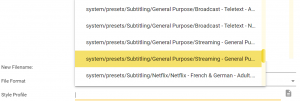
- Or
- Click on the file browse Icon to select from all available Profiles
- Select between the available sets of Profiles
- Select a Profiles folder
- And then a specific Profile
- Once a file is part of a Project you can view and change the assigned Profile by:
- Right Click in the tab at the top of the text column and select Style Profile
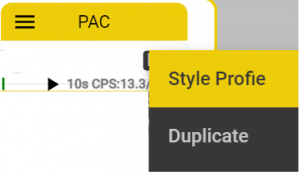
- This will open the Profile configuration dialog for that file
- Go to the File Status dialog and select the Properties Tab
- Go to the File Properties dialog and select the File you want.
- Right Click in the tab at the top of the text column and select Style Profile
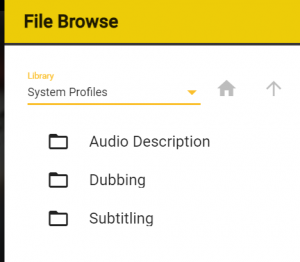

Overriding the settings in a Profile
Profiles and Layers are stored centrally and can be used in many Projects at the same time. If a Layer or Profile is edited then the changes will be reflected in all Projects or Tasks using that Profile. This makes the Profile and Layer system very powerful but there will be times when you want to make a quick change that will only apply to the current Project, and not effect other Projects using the same Profile.
- Note: – If you find you are making the same change for multiple Projects consider making a new Profile that reflects the different requirements.
To override Profiles settings in the current Project:
- Right click in the top tab of the text column you want to make the edits to, and select Style Profile. (If more than one text file is loaded in the Project, make sure you select the right one)
- This will show the Profile currently assigned to the File.
- If the entry is blank see Selecting and Assigning a Profile.

- Click on the Pencil Icon to Edit the Profile settings
- This will open the Profile View
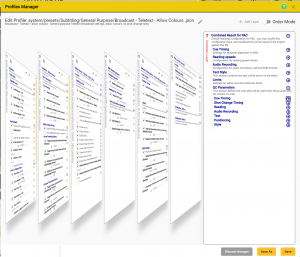
- To override settings in the current Project you only need to make changes on the right hand Summary Layer
- This Layer shows the all the rules made up from all the Layers shown on the left. For more information on the structure of Profiles see Managing Profiles and Layers.
- To see specific rules expand the section by clicking on the blue
 control.
- EG
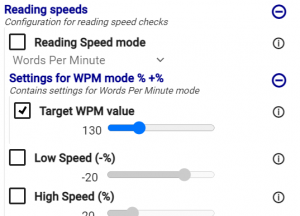
- Some sections have subsections with their own Control
- Hint: Shift Clicking on a + icon will open all subsections
- Shift Clicking on the top + icon will open all sections
- You can then use the Chrome find (Ctrl+F) to search for specific rules.
- EG Search for ‘italic’
- Hint: Shift Clicking on a + icon will open all subsections
- Some sections have subsections with their own
- The value show (160 WPM shows the current value based on the default and any settings in Layers to the left of the Summary Layer.
- Note: The Layers are prioritised left to right and the Summary Layer has the highest priority. So if the same value is set in more than one Layer the one to furthest Right is used.
- Hover over the
 icon to see the detail of all Layer settings for a rule
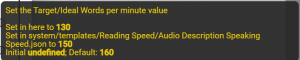
- Here the default reading speed (the value used if no Profile is loaded with a different setting) is 160, the Audio Description Speaking Speed Layer sets the value to 150 and this in turn is overridden in the Summary Layer to 130.

- To set a value in the Summary Layer click on the selection box for that rule – this enables overriding in the Summary layer (the control will turn blue).
- If the select box is not ticked you can’t change the setting value.
- Once you have made a change in the Summary Layer a Save button will become active.
- You have three option
-
- Save – Save the changes to the current Project
- There will no changes to the Profile and no other Projects or Tasks will be effected
- Discard Changes – Any changes you have made will be discarded and the Project and Profile will be unchanged.
- Save As – Save the Profile as a new Profile – Creating a Profile
-
- You have three option
- EG
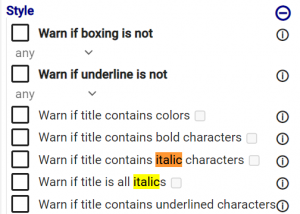
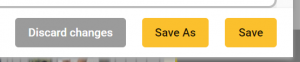
You can override specific settings for a Profile in the Current Project for a specific File. Any changes you make in the Summary Layer will only apply to the selected file in the current Project.
Profile Manager
The Profile Manager allows you to create and edit Layers and Profiles.
- See the Glossary for a full definition of the terms used in this section.
The Profile Manager is designed for Super Users and Project Managers and would not normally be used by subtitles, translators, script writers or voice artists.
The Profile manager is only included in Super User Layouts by default but you can add the Profile Manager Widget to your Layout – see Selecting Widgets
Select the Profiles Manager option from the Settings menu.
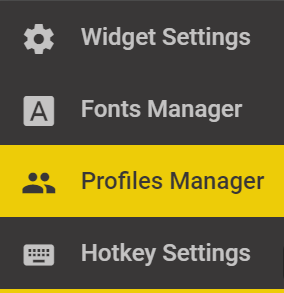
This will open the Profile Manager dialog
-
- The left hand panel has two tabs:
- Profiles – allows the addition, editing, duplicating and deletion of Profiles
- Layers – allows the creation, editing, duplication and deletion of Layers
- Profiles Tab
- There are three sets of Profiles
- System Profiles are available to all users and can be used directly. However you can’t edit or delete System Profiles
- Hint: A quick way to create a new Profile is to duplicate an existing Profile and save it with a new name. You can then edit the Profile and its Layers (see Duplicating a Profile) to create your own custom Profile.
- Company Profiles are available to all users within the same Nebula Company and can be edited and deleted by any user with Company Manager or Company Admin privileges.
- My Profiles are only available on the machine they are created on. Useful for creating and testing Profiles before they are copied to your Companies Profiles.
- You wouldn’t normally keep Profiles you used in My Profiles. Even if you are a freelancer storing your Profiles in Company Profiles allows you to share them with other users and to use the same Profile on different Machines.
- System Profiles are available to all users and can be used directly. However you can’t edit or delete System Profiles
- Profiles are organised in Folders
-
- In the Company Profile you can create or delete folders to organise your Profiles
- New Folder
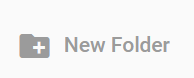
- name the new folder – this will be a subfolder of the current folder.
- Delete a folder
- Click on the red Bin icon to delete a folder
- Note: The folder must be empty before you can delete it.
- New Folder
- In the Company Profile you can create or delete folders to organise your Profiles
- For each Profile there are a number of controls
- View the Profile

- Displays a non editable view of the Profile and all associated Layers
- If you do not have editor privileges this will be the only option available.
- Edit the Profile

- Displays an editable view of the Profile and all associated Layers
- Duplicate a Profile

- Make a copy of the Profile
- Move or Rename a Profile

- Moving or renaming a profile also allows you to change the Profile Configuration
- Delete Profile
- Note: You can not Undo the deletion of a Profile.
- View the Profile
-
- There are three sets of Profiles
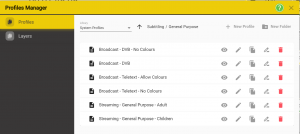
-
- Layers Tab
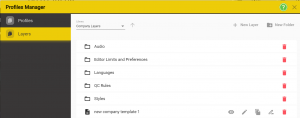
- There are three sets of Layers
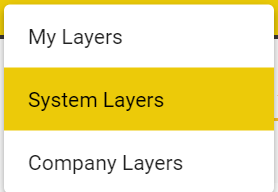
- System Layers are available to all users and can be used as part of a Profile. However you can’t edit or delete System Layers
- Hint: A quick way to create a new Layers is to duplicate an existing Layers and save it with a new name. You can then edit the Layers to create your own custom Layers.
- Company Layers are available to all users within the same Nebula Company and can be edited and deleted by any user with Company Manager or Company Admin privileges.
- My Layers are only available on the machine they are created on. Useful for creating and testing Layers before they are copied to your Companies Layers.
- You wouldn’t normally keep Layers you used in My Layers. Even if you are a freelancer storing your Layers in Company Layers allows you to share them with other users and to use the same Layer on different Machines.
- System Layers are available to all users and can be used as part of a Profile. However you can’t edit or delete System Layers
- Layers are organised in Folders
-
- In the Company Profile you can create or delete folders to organise your Layers
- New Folder
- name the new folder – this will be a subfolder of the current folder.
- Delete a folder
- Click on the red Bin icon to delete a folder
- Note: The folder must be empty before you can delete it.
- New Folder
- In the Company Profile you can create or delete folders to organise your Layers
- For each Layers there are a number of controls
- View the Layers
- Displays a non editable view of the Layer
- If you do not have editor privileges this will be the only option available.
- Edit the Layers
- Displays an editable view of the Layer
- See Editing a Layer
- Duplicate a Layer
- Make a copy of the Layer
- Move or Rename a Profile
- Moving or renaming a Layer also allows you to change the Layer Configuration
- Delete Layer
- Note: You can not Undo the deletion of a Layer.
- View the Layers
-
Layers
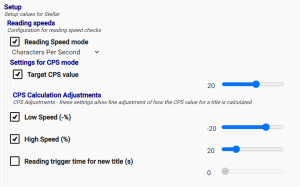
A Layer contains a specific set of Rules that control how a text file (subtitles, script or transcript) will look and what properties it should have.
Layers are only used inside Profiles to collectively make up a complete Style Profile – EG ‘English Teletext for BBC Broadcast’ may consist of a set of Layers to define Reading Speed, Text Style, Editor Limits and QC checking Rules.
The Rules in each Layer type are predefined but you can set a value for each Rule. EG A Timing rule might be the minimum gap between subtitles but you set what the value of this rule is.
See the Rules List for more details.
The Layer types available are:
- Audio Layer
- Contains the Rules for audio recording for AD, Voice Over and Dubbing
- Reading Layer
- Contains the Rules for reading speeds and how this is defined
- Timing Layer
- Contains the Rules for the timing of subtitles
- Display Style Layer
- Contains the Rules for how the text should be displayed and the safe area
- Editor Limits Layer
- Contains the rules that control how the text editor behaves and what options are allowed
- QC Layer
- Contains all the Rules that will be used to check the text file and if violated produce Errors or Warnings in the File Status dialog.
- Combined Layer
- Contains all the Rules in a single Layer
- Useful if you only need a very limited number of Profiles and don’t need the flexibility of multiple Layers.
- Contains all the Rules in a single Layer
Using Layers
Layers and Profiles in Stellar are designed to simplify the creation, distribution and management of the Rules required to control the style and quality of subtitle and script files. See the Profiles and Layers section for a description of their overall use.
There are two approaches to using Layers depending on your requirements.
1. You have a very limited number of different output styles and Rules.
- You may be a broadcaster with just one output style and only different reading speed rules for adult and children’s programs
- In this case you would use Combined Layers to create just two Layers, one for adult’s and one for children’s programming
- These would be used in two Profiles and no other Layers or Profiles would be required
- Any future Rule changes could be made to both Layers (if common to both)
2.You need to manage hundreds of different style settings from multiple clients
- You are a subtitle service provider with hundreds of clients each with one or many separate style requirements
- In this case you will want to rationalise the number of different Profiles by splitting the Rules into separate Layers and organising these in a hierarchy.
- For example: Netflix have different reading speeds for different language groups and within these different speeds for adult’s and children’s programs. In addition there are limitations in some languages but not in others, EG no italics in Hebrew.
- By creating two separate Reading Speed Layers for each Language group you can keep the reading speed rules in two Layers for all Netflix content and not have to create a separate Layer for each of potentially 50+ languages.
Creating a Layer
Before you create a new Layer consider the option of duplicating an existing Layer that is similar to the new one you need and then editing it. This may be quicker and simpler than starting from scratch. Duplicating a Layer.
To create a new Layer, open the Profile Manger and select the Layers Tab.
-
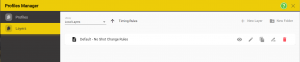
- and click on the New Layer Button
- You will see a dropdown of all the available Layer types.
- Select the Layer type you want to create and you will see a form with all the Rules.
- By default none of the Rules are selected and the controls will be grey and disabled. To set a specific Rule in this Layer check the box next to the Rule, and the control will be enabled.
- Note: Only enable the Rules you want to set in the Layer. Often it is best to leave the default rules and only change those Rules where the default value is not what you want.
- Note: Because Layers are hierarchical it is possible to have two Layers of the same Type in a Profile with the second one overriding a single Rule in the first one.
- For example: You may have a Style Rule for Most Netflix content but when the language is Hebrew you need to disable italics and set QC warnings if italics is present. Rather than create a whole new pair of Editing Limit and QC Layers you can continue to use the general Netflix Layers but in the Hebrew Profile add Layers that override just the italics settings. This way you won’t have to maintain two or more complete Layers which are specific to different languages.
- Note: To see a description of each Rule hover over the icon and a detailed description will pop up.
- Once you have set the Rules you need click Save As, and select Company Layers or My Layers and a Folder and set a file name
- Note: You can’t save to the Systems Layers
- When you click Save you will see the Layer Configuration Dialog.
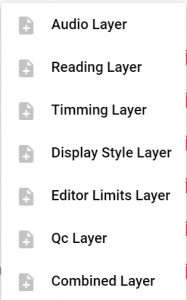
Layer Configuration
The layer Configuration dialog is shown whenever you save a Layer, either by editing, moving or creating.
-
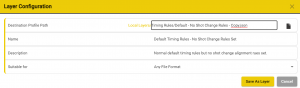
- Destination – Confirms the location (Company layers, My layers), path and file name for the Layer – click on the file browse button to change
- Name – A human readable name for the Layer – put a more detailed description here EG ‘Netflix Adult French & German etc. Reading Speed’.
- Description – A text field where you can add more details if required. EG ‘Netflix – Adult – French, German, Brazilian Portuguese, Italian’
- Suitable For – You have the option to define what file types the Layer applies to. This is used to Filter the Layers available when creating Profiles
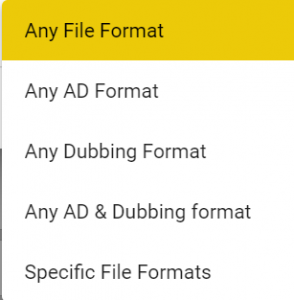
- If you select Specific File Formats you will see another dropdown list with each file type listed and you can add multiple file types by adding each one in turn.
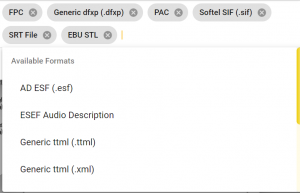
Duplicating a Layer
Often it is better to duplicate an existing Layer and then edit it to get the new Layer you require.
-
- Hint: You can duplicate System Layers and store the new copy in your Company Layers.
- To Duplicate a Layer Open the Profile Manager and select the Layers Tab.
- Select My Layers or Company Layers and a folder containing the Layer you want to duplicate.
-
- Click on the Duplicate button next to that Layer
- Set the file name and location for the new Layer and click Save
- Set the Layer Configurations and click Save
Editing a Layer
You can edit any Layer in your Companies Layers or My Layers set, but not Layers in the Systems Layers.
-
- To Edit a Layer Open the Profile Manager and select the Layers Tab.
- Select either Companies Layers or My Layers and folder containing the Layer you want to edit.
-
- Click on the edit pencil button next to that Layer
- This will open the Layer form with all the Rules.
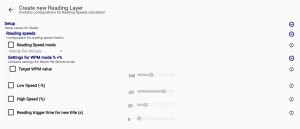
- Note – Not all Rules are editable – EG – some of the Language and character set Rules are fixed.
- By default none of the Rules are selected and the controls will be grey and disabled. To set a specific Rule in this Layer check the box next to the Rule, and the control will be enabled.
- Note: Only enable the Rules you want to set in the Layer. Often it is best to leave the default rules and only change those Rules where the default value is not what you want.
- Note: Because Layers are hierarchical it is possible to have two Layers of the same Type in a Profile with the second one overriding a single Rule in the first one.
- For example: You may have a Style Rule for Most Netflix content but when the language is Hebrew you need to disable italics and set QC warnings if italics is present. Rather than create a whole new pair of Editing Limit and QC Layers you can continue to use the general Netflix Layers but in the Hebrew Profile add Layers that override just the italics settings. This way you won’t have to maintain two or more complete Layers which are specific to different languages.
- Note: To see a description of each Rule hover over the icon and a detailed descripion wil pop up.
- Once you have set the Rules you need click Save As, and select either Companies Layers or My Layers, Folder and set a file name
- Note: You can’t save to the Systems Layers
- When you click Save you will see the Layer Configuration Dialog.
Profiles
A Profile consists of a number of Layers each of which defines a number of Rules that control how a text (Subtitles, Scripts or Transcripts) file will look and what QC checks will be applied to it. Layers are available for a range of settings such as Reading Speed, Timing, Style and Quality Control checks. See Using Layers for more detail.
Understanding Profiles
For most users the Profiles will have been created for you and you’ll never have to create or edit a Profile.
For Super Users and Project Managers this section describes how to create, edit and duplicate Profiles.
See Using Profiles for details on the application of Profiles in subtitling and script creation and QC.
Profiles are structured as a set of Layers each of which contain Rules that set the style, timing and QC rules for a text file. The order in which the Layers are loaded in the Profile sets the priority of each setting.
Priority Order
- Top – File Defaults – Some settings are set by the text file type and can’t be changed.
- EG 37 character line length limit in some subtitle file formats.
- Second – Settings in the Summary Layer
- NOTE: This Layer can only be set once the Profile is loaded in a Project for a specific text file and the changes are local to that Poject only.
- They are not stored as part of the Profile but are used to override the Profile in a specific Project.
- NOTE: This Layer can only be set once the Profile is loaded in a Project for a specific text file and the changes are local to that Poject only.
- Third onwards – Specific Layers as loaded in the Profile
- If there are two layers of the same Type (EG reading speed) then the Layer furthest tot he right in the Profile Manager display will take priority
- You can use the Order mode to change the order of Layers – see Creating a Profile.
- Bottom – System defaults
- If a Rule is not set at any higher level then the system default setting will be used.
You don’t have to define every Rule in your Profile by hand, often the system default values will be suitable, so just focus on the special Rules you need.
Creating a new Profile
You can create a new Profile from scratch, but often it is easier to Duplicate an existing Profile and then edit that to get the desired result. See Duplicating a Profile and Editing a Profile
- To Create a new blank Profile Open the Profile Manger and click New Profile
- This will open a New Profile with no Layers loaded.
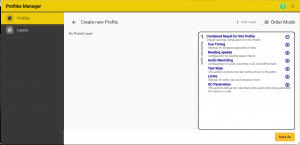
- The Summary Layer shows all the possible rules and will always show the current output value for each Rule.
- With no Layers loaded this will always show the system Default value for each Rule.
- You can now add existing Layers to the new profile
- Click on Add Layer
- You can now browse to see all the Layers in the Company and System Layers and select one to add to the Profile
- You can add System Layers, but you will not be able to edit them.
- When you add a Layer it will appear as a panel within the Profile view
-
- Move the mouse pointer over the available Layers to make one of them visible and editable
- .
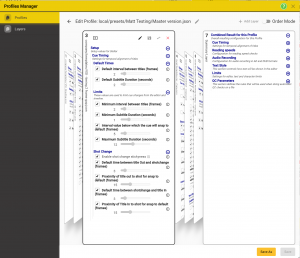
- .
- See Editing Layers within a Profile.
-
- Click on Add Layer

Changing the Layer order in a Profile.
- Because the order in which the Layers are shown in the Profile, from left to right, can effect the way the Rules are applied it is important to Understand Profiles.
- If the Profile only contains one Layer of each Type (reading speed, timing, QC etc.) then the order will have no effect because there will only be one definition of each Rule in the Profile.
- However if there are two Layers of the same type – maybe to override a setting in the first Layer – then the order of the Layers matters.
- To change the order of Layers in a Profile first open the Profile for editing in the Profile Manager
- At the top of the page select Order Mode to be on.
- You will now see the Layers in the Profile presented as a list
- Re Order
- Drag and drop Layers to change the order
- Delete the Layer
-

- Remove the Layer from the Profile
- The Layer will still not be deleted.
-
- Replace a Layer

- Replace the Layer with an alternative
- Open a browser to pick a different Layer
- Save As the Layer, including any changes made in the Layer view, and replace the current Layer with the new version.

- Save any changes as a new file and replace the existing Layer with the new version
- Opens a Save As browser to set the new filename and location
- Defaults to the same folder as the current Layer
- Add another Layer

- Adds a new Layer to the Profile
- The New Layer will be added at the highest priority Layer
- Opens a file selection browser dialog.
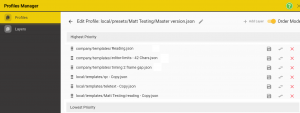
Editing a Profile
You can edit Company profiles and My Profiles (Local) but not System Profiles
- To edit a Profile open the Profile Manger, go to the Profiles tab, select either My Profiles or Company Profiles,
- Browse to find the Profile you want to edit.
- Click on the Edit pencil next to the Profile to edit
- This will open the Profile Editor.
- You can see all the Layers in the Profile with the lowest priority Layer on the left through to the top priority Summary Layer on the right.
- Note: The Summary Layer is always presnt and can’t be removed
- Note: You can’t change the Summary layer settings as these only apply when the Profile is assigned to a text file in a specific Project.
- Moving the mouse pointer over the Layers will bring each one into view in turn. This is how you select a Layer to be viewed or edited within a Profile.
Editing Options
- You have a number of options for editing the content of a Profile
- Add Layers – See Creating a Profile
- Edit the order of the Layers – this sets the priority in which Rules are applied – See Layer order in a Profile
- Remove or replace Layers
- At the top of each Layer there are a number of controls
-
- Note – Not all of the controls will be visible at all times, some only appear once you start editing a Layer
-
- Remove the Layer
-
- Click on the red cross button to remove the Layer from the Profile.
- The Layer will still be available.
-
- Replace this Layer with an alternative
-
- Click on the two arrows button to browse for a replacement Layer
- The Browser will open in the same folder location as the Layer being replaced.
-
- Edit the Rules settings in this Layer
-
- Click on the Pencil button to enable editing of the Rules.
- The Pencil will turn Yellow while editing is enabled
- Click the pencil again to disable editing
- Note – this does not save the edits.
- You can change any editable Rule – See Editing Layers.
- If you have made any changes the Layer number in the top left corner will change to red until the changes are saved
- If you try and leave the Profile editor you will be warned about unsaved changes.
-
- Save changes back to the same Layer
-
- Click on the black save button to save changes back to the same Layer
- You will be warned that changing a Layer will impact all Profiles that use the same Layer (if any).
-
- Save the edited Layer as a new Layer and replace the existing Layer with the new Layer
-
- Click on the grey Save button to make a new copy of the Layer and add this to the current Profile in place of the current Layer
-
- Abandon all changes since the last save
-
- Click on the black X button to abandon the recent changes.
-
- Reset the Layer to default values
-
- Click on the white X button to remove all edits from the current Layer and reset it to its default settings.
-
- At the top of each Layer there are a number of controls
Duplicating a Profile
Duplicating an existing Profile is often a good way of creating a new Profile, rather than starting from scratch.
For example if you have created a Profile for a client for content aimed at adults but now need a Profile for children’s content it is often easier to duplicate the adult version and then change just the reading speed layer for the children’s version.
When a Profile is duplicated you will normally keep the references to all the same Layers. So the new Profile will be identical to the original, and use the same actual Layers. When you edit the new Profile it is important to keep this in mind. You can use the ‘Copy layers to new locations’ options if you want to make a whole new set of separate Layers, but this option should be used with caution as it will result in large numbers of new Layers. Many of which will be identical to other Layers, so defeating the objective of reusable Layers.
- To duplicate a Profile open the Profile Manger, go to the Profiles tab, select either My Profiles or Company Profiles,
- Browse to find the Profile you want to duplicate.
-
- Click on the duplicate button next to that Profile
- This will open a file browser, select either Mu Profiles or Company Profiles and then choose where to store the new Profile and it’s name.
- Click OK
- This will open the profile Configuration dialog
- The Destination will be set to the one just chosen, click on the file browse button if you need to change this.
- Set an Name and Description for your new Profile
- Set the type of files this Profile applies to.
- This is used to filter the list of Profiles when adding the Profile to a specific text file.
- Copy Layer to new locations – this is an advanced option and is not normally required
-
- When you select this option you will see additional fields in the Profile Configuration dialog
- Select either Company Layers or My Layers as the destination for the new Layers
- You can’t select System Layers
- The Destination path and Name will default to the same as the source Profile, but with ‘-copy’ appended
- Click on the file browse button to change this.
- Select either Company Layers or My Layers as the destination for the new Layers
-
- Click on the Save As Profile button to create the Duplicate
-
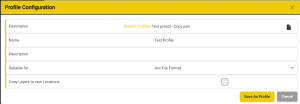

List of all QC Rules
Each of the Layer types has a specific set of Rules. Next to each Rule is am information icon ![]() .
.
If you haver the mouse pointer over this icon you will see a description of the Rule
Hint:
- Click on a + button to open a section
- Press Shift+ will open all the sub sections
- Press Shift+ on the top button will open every sub section
- Use Chrome’s find function (Ctrl+ F) to look for a specific Rule – EG search for ‘bold’ to find all runes for setting or testing for bold text.
Audio Rules Layer
Sets the Rules for recording audio for dubbing, audio description and voice overs.
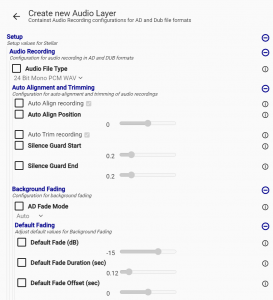
Reading Speed Rules Layer
Sets the rules for the reading speed of a subtitle file, or the speaking speed for an AD, VO or Dubbing file.
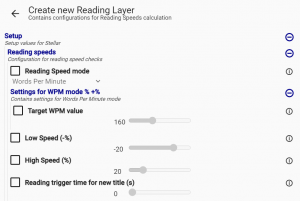
Subtitle Timing Rules Layer
Sets the Rules for the timing of subtitles, including minimums, maximums, gap times and shot change alignment.
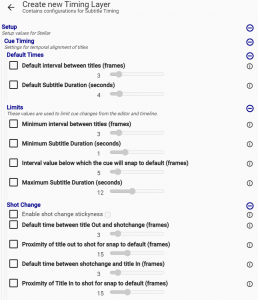
Text Display Style Rules Layer
Sets the Rules for how text can be presented in a subtitle including Fonts, text size and safe area.
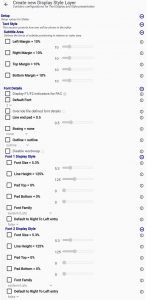
Text Editor Limits Rules Layer
Sets the Rules for how the text editor will behave including characters per row, number of rows, word wrapping and text styling.
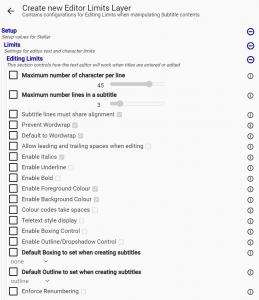
Quality Control (QC) Error and Warnings Rules Layer
Sets the Rules for all the tests that will e applied when Quality Checking a subtitle, AD, VO or Dubbing file.
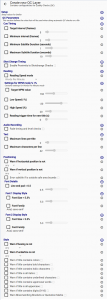
All Rules Combined in a Single Layer
All the Rules in a single Layer – Use when you only need one or two simple Profiles and don’t require the flexibility of multiple Layers
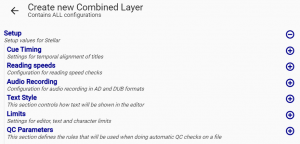
- Shown with all sections folded.
Version and Version History
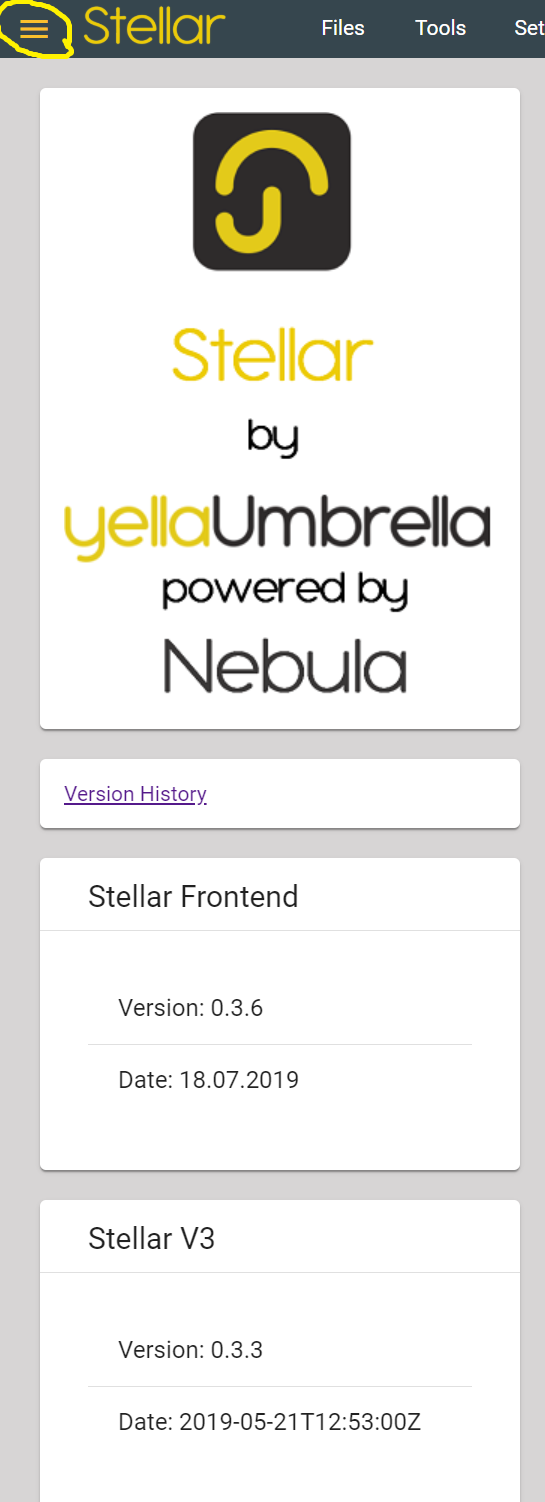
Click on the three horizontal lines at the left-hand end of the top bar to open the Version information sidebar.
- This displays the version numbers of the two main components of Stellar.
- Stellar Frontend is all the components running in the Chrome browser
- Stellar V3 is the Nebula Process running in your local Device.
- You will always automatically run the latest version every time you launch Stellar or just press the browser refresh button
- If in Doubt press Shift+ F5 and this will reload Stellar and clear the browser’s cache.
- For full details of the current version and previous version click on Version History to open the details in a new tab.
Rehearse Mode
Rehearse Mode provides a method of simulating playback of all timed items as they would be in the final version (broadcast or media file).
To turn Rehearse mode On or Off:
- Click the Rehearse Mode icon in the right hand section of the top menu bar
- Use F9 to toggle on and off.
The Rehearse Mode switch controls how the text and other data is displayed when the media time-code changes.
Rehearse Mode = Off
When Rehearse Mode is turned Off any change in the media time-code will not effect the view of the text.
- Subtitle column scroll position – no change.
- Subtitle column highlights – changes to show the current subtitle if in view.
- Subtitle timelines – change to show current time-code view.
- Transcription text – no change.
- Audio Description Text – no change.
- Audio Description Audio – played
- Audio Recording – enabled
- Secondary Audio Tracks – play in sync with main media, if not muted.
Rehearse Mode = On
When Rehearse Mode is turned On any change in the media time-code will cause the text and other media items to update:
- Subtitle column scroll position(s) – updates to show the Current or Next subtitle in the second row of each column.
- If text editing is active (click in a text box or press Tab) then that column will stop scrolling until text editing is stopped (click out or Esc)
- Subtitle column highlights – changes to show the current subtitle by making the outline Bold
- Subtitle timelines – change to show current time-code view.
- Transcription text – highlights each word in turn as it becomes the Current word.
- Audio Description Text – updates to show the current text item.
- Audio Description Audio – AD audio elements (if present) are played in synchronisation with the main media audio track.
- Audio Recording – Disabled
- Secondary Audio Tracks – play in sync with main media, if not muted.
Settings
By default Stellar will remember if you were in Edit Mode or Rehearse Mode last, and restart in that mode again.
If you want to force which mode Stellar starts up in you can define the start-up mode in the Media Control Widget settings.
Editing Text
Within any editable text box all normal editing controls apply. For a full list key combinations see the Hotkeys page.
Formatting, justification and vertical positioning controls are all available via Hotkeys.
Formatting, justification and vertical positioning controls are all available via Hotkeys.
All text editing is done in the subtitle box on row 2 of the selected subtitle column.
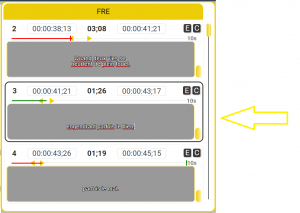
You can only edit text when there is a cursor in the text box. This prevent accidental editing of text at other times.
Note: The text (subtitle or script) file may have been set to either All, Read Only, Text and Times, Text Only, Times only or Comments Only to limit what can be edited by setting the Editability for a file or all files.
You can edit the text in All, Times and Text or Text only modes.
You can protect the text from accidental edits using the Protect Text mode.
To start editing either:
- Click in the text box you want to edit
- When you select a subtitle text box for editing by clicking in it that subtitle will move to position row two in the subtitle column
- Press Tab, this will position the cursor in the first position of the current subtitle box of the currently selected column.
To remove the cursor:
- Click out of the subtitling Widget
- Press Esc
If the Edit mode is set to Protect Text – you will have the option to enable text editing.
- When you click in the current title text box you will see a pencil icon the box.
- Click on the pencil to enable editing and a cursor will appear and the pencil will turn red.
- Press Esc or click out of the box to disable editing
Undo and Redo
There are two levels of undo within Stellar.
Undo last function – Ctrl+ Z.
- Undo most of the changes you can make in Stellar, including text, format, style, insert, delete, split and merge.
- Pressing Ctrl+ Z multiple times will step back through all the most recent changes. There is a limit of approximately 20 changes stored.
Redo last function undone – Ctrl+Y.

- After you have don an Undo, you may wish to Redo that change.
- Redo multiple Undos by repeatedly pressing Ctrl+Y. Tis will repeat until there are no more Undos to Redo.
Advanced Undo – Alt+ Z
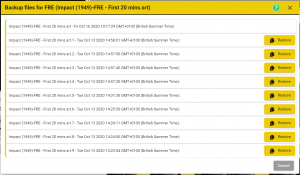
- Alt+ Z pops up an list of the most recent backup versions of the file you are working on.
- These versions are stored automatically whenever a change is made. (Save, Insert, Delete etc.)
- Each text file has its own, separate, set of backups.
- Each version has a timestamp so you can see how long ago it was saved.
- The most recent backup is at the top of the list
- Clicking on one of the Restore buttons will load this version of your work
- The previous current version will become a new Backup with the current time
- The (up to) 10 most recent backups are kept, anything older will be lost permanently.
Editing Time-codes
There are several widgets that have editable time-code displays. These include the master media time-code, subtitle In and Out times and AD times.
Wherever the time-code can be edited or updated the key combinations are the same. See the Time-code Editing section on the Hotkeys page.
Capturing and Editing Timecode in Subtitles, Captions or AD Text.
Every timed text element has at least one time associated with it, for subtitles and captions there will be an In and an Out time while a timed word list will have a time for each word.
For Subtitles, Captions and AD text the times can be captured from the video based on the current timecode by a single hotkey combination. See the Capture Timecode commands on the Hotkeys page.
Timecodes can also be edited via the keyboard or the mouse, for full details see the Timecode Editing section of the Hotkeys page.
Example:
Editing a timecode with the mouse
- Click once in a subtitle timecode to select it for editing – If the subtitle file or the whole subtitle editor is set to Read Only, Comments only or Text only editing you will not be able to select the timecode.
- Press Tab to step between the text, the in cue and the out cue
- One section of the timecode will be highlighted blue – normally the frames.
- With the mouse pointer over the blue area the mouse wheel and the arrow keys will change the value up or down.
- use the left and right arrows or click on a different section of the timecode to select that
- .
- Now the mouse wheel and the arrow keys will change the minutes value.
- You will not be able to make the duration less than zero or to make the In or Out times overlap the neighbouring subtitles.
Editing a timecode with the keyboard.
- Start with the cursor in the text area of the subtitle you want to change the times on by clicking in the box.
- (Tip: Pressing the Tab key will always move the text cursor to the start of the second text box in the active text column when there is no cursor active.)
- Pressing Tab will move the focus to the In time.
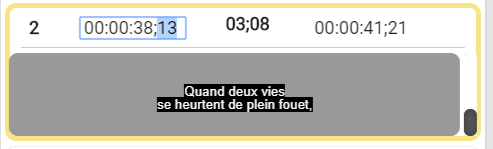
- Pressing it again will move to the Out time.
- (Shift Tab will select the Out time first, then the In time).

- Timecodes can be changed either by using the up and down arrow keys or by entering a new 2 digit timecode.
- Enter accepts the new time, Esc abandons the change.
- Left and right arrow keys move between the timecode sections.
Editing Timecodes on the timeline.
You can use the timeline display to move subtitles relative to other subtitles.
See the TimeLine Widget section here for full details Hotkeys page.
Drag a single subtitle
- You can move one subtitle at a time by placing the mouse pointer over the subtitle you want to move on the timeline
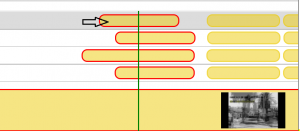
- Hold down the Shift key and the left mouse button and drag to move the subtitle (Shift+Click+Drag). Both the In and Out times will change to move the subtitle but keep the duration the same.
- You can’t move the subtitle past either the Next or Previous subtitle.
- For more details on editing subtitle timing on the timeline see the Edit TC on Timeline Section
Protecting your work – Read Only and other protected modes.
There are two levels of protection for you work in Stellar:
| Edit Mode | Edit Text | Edit Times | Edit Comments | Insert, Delete, Split, Merge | Dubbing Script Adaptation editing | Protected Text mode available |
|---|---|---|---|---|---|---|
| All | Yes | Yes | Yes | Yes | Yes | Yes |
| Text and Times | Yes | Yes | Yes | Yes | Yes | |
| Text Only | Yes | Yes | Yes | Yes | ||
| Times only | Yes | Yes | No | |||
| Comments only | Yes | No | ||||
| Read Only | Yes | No |
- File Level
- In any Project every Text file (subtitles, scripts etc.) can be set to one of 6 protection levels:
-
- All – Full editing allowed
- Times only – use when adjusting the timing or conforming a file so the user can’t edit the text by mistake
- Times and Text (but not Insert, Delete, Split or Merge) – limits the level of editing available
- Text – Only text content and comments (but not Insert, Delete, Split or Merge or text style) – ideal for translators working from a template
- Text, Style and Position – Text, text styles (colours, italic…) and position (horizontal and vertical) can be edited
- Comments Only – Great for getting feedback from clients.
- Read Only – Nothing can be edited – Great for reference files that shouldn’t be changed – EG original language ‘templates’.
-
- In addition in any mode where the text could be edited you can set Text Protect mode on so that you need to take a deliberate action before editing any text.
-
- This is useful when doing QC or when recording an AD or Dubbing script for example.
-
- In any Project every Text file (subtitles, scripts etc.) can be set to one of 6 protection levels:
- Layout level
- you can create a Layout with a set level of protection for all Text files (subtitles, scripts etc.) loaded.
- This is useful if you want to create a QC layout where the user can only add comments or a Conform layout where the user can change timecodes but not text.
- you can create a Layout with a set level of protection for all Text files (subtitles, scripts etc.) loaded.
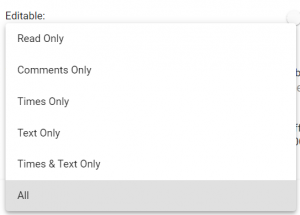

To set File Level protection
- In a specific Project either:
- Go to the Files, Project, Properties dialog and select the Text file you want to change the properties for
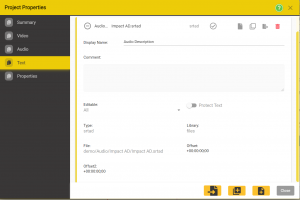
- And use the Editable dropdown
- OR – click on the three line button in the Text column tab

- and select Properties

- And use the Editable dropdown
- Go to the Files, Project, Properties dialog and select the Text file you want to change the properties for
To Set Layout level protection
- Right click anywhere in the text editor widget and select Settings.
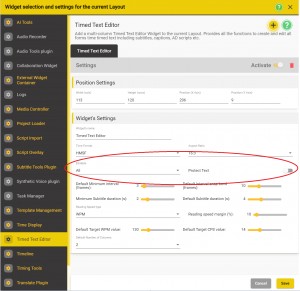
- And use the Editable dropdown
- Don’t forget to Save you changes to the Layout
The Default setting for all protection options is All.
If you combine both File Level and Layout level protection then the highest level of protection will apply to each file.
- EG: If the a File is set to Text and Times and the Layout is set to Comments Only then you can only edit comments in that file.
Protected Text Mode
In addition to setting the Editable level for a file or in a Layout you can enable Protect Text Mode.
- When Protect Text mode is enabled any editable mode that allows text editing (All, Times and Text, Text Style and Position or Text Only) will add an additional level of protection.
- When you click in a text box that has Protect Text enabled you will see a Pencil icon.
- You can’t edit the text in this box unless you first click on the pencil.
- Then the pencil will turn red and a red outline will show around the text area and you can now edit the text.
- To stop text editing either press Esc or click out of the text box.
- When you click in a text box that has Protect Text enabled you will see a Pencil icon.
- Protect Text mode will be enabled for a File if it is set On for either that file or in the current Layout.


There is a Protect Text switch beside the Editable control both for each Text file and for the Text Editor Widget.
Reading Speed Indicators
Each text box in the Subtitle Editor has a Reading Speed Indicator above the text box.
The black triangle markers show the range of acceptable reading speeds based on the current text, the timecode duration and the configured reading speed.

If the reading speed is within the markers the timebar will be Green
If the reading speed is too fast or to slow the timebar will fall outside the markers and be Red.
The small vertical line (green) indicates the In time of the next subtitle and so the limit to which the out time of the current subtitle can be set.
The Reading Speed value is configured in the Settings Template.
Comments
There are several places where you can add comments and notes to your work. This text is separate from the subtitle text and is not visible outside of Stellar. You can use comments to make notes on a specific file or an individual subtitle.
File Comments
File comments can be added and edited in the Project Properties screen.
Note: These comments are stored as part of the Project file as most subtitle file formats do not support file level comments. If you open the same file in a different Project the comments will not be visible.
- Select Files, Project, Properties from the main menu
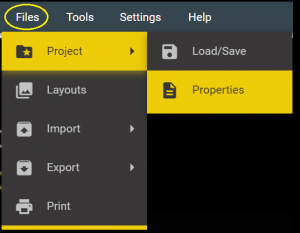
- Select the file you want to add comments about and click the down arrow to show the file properties.
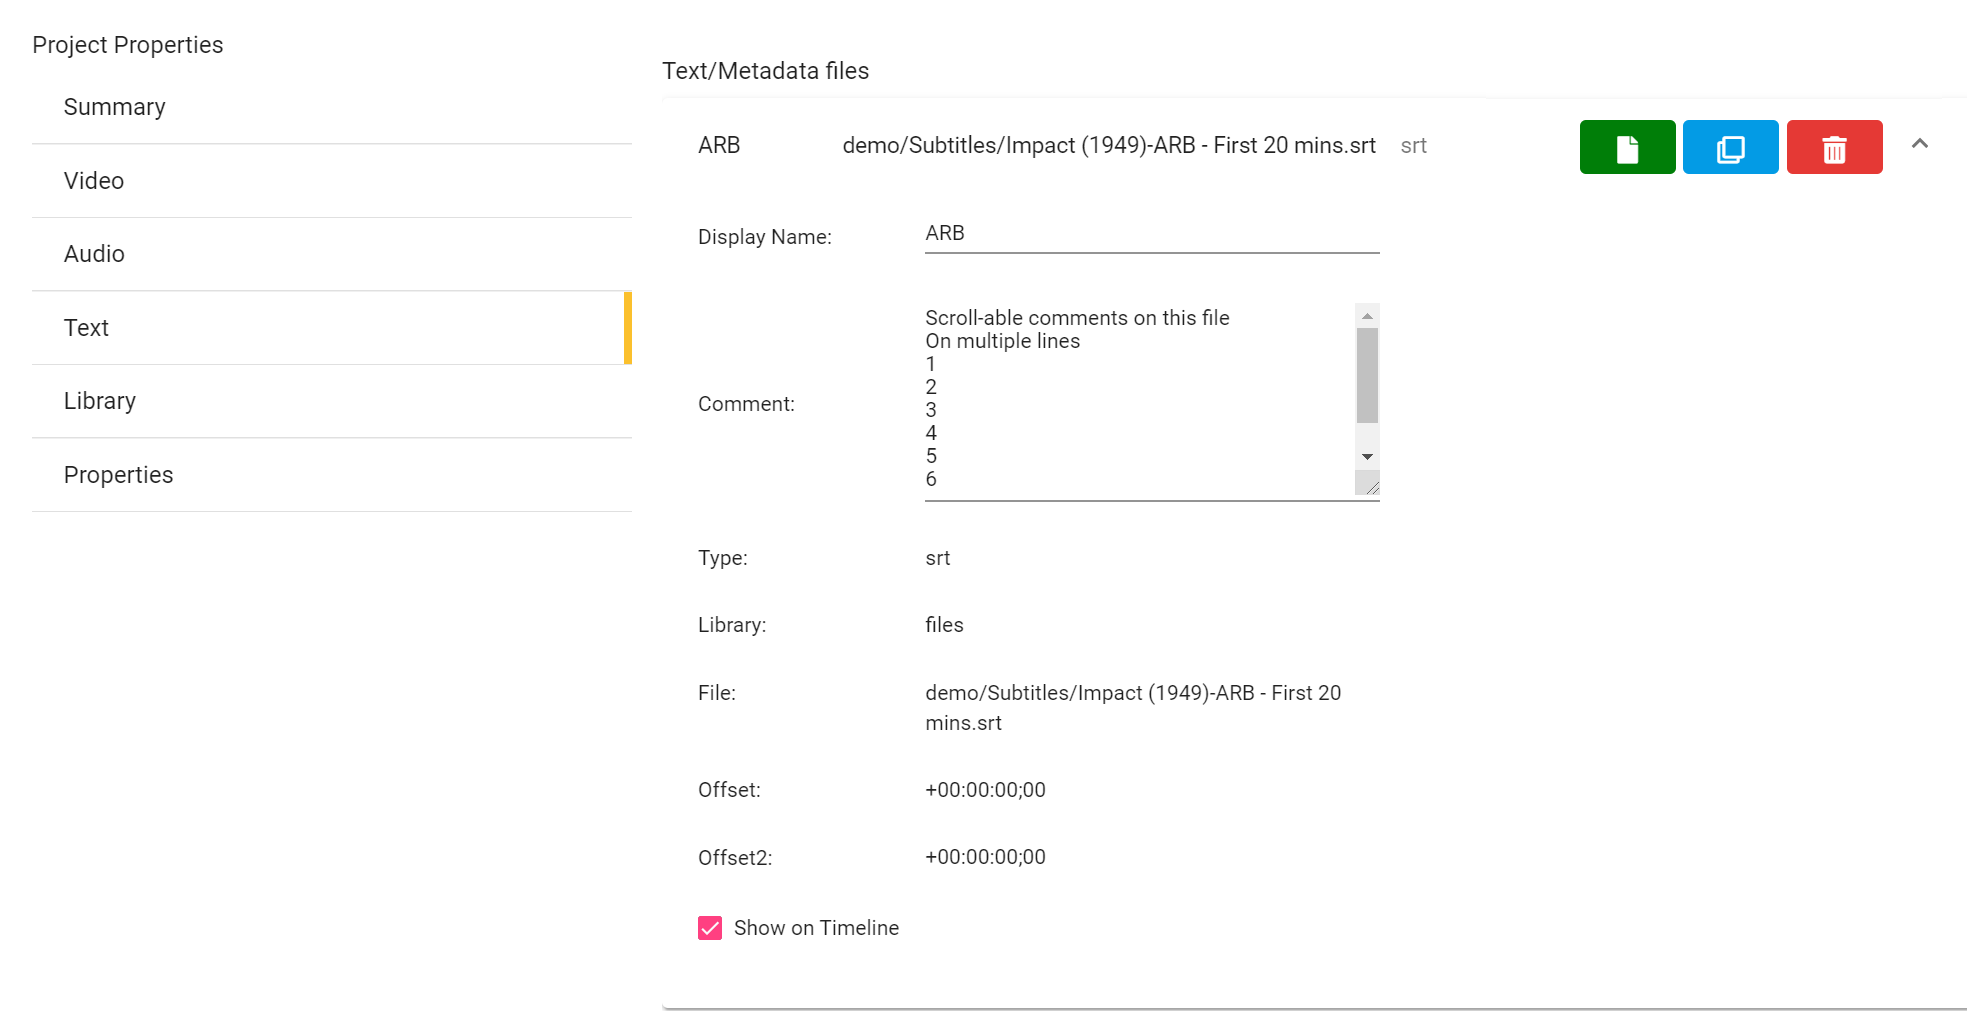
- Add comments in the Comment section.
- You can expand the comments text box by dragging the bottom right corner.
Subtitle Comments
You can add comments to each subtitle (caption, AD Script sections etc.).
Note: Subtitle comments are only supported in some file types. Where supported the comments are part of the subtitle file and will move with the file. If the subtitle file is opened in a different Project the comments will be visible.
- To add a comment to a subtitle click on the C icon in the top right corner of the Subtitle box.
- Hotkey:- Ctrl+ Q
- This will open a text box below the main subtitle box.
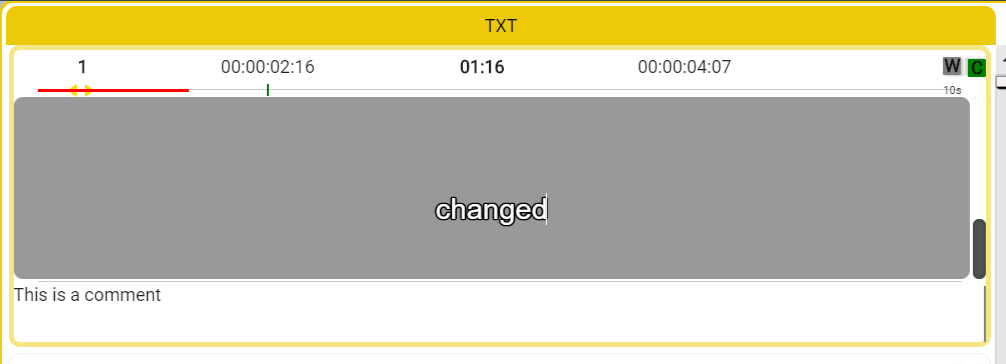
- Enter comment text
- Clicking on the C button again will close the comment box
- If a comment is present the C icon will be yellow
- There are shortcut keys to jump to subtitles with comments
- See: Hotkeys page.
Spelling and Grammar checker and Thesaurus
There is no spelling, grammar or thesaurus functions built into Stellar. Instead we use a range of very powerful plug-ins for the Chrome browser or the native Chrome spell checker.
These are very comprehensive and allow you to select only the functions you require.
To add one or more of these plug-ins just follow the links below and then the instructions on that site, it’s very easy.
Once installed you will see icons in the top right section of the address bar of the Chrome browser. Clicking on each allows you to configure how they work.
Each of these plug-ins has it’s own configuration settings so you can tailor the operation to your requirements. For example in the grammar plug-in you can turn off first word capitalisation as you don’t always want the first word of a subtitle to be capitalised.
You can manage all the settings as well as enable and disable the plug-ins by using the Chrome extensions manager.
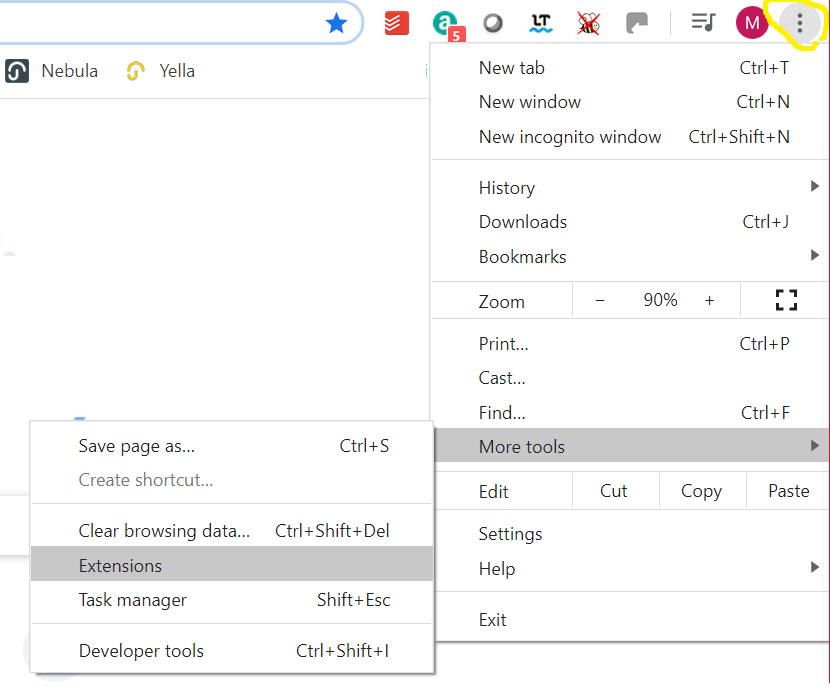
Click on the three dots icon in Chrome and select More Tools, Extensions.
This opens a tab and shows all the extensions you have in Chrome, including any of the Spelling, Grammar or Thesaurus you have loaded.
Tip: If you use the default Chrome spell checker this will show a red underline below any miss spelt words. To access alternative spellings Ctrl+ Right Click in the word will show the options provided by Chrome.
Splitting and Appending Text Files
To either split one text fiel into two separate text files, or to join two text files into one, use the Append Split menu option.
Either from the Tools menu select Append/Split
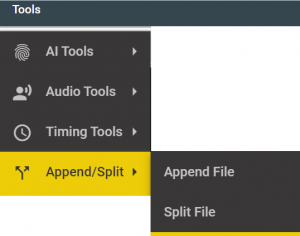
Or right click on the top of the text volume you want to split or append to, and select Append/Split
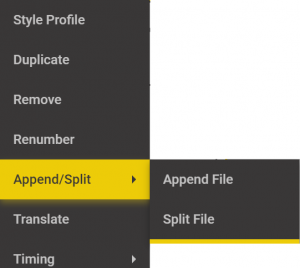
All text files must already be part of the current Project, so you may need to add the correct files first. See – Adding Files to the Project
Splitting a Text File
Splitting a file will create two new files, Part 1 and Part 2. The original file will be unchanged.
Timecodes:
- The timecodes in the two files will be unchanged.
- – EG: If you have a subtitle file containing 200 titles, and split it before title 101 with Title 101 starting at 00:30:00:00.
- – Then the new Part 1 file will contain subtitles 1-100 starting at timecode 00:00:00
- – and the new Part 2 file will contain titles 101 to 200 starting at timecode 00:30:00:00
- If you want the second file to start at (say) 00:00:00:00 then you will need to Recut the file
- First select the file to be Split and select the Subtitle you want to be the first title in the new Part 2 file – the split point
- Select the Split File Option.
- This will open the Split File Dialog
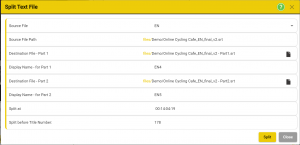
- Source File:- Set the file to be split
- Will default to the currently selected text file in the Project (if more than one).
- Use the dropdown to select a different file.
- Source path:- The location of the source file – Read Only
- Destination File – Part 1:- sets the location and file name of the first file.
- Defaults to the same location and file name as the source file with ‘-part 1’ added to the file name.
- Display name – for Part 1: Sets the name to be displayed at the top of the text column for the new Part 1 file
- Destination File – Part 2:- sets the location and file name of the second file.
- Defaults to the same location and file name as the source file with ‘-part 2’ added to the file name.
- Display name – for Part 2: Sets the name to be displayed at the top of the text column for the new Part 2 file
- Split at: – Sets the timecode at which the file will be split.
- You can change this time either by editing the timecode numbers or use the Alt+ Scroll wheel or Alt + Arrows keys to control the video position.
- Hint:- work in Rehearse Mode (Press F9)
- You can change this time either by editing the timecode numbers or use the Alt+ Scroll wheel or Alt + Arrows keys to control the video position.
- Split Before Title Number – Read Only – Shows which subtitle will be the first title in the new file.
- If the source file is an AD or Dubbing file then there will be the option to copy some or all of the audio files along with the new text files.
- Note: If copying audio files, the destination must be a separate folder from the original file folder.
- None: – do not copy any audio files. The new files will be scripts only.
- All:- Make a copy of all the audio files, both muted and unmuted
- Active:- Copy only unmuted audio files
- Mixed and Trimmed:- Take all active audios, trim the wav file to match the trimmed size in Stellar and if two or more audios for a title, mix into one.
- This option is required if the output format is ESF, as this format can’t support untrimmed and unmixed audios
- Note: If copying audio files, the destination must be a separate folder from the original file folder.
- The two new files will be added to the current Project.

Appending one Text File to another.
Appending two text files will create a single new text file. The original files will be unchanged.
Timecodes:
- If the timecodes in the two files don’t overlap then the timecodes will be unchanged
- – EG – Part 1 starts at timecode 00:00:00:00 and ends just before timecode 00:30:00:00 while the second part starts at 00:30:00:00 and ends at 00:59:59:20
- – Then the new file will contain all the titles from 00:00:00:00 to 00:59:59:20
- If the timecodes in the two files do overlap, then the second file will be offset to start just after the last title in the first file.
- – EG – Part 1 starts at timecode 00:00:00:00 and ends just before timecode 00:30:00:00 while the second part starts at 00:00:00:00 and ends at 00:29:59:20
- – Then the timecodes from File 2 will be offset by about 00:30:00:00 so the new file will contain all the titles from 00:00:00:00 to 00:59:59:20
- – but you will need to check and possibly offset the times of the subtitles after 00:30:00:00
For example: If you have two subtitle files, each containing 100 titles, you can append one to the other to create a new file with 200 titles.
- Select the Append File Option.
- This will open the Append File Dialog
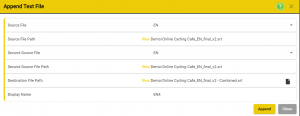
- Source File:- Set the first file to append to.
- Will default to the currently selected text file in the Project (if more than one).
- Use the dropdown to select a different file.
- Source File Path:- The location of the first source file – Read Only
- Second Source File:- Set the file to append to the first file.
- Will default to the first unselected text file in the Project.
- Use the dropdown to select a different file.
- Destination File Path:- sets the location and file name of the new combined file.
- Defaults to the same location and file name as the source file with ‘combined’ appended to the file name.
- Display name: Sets the name to be displayed at the top of the text column for the new combined file
- If the source files are AD or Dubbing file then there will be the option to copy some or all of the audio files along with the new text file.
- Note: If copying audio files, the destination must be a separate folder from the original file folder.
- None: – do not copy any audio files. The new files will be scripts only.
- All:- Make a copy of all the audio files, both muted and unmuted
- Active:- Copy only unmuted audio files
- Mixed and Trimmed:- Take all active audios, trim the wav file to match the trimmed size in Stellar and if two or more audios for a title, mix into one.
- This option is required if the output format is ESF, as this format can’t support untrimmed and unmixed audios
- Note: If copying audio files, the destination must be a separate folder from the original file folder.
- The new combined file will be added to the current Project.
Fonts
Fonts are used in subtitling to simulate the output the viewer will see. In most cases the font used in the subtitling tool is not directly used to generate the output text seen by the viewer. However it is important that the same style and size of font are used when creating the subtitles to make sure that the final output will have text of the right size in the correct position.
In Stellar the Fonts you can use are stored centrally, either as System Fonts available to all Stellar Users or as Company Fonts provided by the Company you are working for.
There is no requirement to load Fonts onto your Mac or PC.
If either the System or your Company Fonts have been set up for you, you don’t need to make any changes to the Fonts available.
All System Fonts are supplied under licence conditions that make them free to use for commercial purposes and for producing output images in media files.
Using Fonts
In most Subtitle files two fonts are assigned – Font 1 and Font 2. These are used to support different Scripts (Latin, Cyrillic, Greek, Arabic, Japanese) and to mix two different scripts (EG Latin and Arabic) in the same subtitle file.
You can select between the two available Fonts in the subtitle editor by using the Format toolbar (Right click in the text area) or Alt+F

Fonts Manager
If you do need to add or change the fonts available you need to use the Fonts Manager on the Settings menu.
- If you don’t see the Fonts Manager you may need to select a different Layout, or add the Fonts Manager Widget to the current Layout.
- Select System Fonts and the default set of Fonts will be listed.
- To see information about the font click on the + icon next to the Font
- Fonts can be made up of one or more Font Files which may be used to add Bold, Italic and other style variations. Often there will only be a single Font File and Stellar will create Bold and Italic variants from the regular style.
- To see any additional Font Files click on the eye icon.
- And this will list the Font Files
- Click the + icon to see more details about the individual Font File
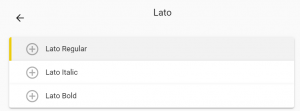
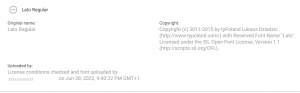
Adding Fonts
You can only add new Fonts to the Company Fonts set, and only if you have suitable Manager or Admin level privileges.
Fonts must be in either .TTF or .WOFF2 format.
Note: Not all .TTF fonts are suitable for web use. Stellar will warn you if the file you have selected isn’t suitable.
Before you can add a new Font you must find or download the font file and make sure that the licence terms for the font allow you to use it as you intend.
IMPORTANT:- Font licencing is your responsibility.
- Open the Fonts Manager dialog.
- Select Company Fonts
- Click on New Font
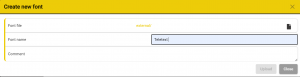
- Browse to find the .ttf file for your new font.
- Add a Font Name – this is the name the font will be shown as in Stellar
- Add any comments about the font if required
- Click Upload
- You will be asked to confirm that you have the necessary licences to use this font.
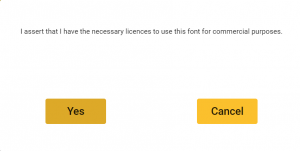
- If you have then click OK
- If you click Cancel the font will no be upoaded
- The Font will now be shown on the Company Fonts List
Printing and Previewing
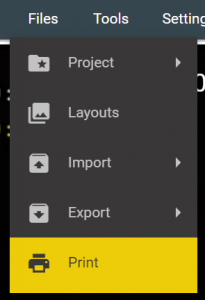
Select the Print option from the Files menu on the top bar.
You can print text files to screen and then print to paper as required.
You can preview text files over video (with limited text styling support).
Selecting Print will display a new tab showing all text files in the current Project.
Click on one of the text preview links to view a printout style.

Click on one of the video preview links to view the text over the video. (Note: the text styling will not be an exact representation of broadcast output styles).
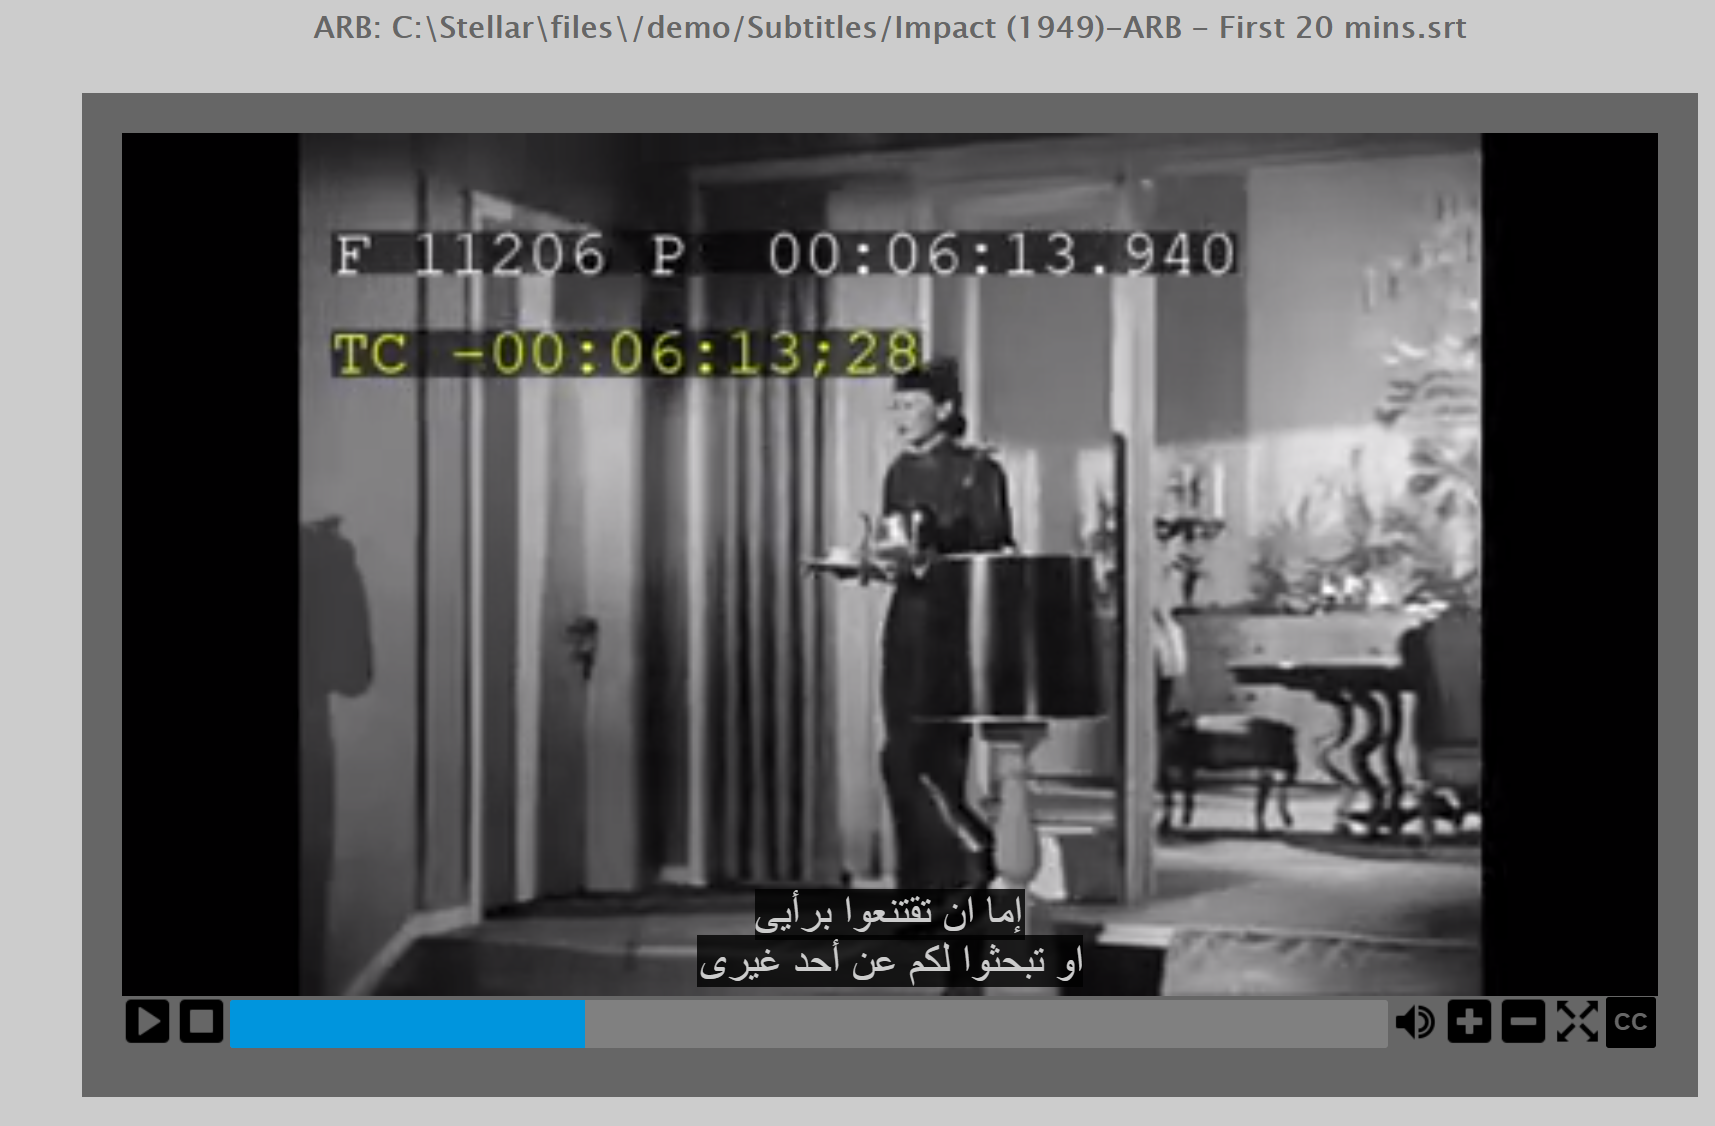
Widgets
In Stellar the controls you see are made up of a number of Widgets; for example the Video Display Widget, The Media Controller Widget and a Timed Text Editor Widget. You can store and retrieve any number of Layouts, each with different Widgets with different sizes and positions on the screen. So for example you could have a Layout for Subtitle authoring with just the basic Widgets (Video and a single text column) and another one for multi language QC with Video, Multi columns of text, timelines and translation Widgets.
Widgets come in different types, some provide a new control or display like the Video Widgets, others add just a new menu item like some of the AD Tools Widgets.
See the section on Selecting Widgets for more information.
Below are details of all the major Widgets:
Video Display Widget
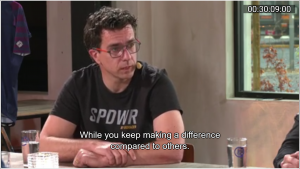
The Video Widget is the display container for all video (and audio) media. In normal operation you would only configure a single Video Widget in your layout. The video will be automatically scaled to fit inside whatever size you chose for your video display but the aspect ratio of the video will always be maintained so you may get black boarders in some cases. You can always resize the widget to match the current video’s aspect ratio.
Note: You must also have a Media Control Widget to be able to control video playback.
Controls:
There are only a few direct controls on the Video area itself.
Click to Play
- If enabled (see Widget Settings below) clicking the mouse with the pointer inside the video area will play or pause the video
Full screen mode
-
- Zoom just the video area to fill the screen (still within the browser frame)
- Toggles between zoom and normal
- Hotkey – F10
- Hint – to get a full screen view also zoom the browser to full screen mode – F11

Settings:
The Video Display has a number of settings that control how the video is displayed and controlled.
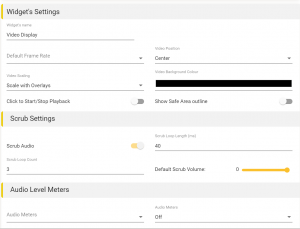
Widget Settings:
- Default Frame Rate – Set the frame rate to use for the video.
- Only used if there is no frame rate information in the video file loaded
- Set to your most commonly used frame rate
- Video Position – set the bias location for the position of the video inside the Video Widget window.
- Because the video widget can be any size or aspect ratio the video will be positioned inside this window depending on this setting and the Video scaling setting.
- The actual video image will always maintain the correct aspect ratio.
- Scale to fit – Sets how the video image is scaled inside the Video Widget window.
- Scale to fit – will maximise the size of the video inside the widget window while maintaining the correct aspect ratio.
- Scale with overlays – will scale the video to allow space on all four sides for overlays, while maintaining the correct aspect ratio.
- See the Script Overlay Widget for more details on overlays.
- Video background colour – sets the colour of the area not covered by the video image
- Set to any colour except black to make the video image size clearer.
- This is especially useful if the video image itself has black sections (e.g. letterboxed).
- Set to any colour except black to make the video image size clearer.
- Click to start stop playback – Clicking in the video image can control Play/Pause and other play modes.
- If you don’t want this feature turn it off here.
Scrub Settings:
- Scrub audio – enable or disable audio scrubbing
- Scrub loop length – Set the time, in milliseconds, for each section of scrub audio to play
- Scrub loop count – set how many times the scrub audio is played
- Default scrub volume – sets how loud the scrub audio will be.
- 0 is 0dB and the scrub audio will be the same level as the program audio.
- Note: you can mute and change the scrub audio volume by using the Volume Manager Widget
- 0 is 0dB and the scrub audio will be the same level as the program audio.
Audio level Settings:
-
- Audio Meters – controls the presence and style of audio VU meters
- These show the levels of the program audio as a graph in the video widget
- Select Stereo or eight channel.
- Audio Meters position – Enable and position the audio meter
- Select between Off, Left or Right.

Overlays.
The Video Display Widget supports a number of optional overlays. The overlays available will depend on what other widgets are loaded as much of the overlay content (EG Timecodes) are supplied by other Widgets.
To configure an available overlay right click in the video area and select from the available Overlays:
Audio Levels:
- Set the type and position of the Audio Meters
Script Overlay – AD and Dubbing text overlay.
- See the Script Overlay widget for full details.
Show Safearea
- Enable or disable the safe area outline over the video.
- If On then a feint box will show over the video indicating the safe area configured for the current subtitle file.
- Not shown if the file type is an AD or Dubbing script
- The size of the safe area is set in the Profile set for the current subtitle file.
Audio level meters

- Set the Audio Levels Overlay to On or Off
- Set the Audio Meters to Stereo or Eight channel
Conference intercom controls

- The three controls provide a simple method of controlling the intercom when this is enabled.
- The circle shows the state of the intercom:
- Red – No connection
- Dark Green – connected but no speech detected
- Light Green – connected and speech detected
- The Microphone shows if your intercom microphone is muted or not
- Click on the button to mute or unmute your microphone.
- Note: The intercom microphone may be different from the Audio Recording microphone, depending on your configuration.
- The Speaker shows if the intercom audio is muted or unmuted.
- Click on the button to mute or unmute the intercom
- Note: If muted you won’t hear anyone speaking, however the green connected status icon will show if there is someone talking by flashing light green.
Time Display:
- One or more timecode overlays can be shown over or above the video
- If more than one Timecode Widget is loaded then more than one timecode overlay can be shown.
- Hint: This is useful if you want to see the timecode in more than one format. EG. hh:mm:ss:ff and Frame count.
- If more than one Timecode Widget is loaded then more than one timecode overlay can be shown.
Edit Text Over Video
You can configure Stellar to support subtitle text editing over the video.
The simplest way to do this is to load the Classic subtitling Layout from the Systems Layouts.
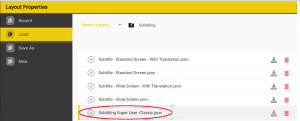
The Classic Layout emulates the look and feel of older subtitling systems.
Hint- Use one of the alternative Hotkey Maps make the Stellar controls similar to subtitling software systems you have used before.
Context Menu:
Right click in the video area to show the context menu:
-

- Video properties – display the video properties section of the Project Properties dialog.
- Video timecode – Set the correct timecode for the video using the Set Video Timecode dialog.
- Video Preview – show the video print output for the currently selected text file
- ASR – Open the Automatic Speech Recognition (ASR) control dialog to extract the text from the soundtrack of the current media.
- Overlays – See the list of available overlays and control their settings.
- Widget Help – Open a new tab with the help section for this widget
- Settings – Open the settings dialog for the Video Widget
Hotkeys:
Toggle full screen mode – F10.
Mouse Actions:
Click in video area – Play / Pause
Shift+ Click in video area – Play reverse/Pause
Alt+ Click in video area – Play in review mode/Pause
- Review mode skips over gaps between titles
- Useful for reviewing a file with long gaps between subtitles or AD sections or reviewing a single Role in a Dubbing file.
Alt+ Shift+ Click – Loop play/Pause
- Plays the current title in a loop with a small amount of pre and post roll.
- Useful for reviewing AD and Dubbing titles
- Note: you can adjust the audio level during playback to set the required level.
Right Click – Show context menu
Alt+ Right click in widget area – Open widget specific Settings dialogue.
Set Video Timecode
One of the first tasks when you set up a new Project is to make sure the timecode used matches the video timecode.
When a Media file is imported Stellar will try and work out the timecode in the file and to detect any pre-roll (colour bars and slates).
If you need to do this manually use the Set Video Timecode control.
- First move the video to show the first frame of Active Video
- The first frame after any colour bars or information slate, then:
- Either
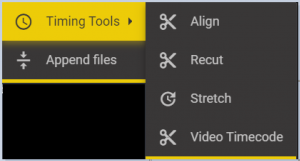
- Select the Video Timecode option from the Tools, Timing Tools menu
- Or
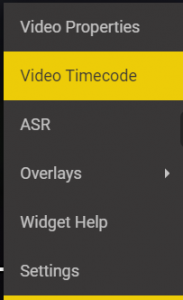
- Right click in the video area and select Video Timecode.
-
- Required Timecode for first frame – Select the correct timecode for the fist frame of active video.
- Set the frame rate if you know it.
- Offset 1& 2 – calculated based on the video time and the required time.
- Capture offset 2 from video position – if ticked then offset 2 will be calculated to allow for any slate or colour bars on the front of the video file.
- Change text file offsets – Select if you want to change all Text files in the Project to match the video timecode.
- Summary area – Shows what values will be applied when you click on the Set button.
- Hint: While this control is open, you can still use the video controls
- Hotkeys – try single step and see the offset values recalculate
- Mouse control – move the mouse pointer outside of the control so it is over the video and try using the scroll wheel. This will step the video and the offsets will update.
- This is very helpful wen setting the first frame of active video.
- Hint 2: Us any burnt in timecode as a reference, if present.
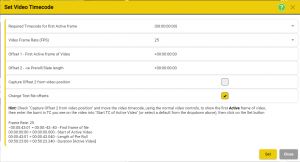
Script Overlays Widget
The Script Overlay Widget adds a range of functions used when recording AD or Dubbing audio.
The script text (Lines) can be shown in three different styles either over or below the video.
Wipe Mode for AD Text:
- Select Wipe mode in the Select Display Style control.
- When an AD file is loaded and selected the AD text will be displayed over or under the video
- Select the first AD Text element by clicking in the first text box in the script
- This will show the text in the video window with a count down timer, either digital or analogue style.

- A colour wipe will move across the text to show the correct reading speed.

Scrolling for Dubbing Rythoband:
- Select Scrolling mode in the Select Display Style control.
- If a specific Role is selected then only this Role will be shown on the top row of the Rythmoband

- You can select the text size and the number of rows on the Rythmoband in the settings.
Static text display – alternative to Wipe for AD recording.

- Select Static mode in the Select Display Style control.
- Static mode displays a static block of text with no Wipe.
- Uses a Moving Line timer mode for an alternative lead-in and progress display
AD count down timer
- For either the Wipe or Static text modes you can add a count down timer
- Select either None, Pie or Numbers in the Countdown Style control.
Settings
You can access the Settings for this widget by either:
- Right click in the video area and select Overlays – Script Overlay – Settings
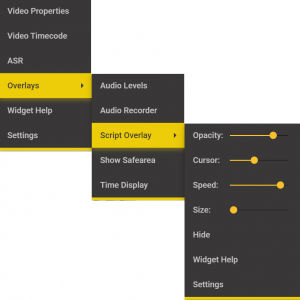
- Or – Go to Settings on the top menu
- Select Widget Settings
- Select Script Overlay
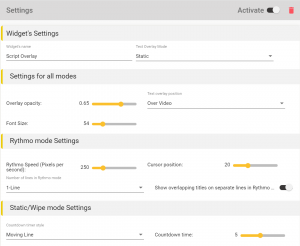
-
Widget Settings
- Widget name – The name shown on the video context menu – you can change the name.
- Text Overlay Mode – Select which style of overlay you want
- Default – will set the overlay type depending on the current text file selected
- Subtitles – normal subtitle text overlay
- Audio Description – Wipe mode
- Dubbing – Scroll (Rythmoband) mode.
- Scroll – Rythmoband mode
- Wipe – Text wipe mode
- Static – Static text with no wipe.
- Default – will set the overlay type depending on the current text file selected
-
Settings for all modes
- Overlay Opacity – set how dark the background is.
- Font Size – Sets the size of the text displayed
- Text overlay position – Sets where in the video widget the text block will be displayed.
- Over Video – The text block will show over the top of the video in the lower third.
- Note: In Wipe and Static modes large blocks of text will extend up the screen and may even be too big to display.
- Try splitting large text blocks into smaller chunks.
- Note: In Wipe and Static modes large blocks of text will extend up the screen and may even be too big to display.
- Under the video – The text block will show below the video.
- Note: in Wipe and Static modes large blocks of text will extend up the screen and may even be too big to display.
- Try splitting large text blocks into smaller chunks.
- Note: Depending on the aspect ratio of the video, the size of the video widget and the Video Scaling setting (in the Video Widget) the text may cover part of the video.
- Note: in Wipe and Static modes large blocks of text will extend up the screen and may even be too big to display.
- Over Video – The text block will show over the top of the video in the lower third.
-
Rythmo mode settings
- Rythmo speed – sets the speed the Rythmoband moves by changing the horizontal size of the text.
- Number of lines in Scroll (Rythmoband) mode – Sets on or two line mode
- In one line mode all Roles (characters) are shown on a single line
- In two line mode the currently selected Role is always shown on the top line and all other roles on the second line
- If all Roles are selected the Roles will be shown with the best fit available.
- Cursor position – sets how much lead-in time you see on screen by moving the Reading Cursor (green line) position
-
Static/Wipe mode settings
- Countdown style – sets the countdown time type for Wipe and Static modes
- None
- Numbers – numeric count down – Will also count down remaining time once the start time is reached
- Pie – a Pie graph style countdown clock – Will also show remaining time once the start time is reached.
- Moving Line – a line that moves from left to right across the text box to show lead-in and reading progress.
- Count Down timer – Set the duration of the countdown you want, in seconds
- Default 5 seconds
- Overlay Opacity – sets the level of background transparency for the text overlay
- Note: You can also adjust this from the context menu in the video area
- Move the Opacity slider to change the level of opacity.
- Note: You can also adjust this from the context menu in the video area
- Cursor Position – sets the position of the vertical green cursor in the Scroll (Rythmoband) mode
- Can be set between 20% and 50% of the rythmoband width.
- Note: You can also adjust this from the context menu in the video area
- Select Cursor Position and use the slider to move the cursor as required.
- Speed – Rythmoband only
- Sets the speed at which the text moves across the screen, in pixels per second
- Size – Sets the vertical size of the text in the overlay
- Hide – hide or unhide the overlay – useful if you need to see the video more clearly when writing the script.
- Settings – Open the settings dialog for the Script Overlay Widget
Media Controller Widget
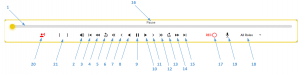
The Media Control Widget provides all playback controls for the current media file (video or audio). As well as the visible control buttons this widget supports all the hotkey and mouse controls. In normal operation you would only configure a single Media Control Widget in your layout.
Note: You must also have a Video Widget to display the current media.
Controls:
1. Media progress slider – shows the overall position of the current media between start and end.
- Click on bar to jump to new position in media file.
- Click and drag handle to manually scroll through media file.
2. Mute Audio Scrub – normal media audio not muted.
3. Jump to Start of media.
4. Vari speed reverse play.
- Vari speed provides a range of playback speeds, both forward and reverse, between -x1000 and +x1000.
- Each click on this control will step to the next reverse play speed.
- If paused then will play reverse -0.25x.
- If current play speed is forwards then each click will slow the forward speed down until it reaches pause and then start to play in reverse.
5. Step backwards large step.
- Step size is configurable. Default 10 Seconds.
6. Step backwards small step.
- Step size is configurable. Default 10 Frames.
7. Single step (1 frame) reverse.
8. Play reverse (-1x speed).
- Clicking toggles between reverse play and pause.
9. Pause.
10. Play Forwards (1x speed).
- Click – toggles between play and pause.
- Alt+ Click – Play in review mode/Pause
- Review mode skips over gaps between titles
- Useful for reviewing a file with long gaps between subtitles or AD sections or reviewing a single Role in a Dubbing file.
Alt+ Shift+ Click – Loop play/Pause
- Plays the current title in a loop with a small amount of pre and post roll.
- Useful for reviewing AD and Dubbing titles
- Note: you can adjust the audio level during playback to set the required level.
11. Single step (1 frame) forwards.
12. Step Forwards small step.
- Step size is configurable. Default 10 Frames.
13. Step Forwards large step.
- Step size is configurable. Default 10 Seconds.
14. Vari speed forward play.
- Vari speed provides a range of playback speeds, both forward and reverse, between -x1000 and +x1000.
- Each click on this control will step to the next forwards play speed.
- If paused then will play at 0.25x.
- If current play speed is reverse then each click will slow the reverse speed down until it reaches pause and then start to play forwards.
15. Jump to End of media.
16. Play mode indicator.
- Shows current play mode.
17. Audio Record Button
- Only visible if the Audio Recording Widget is loaded
- Red if enabled
- Red and flashing during recoding
- During Recording clicking again will stop recording
- Loop Record – Alt+ Shift+ Click will start a loop recording of the selected title or the time set by the Markers (see 21)
- Endless Record – Alt+ Click will record from the start point and keep recording for a configured maximum time or until the Record button is clicked (Stop).
- Right click to open the Audio Recorder settings screen.
18. Role Selector
- Only visible if the Audio Recorder Widget is loaded, the column is selected and there are more than one Roles specified in the greater than one.
- Select which role to Record, or All Roles
- If a specific Role is selected then the lines for that role will be shown on the top line of the Rythmoband (if enabled).
- Only Lines for the selected Role will be recorded.
19. Record Microphone Setup Wizard.
- Only visible if the Audio Recorder Widget is loaded.
- Open the wizard to help you setup the source, level and silence settings for recording AD or Dub audio in Stellar.
- See How to Set Up Recording Mic
20. Synthetic Voice Speak Button
- Only visible if the Synthetic Voice Widget is loaded and the selected text file is and AD or Dubbing Script (srtad, esf, srtdub).
- Right click on the button to select the synthetic voice to use and set the parameters.
- Or to render more than one Title at a time.
- Click on the button to speak the currently selected title using the selected voice.
Context Menu:
Right click in the Media Controller area to show the context menu:
- Audio Scrub on/off – toggle the audio scrubbing audio on or off
- Widget Help – Open a new tab with the help section for this widget
- Settings – Open the settings dialog for this widget
Hotkeys:
There are a wide range of media control hot keys that duplicate all the control functions and more. See the Video control section of the Hotkeys page.
Mouse Actions:
There are a wide range of media control mouse actions that duplicate all the control functions and more. See the Video control section of the Hotkeys page.
Right Click in widget area – Open widget specific context menu.
Alt+ Right click in widget area – Open widget specific Settings dialogue.
Options:
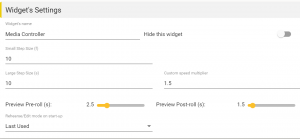
Small Step Size (f):- Set the step size used on the media control functions 5 & 11 – Default 10 Frames.
Large Step Size (s):- Set the step size for hotkey and mouse larger step functions – Default 10 Seconds.
Hide this Widget: – turns off the display part of this Widget but allows all the media control hot keys and mouse controls to keep working.
Custom Speed Multiplier: – Sets the speed the video will play at when the Preset Speed option is used – Default Hotkey Ctrl+ Alt+ Shift+ Right Arrow
Rehearse/Edit mode on start-up:- Sets the mode that Stellar will start up in:
- Last Used: – Stellar will start up in the mode you last used
- Rehearse Mode:- Always start in Rehearse Mode
- Edit Mode:- Always start in Edit Mode
Translation Widget
The Translation widget supports two separate tools.
- A Quick Translation Widget for use then working on multiple language files.
- A Full File translate for making a draft new language translation suitable for checking and using as a subtitle file.
Quick Translation
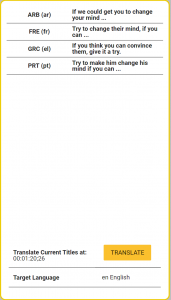
The Translation Widget provides a quick and simple interface to translate subtitles at the current timecode into a target language.
While the translation may not be suitable for use as the final output it is ideal for QC checking multiple language subtitle files.
One click will translate all the subtitles at the current media time, in multiple languages, to provide a quick confidence check that all the files match.
Controls:
Target Language
- Set the language to translate into.
Translate subtitles at or after current time.
- Click on the ‘Translate ‘ button to translate all the different subtitle tracks into the target language
- Used for QC and confidence checking.
Hotkeys:
There are no hotkeys specific to the Translation Widget.
Mouse Actions:
There are no mouse action specific to the Translation Widget.
Right Click in widget area – Open widget specific Settings dialogue
Alt+ Right click in widget area – Open widget specific Settings dialogue
Full File Translate
Either – Select the Translation option from the AI Tools menu
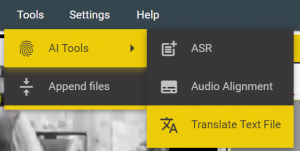
Or – Select Translate from the right click context menu for the file you want to translate from.
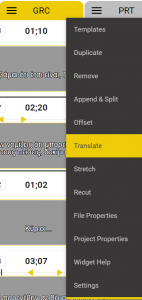
This will display the Translate File dialog.
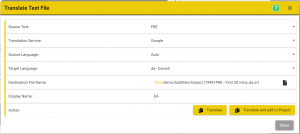
- Source Text – selects the source text for the translation. Defaults to the current text column.
- Translation Service. – Select from the available translation services.
- Source language – Set the language of the original text.
- Some Translation Services support Auto Detect for the source language.
- Target language – Select the language to translate into.
- The list will be set by the language options provided by the selected Translation Service.
- If you don’t see the target language you need, try a different Translation Service.
- Destination File Name – set the location and file name for the new file.
- The file must be in the /Stellar/Files folder or a sub folder.
- Translated files will always be in the SRT format
- You can select between SRT, SRTAD or SRTDUB.
- The File Name will default to the source file name and location with a two letter language code (_en) appended.
- The File Profile will default to the same as the source file
- Display Name – Sets the name for the Column and Timeline Track if the new file is added to the current Stellar Project.
Click on one of the control buttons:
- Translate – the source file will be translated to create the Destination File but it will not be added to the current Project.
- Translate and and to Project – the source file will be translated to create the Destination File and it will be added to the current Project.
- The new file will be shown as the last column in the Project.
- Note: this may result in the new file being on the drop down list in the last column tab.
-
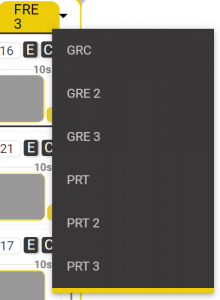
![]()
Translation Service
- Select from the available translation services and then click Save.
- By default only Google Translate is available.
Target Language
- Select from the available languages – Default = English.
- All future translations will be into this language.
Mouse Actions:
Right Click in widget area – Open widget specific context menu.
Alt+ Right click in widget area – Open widget specific Settings dialogue.
Time Widget

Multiple Copies – You can have several Time Widgets in a Layout.
The Time-code Widget displays, and can set, the current media time.
You can have multiple copies of this widget. If you need to see the time-code in different formats then having two or more copies can be useful.
To add additional instances of the Widget
- Right click in an existing timecode display
- Select Settings.
- Click on the yellow + Button
- This will add a new instance of the timecode widget in the current Layout
Controls:
None.
Context Menu:
Right click in the video area to show the context menu:
- Widget Help – Open a new tab with the help section for this widget
- Settings – Open the settings dialog for this widget
Hotkeys:
- Alt+ S – Jump focus to the seconds field of the timecode display.

- Up and down arrow keys will change the value, the video will track the change.
- Hint: This is a good way to move through the video, especially if you know the rough timecode you want.
- Left and Right arrow keys will move between sections
- Typing digits will enter the time in the current section
- Tab to step between sections
- Esc to remove highlight
For time-code editing hotkeys see the time-code section of the Hotkeys page.
Mouse Actions:
Click in the timecode display to highlight one of the sections (hours, minutes, seconds or frames)
- Hover the mouse pointer over the section and use the scroll wheel to adjust the time, the video will track the change.
- Hint: This is a good way to move through the video, especially if you know the rough timecode you want.
For time-code editing mouse actions see the time-code section of the Hotkeys page.
Right Click in widget area – Open widget specific context menu.
Alt+ Right click in widget area – Open widget specific Settings dialogue.
Options:
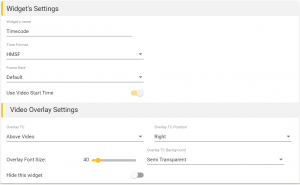
Widget Settings:
Time Format:- Sets the display format for this Widget.
- HMSF – Hours Minutes Seconds Frames.
- HMST – Hours Minutes Seconds Thousandths.
- ST – Seconds and Thousandths.
- F – Frames
Frame Rate:- Default sets the frame rate to be displayed as detected from the media file. Other options override the default, for this Time Widget only.
Use Video Start Time:- If On then the start time-code in the media file is used as the time for the first frame, otherwise a start time of 00:00:00:00 is used.
Video Overlay Settings
Overlay TC: – enables and sets the position of a timecode overlay displayed in the Video Widget.
Overlay TC Position: – Select Left, Right or Central.
Overlay TC Background: – Select the level of transparency for the timecode background.
Overlay Font Size:- Sets how large the timecode overlay digits are.
Hide this Widget: – Disable the Timecode widget in the current Layout. If Hidden any Video overlay timecode will still be shown.
- Hint: Useful if you want to save screen space.
Timed Text Editor Widget
Watch the Video
Using multi-columns in Stellar
Multiple Copies – You can have several Timed Text Editor Widgets in a Layout. See the Edit Over Video option for more information.
The Timed Text Editor Widget provides a comprehensive set of functions for viewing, editing and authoring single or multi language subtitle and caption files as well as AD and Dubbing scripts.
Other timed text types can also be displayed including comments, transcripts, compliance metadata, edit list data etc.
The active column and tab for editing is indicated by a yellow highlight on the tab.
The current tab in a multi tab column is indicated by a grey highlight if it is not the active column for editing.
In Rehearse Mode the active column (for text overlays) is indicated by a yellow highlight for the whole column.
Columns:
Each column is associated, via the current Project file, with a text – see the Files section above. In addition each column can be restricted in the level of edit access that is allowed – see File Attributes.
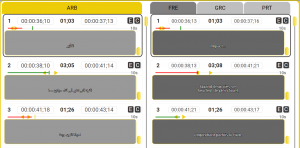 –
– 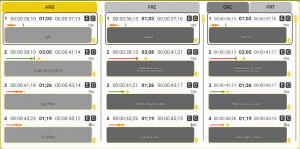
Changing the column layout:
The widget can be configured to show between one and four columns, the right hand column may have up to four tabs.
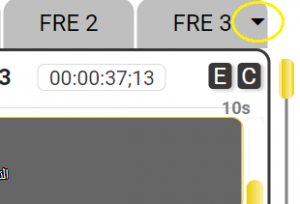
Additional files, if present in the Project, can be brought into view by using a drop down selector on the fourth tab.
To change the number of columns, up to a maximum of four or the number of text files loaded (whichever is fewer) drag columns to or from the right hand column. As you start to drag a column a space will open up where it can be dropped.
To re order columns drag a column and drop it onto an existing column to replace it. The replaced column will move to the last column, end tab position.
To select a text file that are not currently in view use the drop down list from the last tab. The selected file will appear in the last tab, displacing the current file.
Editing the column Name:
Clicking on the name in the column tab allows you to edit the name.
This name is just for display, but must be unique.
You can also edit it in the File Status screen or the Project Properties screen
Vertical Positioning
Subtitles and Captions can be moved to different vertical positions, for a full list of controls see the Hotkeys page.
The vertical position of a subtitle is shown in the editor box by the scroll bar in each box.
The scroll position will always automatically adjust to show any text. Here the text is at the bottom of the screen.
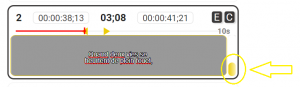
Here the text is in the middle of the screen.

Here the text is at the top of the screen.
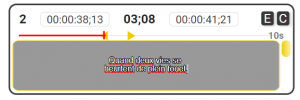
Text for the selected subtitle will also be shown over the video in the correct horizontal and vertical position (if enabled).
Another way of viewing the vertical positioning of text is to switch the text box from 16:3 to 16:9 mode.
To do this either
- Alt+ Right Click anywhere in the subtitle widget and set the Aspect Ratio to 16:9.
- Right click anywhere in the Timed Text Widget and select Settings from the context menu.
- In the Settings screen set the Aspect Ration to 16:9 and then click Save
This will display a full screen size box with the text in the configured location. No scroll bar is displayed in this mode.
- Use this mode if yo need to display vertical style (Japanese) subtitles.
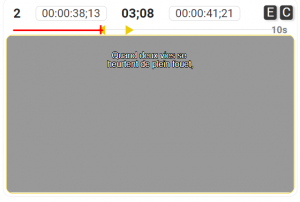
AD and Dubbing script text
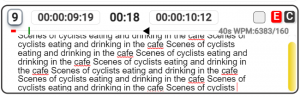
If the file type is an AD or Dubbing Script vertical and horizontal positioning is not used. Text will be shown slightly larger and top left justified.
If the text is too large for a standard subtitle box then the box will increase in height. After a limit a scroll bar will be added so even longer text can be added.
File Status Display:
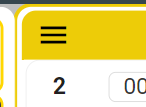
- For each text column you can click on the three line icon in the top tab to show the File Status display:
Unlike many displays this screen allows you to interact with the main Stellar controls while it’s open. This allows you, for example, to work through a list of subtitles with errors editing each one in turn and moving onto the next one, all without closing the File Status screen.
You can also make the File Status a fixed Widget so that it always shows as part of the Layout – Useful for QC tasks. See File Status Widget for more information
The File Status screen is divided into a number of sections
- Top bar – the yellow section at the top
- Tab controls – top left
- Filter controls – left hand side bar
- Information area(s) right hand side
Top Bar:
- The top bar shows which text file is selected.
- If your Project contains more than one text file (subtitle, AD script …) then you can select which one you want to view the File Status for.
- With the screen open you can still click on a different column’s three line icon to select it.
- You can move the File Status screen out of the way if required, and resize it.
Overview Tab:
- Statistics Area:
- Whole file information at the top which shows a range of data which will vary depending on the file type.
- Whole file information at the top which shows a range of data which will vary depending on the file type.

- Active Errors
- A summary of the current errors and warnings
- A summary of the current errors and warnings
Properties Tab:
-
- The Properties tab gives a summary of the settings for the selected text file.
- This is the same information found in the Project Properties Text File information section.
- Some of the items can be edited.
- If you edit any you will need to click the Save button at the bottom of the screen
- See Protecting Your Files for more information on the Editable protect Text modes.
- See Profiles and Layers for more information on setting up the Style and QC Profile for a file.

Role Tab:
The Role tab is only visible if the file is a dubbing file type (SRTDUB or TTAL).
The Role tab provides a summary of all the titles (lines) for each Role in the dubbing Project.
This is useful to see the status of the recording for a whole program.
Titles Tab:
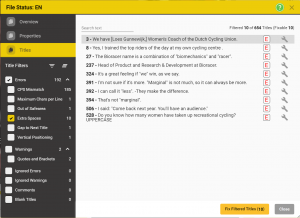
- The Titles tab lists Errors and Warnings for the selected file
- The errors and warnings are based on the content of the file, and the QC settings defined in the Profile assigned.
- You can see the Profile used in the Properties tab, where you can view, replace or edit (with limitations) – See Profiles and Layers for more information.
- Search control
- You can search for text in the titles listed using the search control at the top of the dialog
- This search will only show results for titles that also match the filter criteria.
- You can search for text in the titles listed using the search control at the top of the dialog

- The individual subtitle section:
- This lists some or all subtitles with indicators on each line showing a range of statuses.
- Which titles are listed will depend on any filters set – see below.
- Clicking on a row will select that title in the editor.
- Use the up and down arrows to step through the errors and warnings
- Clicking on a title will make that the Active title in Stellar.
- On each row there may be one or more icons.
- Hovering over an icon will show information about the title.
- Clicking on a icon will make that title the active title in Stellar and open an information box showing the Errors and Warnings for that Title
- Hint:- You don’t need to close this error message box, to see the errors for a different subtitle, just select that title and the error message box will update.
- Hovering over an icon will show information about the title.
- Filter Controls
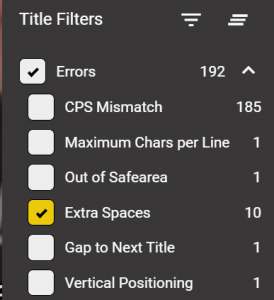
- When the Titles Tab is selected a number of Filter Controls will be visible.
- The exact filters available will depend on the file type and the current errors and warnings
- Errors and warnings with a count of zero will not be listed.
- The exact filters available will depend on the file type and the current errors and warnings
- Filter By Role
-
- Only available for Dubbing Script files (srtdub) with more than one Role (Character)
- Select from the available Roles or All Roles.
- If a specific role is selected then only titles assigned to that role will be displayed.
- This is very useful if you want to see if all the titles have been recorded and approved for a specific character.
-
- Filter by Errors
- Use the arrow icon on the Errors line to open a list of all current errors for the selected file
- Only errors with a count above zero will be listed, so the actual errors shown will change.
- Tick the Errors box to see all errors
- Tick individual error boxes to limit the list to specific error types – useful when working through fixing errors.
- Use the arrow icon on the Errors line to open a list of all current errors for the selected file
- Filter by Warnings
- Use the arrow icon on the Warnings line to open a list of all current errors for the selected file
- Only Warnings with a count above zero will be listed, so the actual errors shown will change.
- Tick the Warnings box to see all Warnings
- Tick individual warning boxes to limit the list to specific warning types – useful when working through fixing or reviewing warnings.
- Use the arrow icon on the Warnings line to open a list of all current errors for the selected file
- Filter by Comments
- If set shows all Titles with a Comment
- Filter by No Audio
- Only visible for AD and Dubbing files
- If set shows all titles with no audio recorded
- Filter by Not Approved
- If set shoes all Titles where the Approved flag is not set.
- All filters are cumulative, so if you select Errors and Warnings all titles with either an error or a warning, or both, will be shown,

- Apply all Filters
- Click to set all filters on

- Reset all filters
- Click to clear all filters
- If no filters are applies (all off) then all titles will be listed.
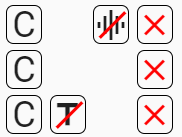

Error and Warning Details.
For details of all the available QC checks with Errors and Warnings see the full list of Rules.

- Every Title listed in the Titles Tab has one or more errors and warnings.
- Titles with no errors or warnings will never be listed
- The Titles listed depend on the filters selected.
- Each line will have a Warning or Error icon, or both.
- Hover over the icon to get a summary of the error or warning
- Click on the icon to pop up the QC Results dialog
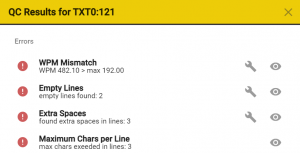
- This lists the full details of every error and warning associated with this title
- Hint:- you can leave this box open, click on another titles with errors and the QC Results dialog will update to show the details for then new title. Or even use the arrow keys to step through the Titles
- You can decide to Ignore an error or a warning by clicking on the ignore icon
- Ignored errors and warnings are shown as

- Ignored errors and warnings are removed from the main list, but are added to a separate Ignored Errors and Ignored Warnings filter section.
- The Ignore status can be cleared by clicking on the icon in the Ignored list or the QC Status dialog.
- Some errors and warnings support an auto fix option, in these cases a small spanner icon is visible next to the error or warning

- It won’t always be possible for the auto fix to work. For example, if the reading speed is to high then the our cue is extended, but only if there is room before the start of the next title.
- In some cases an autofix may cause a new error, such as a shot change violation.

Note: If you edit a title, for example to fix an error, it will take a few seconds before the File Status list updates.
Subtitle Icons:
- Each Subtitle box can have up to four controls in the top right corner:
Subtitle Comments:
You can add comments to each subtitle (caption, AD Script sections etc.).
Note: Subtitle comments are only supported in some file types. Where supported the comments are part of the subtitle file and will move with the file. If the subtitle file is opened in a different Project the comments will be visible.
- To add a comment to a subtitle click on the C icon in the top right corner of the Subtitle box.

- Or use Ctrl+Q
- This will open a text box below the main subtitle box.
- Enter comment text
- Clicking on the C button again will close the comment box
- If a comment is present the C icon will be yellow
Errors and Warnings
- If there is an Error or a Warning for a specific subtitle (EG line length too long) then the E icon will change colour
- Yellow = Warnings
- Red = Errors

- Hover over the E icon to see a summary of the errors and warnings
- Clicking on the icon will open the QC Results box
- Hint: you can leave this box open and when you click on the E button for a different title, the QC results will update to show those for the new title.
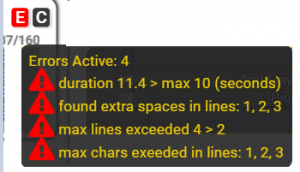
Approved Check Box
- Each subtitle has an Approved check box

- If checked this will be reported in the Files Status display
- This is useful for tracking a QC process to mark each subtitle as accepted
Audio Recording status
- For AD and Dubbing files only
- For these file types an Audio Present icon will appear if there is at least one audio associated with the Title

- If the audio is present and unmuted (selected) the icon will be present
- No Icon means that the audio is present but muted (not selected) or there are no audios.
Roles Status Tab:
If the File type is a dubbing file (srtdub) then there will be a third tab available. This lists each Role defined in the dubbing/script file and shows details about each Role.
This is very useful for tracking the progress of a dubbing project.
Note: If the Dubbing is being done as a Stellar Task then changes made by other users will automatically update this display.
-
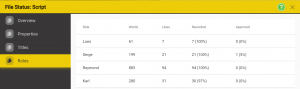
- Each column can be sorted by clicking on the title at the top.
- Role – a list of all the Roles (Characters) in the script file.
- If there is a Selected Role then this will always be on the top row.
- All other Roles will sort in alphabetical order.
- Lines – the number of Lines (Titles) assigned to each Role.
- Recoded – If there is at least one Active Take (audio) for a Line it is counted as being Recorded.
- Approved – Each Line is set to Approved by ticking the Approved box in the text editor or on the timeline.
- Role – a list of all the Roles (Characters) in the script file.
Controls:
None.
Context menus:
Context menus are displayed by right clicking inside the Widget area.
There are different Context menus depend on where you click:
- Top Tab – Right click on the column Tab.
- A list of functions, most of which are specific to that text file type
- Subtitle and Caption files
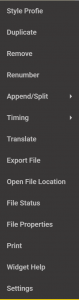
- Style Profile – Set or change the Style and QC Profile selected for this text file.
- Duplicate – Make a copy of this file file
- Remove – Remove this file from the current Project. The file will still be present on disk.
- Renumber – reset the sequential numbering of this text file.
- Hotkey – Alt+N
- Append and Split – Open the Append and Split dialog
- Append another text file onto this one
- Split this text file into two new separate files
- Optional – only visible if the Append and Split Widget is loaded.
- Timing – Timing Options
- Align
- Recut
- Stretch
- Translate – Use one of the external Machine Translation service to translate this file into another language
- Export File – Use the Export Text File dialog to make a copy of this file, optionally in a different file format, on an external storage location.
- Open File Location – open Windows Explorer or Mac Finder with the text file selected in its correct folder. – A quick way of finding the file if you need to make a quick copy.
- File Status – Open the Status dialog for this file
- Properties – Show the Properties of the file selected in the project Properties dialog.
- Print – Display a print ready version of the text file in a new Chrome tab ready to be printed.
- Use Ctrl+P to select the printer.
- Widget Help – Open a new tab with the help section for this widget
- Settings – Open the settings dialog for this widget.
- AD or Dubbing File
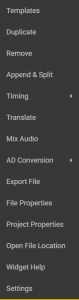
- The options are the same as for a Subtitle File, see above, plus:
- Mix Audio – open the Audio Mixer dialog
- AD Conversion – Options to convert a text file to an AD File:
- Create AD file – use the Gap Detector dialog to use a text file (in the current Project) to find gaps that can be used for audio description.
- Convert from a Subtitle file to create an AD or Dubbing file (srtad, esf or srtdub)
- Subtitle and Caption files
- A list of functions, most of which are specific to that text file type
- Subtitle box – Right click in the subtitle text box.
-
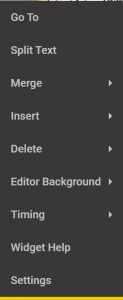
- Go To – Open the Go To and Jump dialog
- Split Text – Split the current subtitle in two at the current cursor position
- Merge – Merge the current subtitle with either the one above or the one below.
- Insert – Insert a new subtitle above or below the current one.
- Note: A warning will be shown if there’s not enough space to insert a subtitle of minimum duration.
- Delete
- Delete all the text in the current Subtitle
- Delete the current subtitle completely.
- Editor Background – Adjust the grey level of the text edit boxes to suite your preference.
- Note: Save as part of the current Layout
- Make sure you Save the Layout
- Timing – Timing Options
- Align
- Recut
- Stretch
- Widget Help – Open a new tab with the help section for this widget
- Settings – Open the settings dialog for this widget.
-
- Timecode area – Right click in the timecode area above the subtitle text box.
-
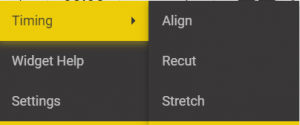
- Timing – Timing Options
- Align
- Recut
- Stretch
- Widget Help – Open a new tab with the help section for this widget
- Settings – Open the settings dialog for this widget.
-
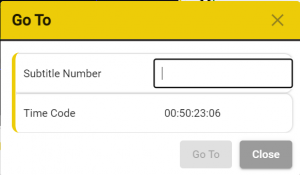
Hotkeys:
There are a range of hotkeys specific to the Timed Text Editor Widget. For a list see the Timed Text Editor section of the Hotkeys page.
For time-code editing hotkeys see the time-code section of the Hotkeys page.
Mouse Actions:
There are a range of mouse actions specific to the Timed Text Editor Widget. For a list see the Timed Text Editor section of the Hotkeys page.
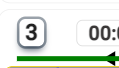
Double clicking on the Subtitle ID will jump the media to the in-time of the selected subtitle.
Shift double clicking on the ID will jump the media to the out-time.
Right Click in widget area – Open widget specific context menu.
Click in the text area to edit the text.
Alt+ Right click in widget area – Open widget specific Settings dialogue.
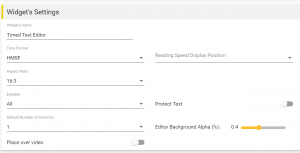
Time Format:- Sets the display format for this Widget.
- HMSF – Hours Minutes Seconds Frames.
- HMST – Hours Minutes Seconds Thousandths.
- ST – Seconds and Thousandths.
- F – Frames.
Reading Speed Display Position:
- Set the style of the reading speed information in the editor box
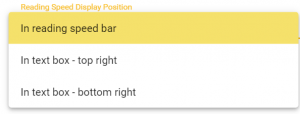
- In reading speed bar
-
- In text box – top right
- In text box – bottom right
- The display can be in Words Per Minute or Characters per Second, depending on the Reading Speed settings in the Profile selected for this text file.
- In the two In text box’ modes the count of how many characters or words over or under the ideal is shown on the third row.
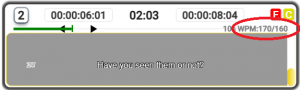
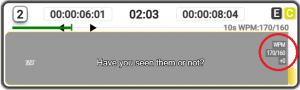
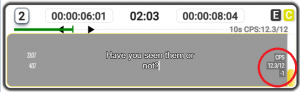
Aspect Ratio:- Sets the text box to be:
- 16:3 – equal to one third of the vertical resolution of the screen. A vertical scroll bar controls the view within the full screen height.
- 16:9 – equal to the full screen vertical resolution. The text is shown in it’s correct position.
Editable and Protected Text:
- Configure the level of editability for any loaded files. This allows files to be limited to Read Only, Comments only, Times Only, Text and Times, Text only or All
- See Protecting Your Files for more information.
- NOTE: This control works in conjunction with the File properties edit limits
- The most restrictive limit is applied.
Default Number of Columns
- Set the maximum number of columns shown when the Layout is loaded
- You can still add more columns by dragging once the Layout has loaded.
Editor Background Alpha (%)
- Adjusts the grey level of the text edit boxes to suite your preference.
Note: All of these Settings are saved as part of the current Layout
- Make sure you Save the Layout if you want to make the changes a permanent part of this Layout
Timeline Widget
The Timeline is a central part of Stellar and is used in all workflows, Subtitling, Captions, AD, Dubbing and Transcription.
By representing text and audio on a timeline you can see how all the components fit together as well as editing the timing of text and audio components.

The Timeline Widget can be configured to displays a range of timeline types (Rows):
- Time Track – always visible and on the top row.
- Includes time line zoom controls.

- Timed text – Captions and Subtitles,
-
- Transcripts – Timed word lists from Speech to Text engines
- Program audio wave form(s).
- Shot change tracks.
-
- Audio Description track – includes text, fade and audio tracks.
- Dubbing track – includes multiple Roles each with text, fade/gain (optional) and multiple audio Takes


- Other graph type data and metadata.
The type of row displayed will depend on the types of files loaded.
- Shot changes will be shown only if a shot change file is included in the Project.
- Program audio waveform(s) will be shown only if a waveform graphic file (json) is included in the Project.
- Multiple waveform files can be loaded which may represent different program audio elements (separate M+E for example).
- Subtitles will be show for each subtitle file included in the Project
- Audio Description text, fade and audio clips will be shown for each AD file (srtad or esf) included in the Project
- Audio Dubbing rows for multiple Roles will include text, fade/gain and multiple audio clips (Takes) is a dubbing file (srtdub or TTAL) is included in the Project.
- Transcript rows for each timed text (JSON) file included in the Project.
The green vertical bar represents the current media time or Play Head.
Darker outlines highlight on either a subtitle, text or shot-change object indicate that it is valid for the current media time.

A grey Subtitle box indicates this is the current title selected for editing

Controls:
Zoom Controls:
- Use the + and – buttons to zoom the timeline view
- With the mouse pointer in the timeline Ctrl+Shift+ Scroll wheel will zoom the timeline
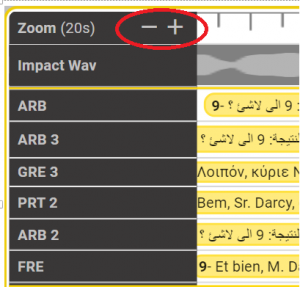
- The Displayed Seconds figure shows the duration of the current view. Range 2 seconds to 200 seconds.
AD and Dubbing track fold controls:
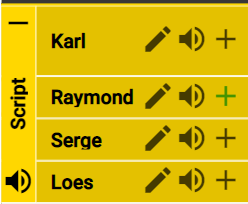
- Each Role on the timeline has a + control.

- If there a recorded audio takes for this Role in the visible section of the timeline the + button will be green
- Click on the + button to see any Active Tales for the Role.

- This will show one or more Active Takes
- An Active take is one that is not muted.
- Active Takes are shown with a blue backbround
- Click on the + button again to show all Takes
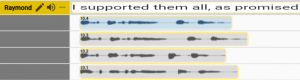
- Inactive or Muted takes will be shown with a grey background.
- Note: Takes are show with active Takes at the top and inactive Takes below, each in Take number order.
- The central section of the Timeline can be scrolled vertically if there are too many rows to show.
- Use the scroll bar at the right hand end of the Timeline.
- Use the mouse scroll wheel over the left hand title section of the timeline.
- The Global + control (on the vertical name bar) opens all closes all Roles at the same time
- Hint: Use Shift+ Click on the Role + buttons to open one Role and close all others.
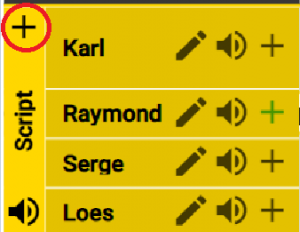
AD, Dubbing and Program Audio Mute control:
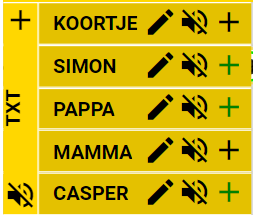
- You can mute each AD track, Dubbing Role and Program Audio individually.
- In a Dubbing File you can
- Mute each Role individually
- Mute all Roles together
- Hint: Use Shift+ Click on the Role Mute buttons to unmute one and mute all others.
- In a Dubbing File you can
Dubbing Text Adaptation edit control:
Once you have a Dubbing Script with all the Lines, Roles and basic timing you may need to do detailed Adaptation for lip-sync timing.
Adaptation is done on the Timeline using drag handles at the beginning and end of each word.
- Each separate Role (Character) is represented on a separate track (row) on the timeline.
- On each track for a Role there is an edit control
- Clicking on the pencil button for a Role enables Adaptation editing for that Role
- There is a Handle for the start and end of each word
- The start of the first word and the end of the last word are fixed to the ends of the text box times.
- You can edit the start and end points of the text box either by editing the times in the text editor
- or by using Shift+ Drag over the ends of the text block on the Timeline.
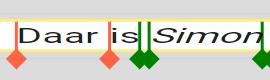
- Green Handles are unfixed and will move as you make other adjustments.
- Red Handles are fixed and won’t move as you make adjustments
- The start of the first word and the end of the last word are fixed to the ends of the text box times.
- To move a Handle drag it with the mouse.
- The word timing will change as you move the Handle
- If the Handle is Green it will turn Red and the timing of that handle will be fixed.
- As you drag the Handle you will see a green limit line above the Handle showing how far you can move it.
- To unfix a Red Handle Shift+ click on it and it will turn Green and so be unfixed.
- To add a new Handle in the middle of a word ???
- Once added new Handles can’t be removed, but if set to Unfixed (green) will have no effect on the word timing.
- Any changes you make will be saved automatically.
- Click on the Edit Pencil icon to turn off Adaptation editing for a Role.
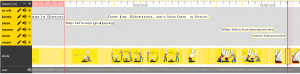
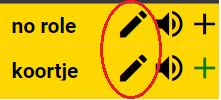
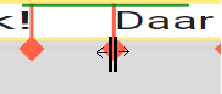
Hotkeys:
For timeline hotkeys see the timeline section of the Hotkeys page.
Context Menus:
By right clicking in the timeline you can access context menus that are specific to the area you clicked in.
For example: Right clicking in an AD audio Take will give access to tools for editing one or all Fades.
General options available in all of the timeline areas:
-
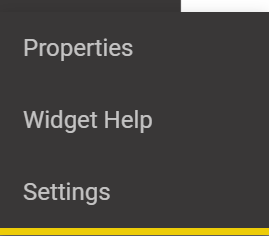
- Properties – Show the Properties of this track (file) in the Project Properties dialog.
- Widget Help – Open a new tab with the help section for this widget
- Settings – Open the settings dialog for this widget
Over the Time track:
-
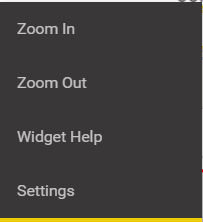
- Zoom in and out change the size of the timeline view
- Widget Help – Open a new tab with the help section for this widget
- Settings – Open the settings dialog for this widget
Header area and empty timeline areas
-
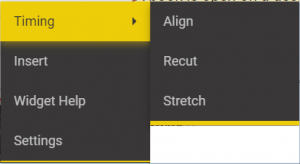
- Intervals, Align, Recut and Stretch cover options for Editing the Timecode on the Timeline.
- Insert will insert a new title of the default duration at the current video position – Only present over a text track.
- Note: if there isn’t room for a new Title at the current position you will either get an error message of the new title will be inserted after any title at the current video position.
- Widget Help – Open a new tab with the help section for this widget
- Settings – Open the settings dialog for this widget
Over a subtitle box
-
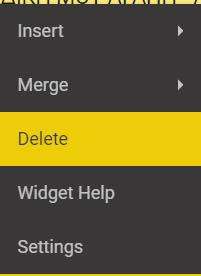
- Insert a new title to the left or right of the current Title
- Merge left or right with the current Title.
- Delete the current Title.
- Widget Help – Open a new tab with the help section for this widget
- Settings – Open the settings dialog for this widget
Over an AD or Dubbing Title
-
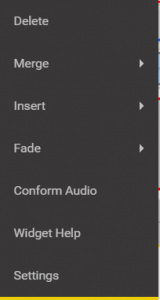
- Delete – Delete the selected title and any associates audio Takes
- Merge – Select merge Right or Left to merge this title with one of its neighbours.
- Any existing audio Takes will be included in the new combined Title.
- Insert – Select Right or Left to insert a new Title after or before the selected one.
- An error message will show if there’s no space to make the insertion
- Fade – Make changes to the Fade settings for this Title – AD and VO only.
- Edit Fade open the Edit Fade dialog
- Reset Fade – Reset the fade settings for this Title to the default.
- Conform Audio – Create a new audio Take by trimming and mixing all current, unmuted, takes
- Useful if you have used multiple sub recordings to achieve the result you want.
- For example when recording the AD for long film credits.
- Useful if you have used multiple sub recordings to achieve the result you want.
- Widget Help – Open a new tab with the help section for this widget
- Settings – Open the settings dialog for this widget
Over a Fade Track – AD Only
-
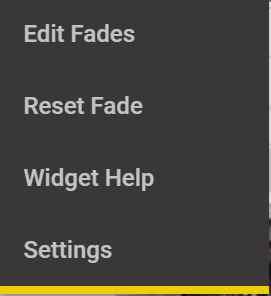
- Edit Fade – Open the Edit Fade dialog
- Reset Fade – Reset the fade settings for this Title to the default.
- Widget Help – Open a new tab with the help section for this widget
- Settings – Open the settings dialog for this widget
Over an audio Take
-
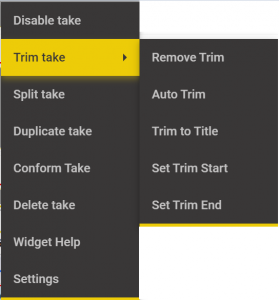
- Disable or Enable Take – Toggle between muted and unmuted
- Trim Take
- Remove Trim – set the audio length to the full extent of the recorded clip.
- Auto Trim – use the stored Silence level and silence guard setting to automatically trim the clip.
- Note: You can use the Scissors button on the Take waveform (hover over the waveform) to do an Auto Trim.
- Trim to Title – Trim the audio to match the text box length – Warning- this may clip off recorded speech.
- Set Trim Start – calculate the correct trim for the start of the Take – This option is only visible if the media time makes the action possible.
- Set Trim End – calculate the correct trim for the end of the Take – This option is only visible if the media time makes the action possible.
- Conform Take – Create a new audio Take by trimming and mixing all current, unmuted, takes
- Useful if you have used multiple sub recordings to achieve the result you want.
- For example when recording the AD for long film credits.
- Useful if you have used multiple sub recordings to achieve the result you want.
- Delete Take – remove the selected Take from the timeline.
- Widget Help – Open a new tab with the help section for this widget
- Settings – Open the settings dialog for this widget
Over the Shot Change track.
-
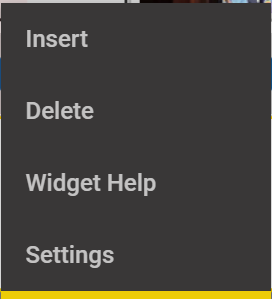
- You can insert and Delete shot change points on the shot change track
- Useful if you need to fine tune the shot changes during subtitle QC.
- Insert – adds a new shot change at the current video timecode
- Delete – remove the shot change at the current video timecode
- Not visible if there is no shot change at the current timecode
- Widget Help – Open a new tab with the help section for this widget
- Settings – Open the settings dialog for this widget
Mouse Actions:
Hover over:
- Over a text box will show pop up controls and information

- Play button – play the video from just before the selected item to just after.
- For AD and Dubbing text boxes all the associated audios, that are not muted, will play with a preconfigured pre roll and post roll.
- Approve tick box – if enabled
- Approve or un-approve the selected title.
- You can’t approve a Title with no active (unmuted) audio.
- All Approved titles have a green ring around the title number.

- This approval tick box is the same as the one on each title in the text editor and they work together.
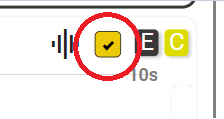
- Set Default Fade – Only visible if the file is an AD Script file.
- Set the fade level for this title to the default defined in the Profile assigned to this file.
- Over a audio Take waveform

- Play – play just the Take audio using any trim and gain settings – no program audio
- Hint: Double clicking anywhere in the waveform will also play the clip.
- Alt+ Play – Play the whole Take without any trim or gain settings
- Alt+ Ctrl+ Play – play the trimmed Take in a loop.
- Useful when adjusting the audio level
- Mute – Mute this specific Take
- Note: Any gain settings will be retained and re-applies if the Take is unmuted.
- Set Gain -Hover over the Mute control and a gain slider will pop up.
-
- Use this to adjust the gain of the Take.
- Hint: Play the Take in loop mode to hear the effect of the gain changes.
-
- Trim – Remove leading and trailing silence and align the Take to the start of the text block.
- Trim is non destructive, you can always reveal trimmed audio if required.
- For AD the Fade settings will be adjusted to match, unless Auto Trim is disabled in settings.
- Hint: Shift+ click on the Trim icon will trim without the confirmation dialog popping up.
- Delete – delete this Take – you will be asked to confirm
- Hint: Shift+ click on the Delete icon will delete without confirmation.
- Over a shot-change object will cause a larger image to pop up
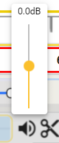
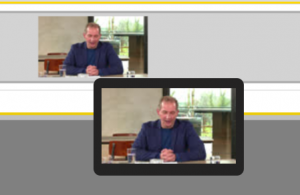
Scroll Wheel:
- Over the main timeline area
- Use the scroll wheel to step through the video
- Scroll wheel – step one frame back and forwards.
- Shift+ scroll wheel – step 10 frames (step size configurable)
- Ctrl+ scroll wheel – step 5 seconds (step size configurable)
- Use the scroll wheel to step through the video
- Over timeline title area
- Scroll vertical view of all timelines (if available).
Double clicking:
Double Click
- On a text box or shot change will jump the current media time to the start time of the selected object.
- Anywhere on a program audio track or the timecode track will jump to the point selected.
- On a Take waveform will play that Take. Double click again to stop.
- On a shot change track will move the video time to the beginning of that scene
- On a Dubbing script row tab – Select All Roles – All row tabs go yellow.
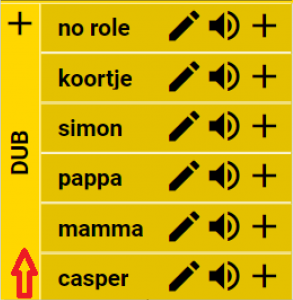
Shift+ Double Clicking
- On any text box on the timeline will jump the selected title to align with the current video time AND all titles in the same file (row) after it will move the same amount.
- Will not allow you to overlap text boxes on the same row.
- Hint: Useful for conforming text tiles to correct for video edits (cuts and inserts)
- On an audio Take
- Will do an Auto Trim to remove leading and training silence.
- Note: This is non destructive and the recorded audio is unchanged. You can always adjust the trim manually or do Undo.
- Will do an Auto Trim to remove leading and training silence.
Ctrl+ Shift+ Double Click
- On any text box on the timeline will jump the selected title to align with the current video time AND all titles in all other text tiles (rows) after it will move the same amount
- Will not allow you to overlap text boxes on the any of the rows
- Hint: Useful for conforming text tiles to correct for video edits (cuts and inserts) in multiple different language files at the same time.
Alt+ Double Click
- On a text box with AD or Dubbing Audio
- Will Conform all active (unmuted) Takes into a single audio clip and makes that the only active Take.
- All other Takes will be muted
- Hint: Essential when using ESF Files as these don’t support multiple Takes or Trim and Gain data.
- On an audio Take
-
- Will Conform the selected Take by applying all Trim and Gain changes and create a new single active Take.
- The original Take will still be present, but will be muted.
- Hint: Essential when using ESF Files as these don’t support Trim or Gain data.
-
Dragging:
- Drag in the timeline area to drag the video time forwards or backwards.
- On a touchpad two finger horizontal movements will move the video time.
- Shift+ Drag is used to move and edit on the timeline:
- Text boxes

- Shift+ Drag in middle to move on timeline – mouse pointer changes to a hand symbol.

- Shift+ Drag on ends to edit in and out times – mouse pointer changes to a line move symbol.
- Audio waveforms

- Shift+ Drag in middle to move on timeline – mouse pointer changes to a hand symbol.
- Note: In an ESF file the audio can’t start before the beginning of the Text box.
- This is a limitation of the ESF file format. If you need to have more flexibility in where the audio start you should use the more general SRTAD file format
- If the Audio does start before the text box, the waveform will turn Red and a warning message will be shown when hovering over the waveform.
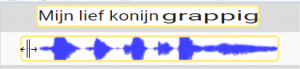
- Shift+ Drag on ends to edit in and out trim points – mouse pointer changes to a line move symbol.
- Note: In an ESF file the audio has to be Conformed to take account of any trimming you have done or changes to the gain level..
- This is a limitation of the ESF file format. If you need to have more flexibility in where the audio start you should use the more general SRTAD file format.
- If the Audio has been trimmed, or the gain adjusted, the waveform will turn Red and a warning message will be shown when hovering over the waveform.
- Fade and gain tracks

- Shift+ Drag on a marker will allow adjustment of the fade or gain settings
- Note: In an ESF file limits are imposed that stop the fade points being outside of the text box area.
- This is a limitation of the ESF file format. If you need to have more flexibility in where fades start and end you should use the more general SRTAD file format.
- Record Markers
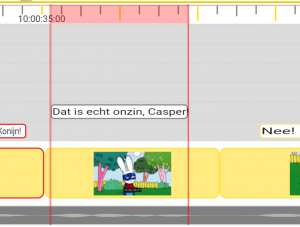
- Shift + Drag on the ends of the red marked area to adjust the in and out times
- On the middle of the red section to move the marked section.
- Row height
- Shift+ Drag on the bottom edge of a row in the Title area allows the height of a row to be set.
- Row Order
- Shift+ Drag allows rows to be reordered.
- Rows dragged to the very top or bottom are fixed and don’t scroll vertically with other rows
- Any Row(s) moved into one of these areas is fixed and won’t scroll vertically.
- This can be useful to lock specific Row(s) so they are always in view.
- Dubbing and AD files can only be moved as a set using the ‘handle’ on the very left hand end of the rows
- Roles within a dubbing file can be reordered.
- EG to put the current Role being recorded at the top.
- Text boxes
- Ctrl+ Shift+ Drag
- On a text box (AD, Dub or subtitle) will move all the titles on that track together.
- Hint: Useful for fine tuning the alignment of complete subtitle files.
- Note: This is a Recut action and changes the times in the text file.
- On a text box (AD, Dub or subtitle) will move all the titles on that track together.
- Ctrl+ Alt+ Drag
- On a text box (AD, Dub or subtitle) will move the selected title and all following titles on that track together.
- Will not allow you to overlap text boxes on the same row.
- Hint: Useful for conforming text tiles to correct for video edits (cuts and inserts).
- Note: This is a Recut action and changes the times in the text file.
- See also Shift+ Double Click on a text box – above
- On a text box (AD, Dub or subtitle) will move the selected title and all following titles on that track together.
- Alt+ Drag
- Anywhere in the Timeline will move the video and all Text columns will synchronise with the video
- This is a shortcut to Rehearse mode, only while the Alt key is held down.
- Anywhere in the Timeline will move the video and all Text columns will synchronise with the video
- Alt+ Right click in widget area – Open widget specific Settings dialog.
Hotkeys
Space Bar – When there is no text cursor in the subtitle editor or any text areas the Space Bar is used to control video Play.
- Space Bar – Play / Pause
- Shift+ Space Bar – Play reverse/Pause
- Ctrl+ Space Bar – Play in review mode/Pause
- Review mode skips over gaps between titles
- Useful for reviewing a file with long gaps between subtitles or AD sections or reviewing a single Role in a Dubbing file.
Ctrl+ Shift+ Space Bar – Loop play/Pause
- Plays the current title in a loop with a small amount of pre and post roll.
- Useful for reviewing AD and Dubbing titles
- Note: you can adjust the audio level during playback to set the required level.
For the full range of applicable mouse actions see the Timeline Widget section of the Hotkeys page.
Settings:
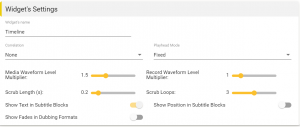
- The Settings menu from the Timeline Widget allows you to set how the timeline works.
- Make sure you Save the current Layout after making any changes if you want them to be permanent.
- Correlation – Select one of the Correlation options if you want this to appear on the timeline
- The correlation track is used when comparing the relative timing of multiple language subtitle files for a single video.
- Hint: Turn this on if you are conforming multiple language files at the same time.
- Playhead Mode – Controls how the vertical ‘Playhead’ green bar in the timeline works.
- Fixed – the playhead stays fixed and the timetrack moves underneath it.
- Drag the timeline to move the video position.
- Note: Drag the red handles at the ends of the green bar to move the fixed position.
- The bar can be positioned between the 20% to 50% positions on the Timeline.
- Moving – The Playhead will move across the timeline as the video plays between the 20% and 80% positions.
- Drag the Playhead to select the video position.
- Fixed – the playhead stays fixed and the timetrack moves underneath it.
- .Media Waveform Level Multiplier – Set the size of the program waveform
- Note: This doesn’t change the program audio volume, just the visual size of the waveform.
- Record Waveform Multiplier: – Set the size of all recorded AD and Dubbing audio waveforms.
- Note: This doesn’t change the audio volume, just the visual size of the waveform.
- Scrub length – Sets the time, in seconds, of the audio scrub used when single stepping the media.
- Scrub Loops – Sets the number of times the Scrub clip is played when single stepping the media.
- Show Subtitle text in blocks – enable or disable the display of the subtitle text in the subtitle blocks on the timeline
- Show position in subtitle block – shows a small vertical position indicator in each subtitle block

- Useful if you need a quick visual check on the timeline of vertical positions – EG when comparing multiple language files.
- Show Fades in Dubbing Formats – when a dubbing file type is loaded (srtad or TTAL) then this option adds a fade track to each Role.

- This allows voice over recordings to fade the original audio track during the new dialog.
- Used if there is no music and effects (M+E) track available so the original language dialog has to be faded down.
Edit timecodes on the Timeline.
You can move subtitle blocks by dragging or clicking as follows:
To drag a single subtitle on the timeline
-
- Shift+ Drag the central section of the selected subtitle
- The in and out timecodes will be updated to match the change (recut)
- You can’t move the subtitle past the previous or next subtitle
- Any Min Gap settings are enforced.
To Edit the in and out times of a subtitle.
-
- Shift+ Drag one of the end sections of the selected subtitle
- The in or out timecode will be updated to match the change (recut)
- You can’t move the subtitle end point past the previous or next subtitle
- Any Min Gap settings are enforced.
To drag all the subtitles together on the timeline
- Ctrl+ Shift+ Drag
- All the subtitles on the selected track will move
- All subtitle in and out times will be updated (recut)
To drag only the subtitles from the selected subtitle
- Alt+ Ctrl+ Drag the selected subtitle
- The selected subtitle and all following subtitles will move
- Earlier subtitles will be unchanged
- The selected subtitle cant be moved earlier than the previous subtitle
- Any Min Gap limit will be enforced
- Subtitle in and out times for the selected subtitle, and all following subtitles, will be updated (recut)
To align the current subtitle and all following subtitles to the current video time
- Find the first subtitle you need to reposition
- For example you are conforming a subtitle file due to the video being edited.
- Move the video time to the correct in time for the subtitle
- Shift+ Double Click on the selected subtitle
- This will move the selected subtitle to align with the video timecode.
- All following subtitles will move by the same time offset
- All earlier subtitles will be unchanged
- The subtitle in and out times will be updated (recut)
Edit all timecodes on the Timeline.
There are multiple ways to edit subtitle timing on the Timeline.
Timecodes can be changed in three ways:
- Adjust just the intervals (gaps) between titles
- Optionally this can include gaps to shot changes
- An Offset changes how the text files are displayed in relation to the video and system timecodes
- Changing an Offset will NOT change the timecodes stored in the text (subtitle) file
- Re-cutting a text file changes some or all of the times inside the file
Intervals
- Select Intervals from the Timing Tools menu, or one of the context menus that provide Timing options.
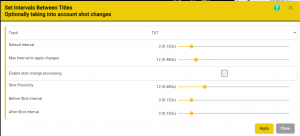
- Adjust just the intervals (gaps) between titles
- Adjust the intervals (gaps) between subtitles and shot changes
- Track: – Select which subtitle file you want to adjust the intervals for (if more than one loaded in the Project) – Defaults to the current track
- Default Interval: – Set the required interval in frames – Any adjustments will be made to the Out time of the preceding subtitle.
- Max interval to apply changes – Set the time below which changes will be applied in frames
- EG – Only adjust Gaps that are smaller than 12 frames, any larger gaps are unchanged
- Enable Shot change processing – enable the adjustment of times in relation to shot changes – Default = Off
- This required there to be a shot change track in the current Project.
- Shot Proximity – Set the range either side of a shot change where any changes should be applied
- Any in or out cue that is further from the shot change will not be changed
- Before Shot Interval – Set the out cues on any subtitles to be this number of frames before the shot change
- After Shot Interval – Set the in cues on any subtitles to be this number of frames after the shot change
Align
Change Subtitle track display offset time – Align the Subtitles to the video.
Align only changes the Offset 1 and Offset 2 for the selected file, it does NOT change the actual in and out cues in the subtitle or script file.
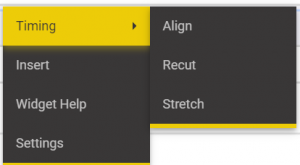
- Right click in the Timeline and select Align
- OR
- Use the Tools, Timing Tools menu to select Align
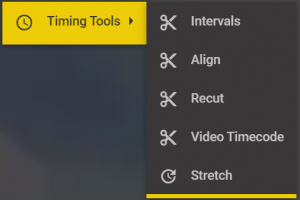
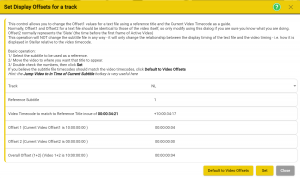
- Select the Track -(Text file) you want to offset – defaults to the current file selected.
- Select which Subtitle you will use as the reference
- If the File has a Subtitle Zero then select subtitle 1.
- Use the normal video controls to set the video to where the selected subtitle should start
- Or do this before opening the Align dialog.
- Hint: you can move the video even with the Align dialog open. Use the normal video control hotkeys, or move the mouse pointer over the video and use the scroll wheel. This allows you to fine tune the offset.
- The Offsets will be calculated automatically.
- Click Set to move the selected subtitle to the set video position.
- All other titles will move in relation to the selected title.
- You can revert to the default offsets (as set for the video file) by clicking on the Default to Video Offsets button.
Recut
Change Subtitle times for all subtitles on a track – Recut
Recut updates the actual In and Out times for some or all subtitles in the subtitle file.
Times in the subtitle file are changed (recut)
-
- Right Click in the Timeline and Select Recut
- Or
- Select Recut from the Tools – Timing Tools menu.
-
-
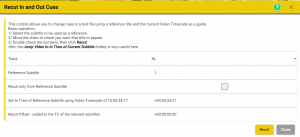
- Select the Track -(Text file) you want to recut – defaults to the current file selected..
- Select which Subtitle you will use as the reference
- If the File has a Subtitle Zero then select subtitle 1.
- Recut Only from reference –
- If set only the reference subtitle, and all following subtitles will be Recut.
- If Unset all subtitles in the file will be Recut.
- Set Intime for the reference Subtitle – Follows the video timecode
- Set by moving the video to the point the Reference subtitle should start.
- Hint: you can move the video even with the Recut dialog open. Use the normal video control hotkeys, or move the mouse pointer over the video and use the scroll wheel. This allows you to fine tune the recut time.
- Recut Offset – Displays the change (positive or negative) that will be applied to all selected in and out time cues.
-
- Click Recut
– For more information on time-code editing mouse actions see the time-code section of the Hotkeys page.
Stretching and Compressing subtitle times on the Timeline
Sometimes you need to change the subtitle in and out times relative to each other. This tool allows you to either Stretch or Compress the times for whole subtitle file. A common reason for this is due to video rate conversions that cause distortions in the runtime of the video.
WARNING: this is an advanced feature and should be used with care. There is an advanced Undo function if you need it.
- Make sure you know what the change needs to be
- Make sure you understand why this is required
- Make sure that changing the subtitle file is the best way of fixing the problem
- Before you make a change it’s good practice to make a copy of the subtitle file
- If you use the File Duplicate option in Stellar you can have a before and after copy of the file visible on the timeline for comparison.

To open Right Click on the timecode at the start of the selected track
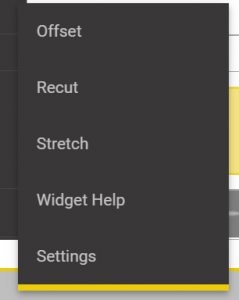
- And select Stretch
- Make sure you’ve selected the right track to modify.
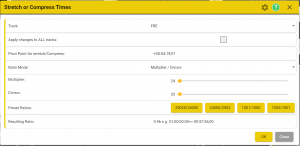
Timeline: This shows the timeline you have selected to modify – Make sure it’s the right one.
Pivot Point: This is the timecode in the video that won’t change.
- This would normally be the first frame of active video.
- If there’s a pre-roll on the video you want to start after this.
Multiplier: Sets the top value of the conversion ratio.
Divisor: Sets the bottom value of the conversion ratio.
- Use the left and right keys for fine adjustments
- Tab and Shift+ Tab will move between the Multiplier and Divisor settings
Resulting ratio: Shows the result of the ratio selected.
- The first part shows the ratio.
- Positive for Stretch
- Negative for Compress
- The second part shows the effect of the change over one hour of video
Click OK to make the change
Click Cancel or Click Esc to close the window without making the change
- The settings will be stored and shown next time this tool is selected.
Options:
You can define the preset stretch options on the configuration menu.
By default these are set to common conversion ratios.
- Click on the Settings Icon at the top of the Stretch screen:
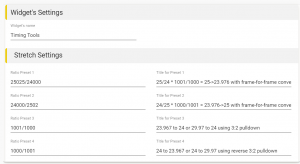
- For each of the four presets you can define the stretch ratio and a short explanation
- Each Ratio preset can be entered as a fraction or a decimal .
- The Text tile will show as hover help for that Preset.
Every audio Take is shown on the Timeline as a separate waveform. Each waveform can be trimmed, moved, gain adjusted and muted.
Waveforms are displayed in different colours:
- Blue – The audio is Unmuted and will be audible
- Grey – The audio is muted and won’t be heard.
- Red stripes with no waveform – the audio wav file is missing.
-
- The srtad or ESF file are referencing a wav file, but the file is not present in the expected location.
- This can happen if you are sent an srtad or esf file without the associated audio .wav files.
-
- Red – ESF Files only
- The Audio is unmuted but needs to be Conformed to match the limitations of the ESF file format
- The reasons a waveform may be Red in an ESF file are:
- Audio starts before Text box.
- Audio has been trimmed but not conformed.
- Audio gain has been changed but not conformed.
- There is more than one active audio for this Title and it hasn’t been conformed
- Hovering over a red audio waveform will show information on the reasons.
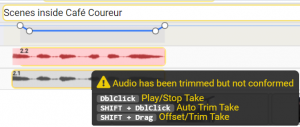
For full details of all the Audio editing controls on the Timeline see the main Timeline section above.
Each audio clip in an AD file has an associated fade setting, this controls how much, and when, the program audio will be faded down during the AD audio.
- You can move any of the circular Handles by Shift+ Dragging
- For ESF files you can’t move the fade start and end outside of the confines for the text box.
To reset the fade to the default values set in the Profile assigned to this file.
- Right click over a specific fade and select Reset Fade
- This will apply the default fade level and slope to this fade and change the timing to match the current audio clip – if present.
To edit all the fade settings for an AD file right click in the fade track to show the context menu and select Edit Fade.
- Click on Edit Fade
- Source File – Select which AD or Vo file you want to set the fades in – Defaults to current file
- Apply to all titles – If set all the fades will be set to the same settings
- If unset just the current fade will be changed.
- Target Title ID – Shows the Tile number of the selected fade – read only
- Edit Type – Select how you want the fades to be changed
- Absolute Values – set the fade(s) to the values set in dB and seconds
- Relative Adjustment – change fade(s) by a relative amount in dBs
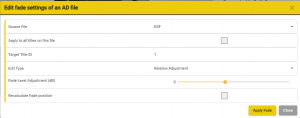
- Fade Level Adjustment – set the change required, plus or minus, in dB.
- Recalc Fade position – if set the timing of each fade(s) will be reset to match the current audio clip.
- If unset the timings will be unchanged and only the fade level will be changed.
- Recalculate Fade – Recaculate the times of the fade(s) to match the current audio clips.

- Fade levels will be unchanged
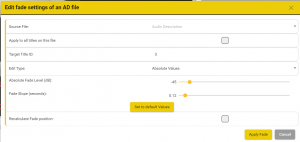
Drag and Drop a new Audio File
You can add an existing audio clip (.wav) file by Dragging and Dropping.
This is very useful if you have sections of audio you want to re-use, rather than re-recording.
- Find the audio file (.wav) that you want to import and Drag it and Drop it onto the text box on the timeline associated with that audio.
- You can only Drop audio clips onto a specific text box
- The associated file must be an AD or Dubbing file type (esf, srtad, srtdub or ttal)
- You can only Drag and Drop one audio file at a time.
Audio Recorder
The Audio Recorder Widget adds additional controls to the Media Controller and a range of hot keys to support local audio recording for Audio Description, Voiceover and Lipsync Dubbing.
See the Media Controller Widget for details of all media controls.

Audio Record Button
- Only visible if the Audio Recording Widget is loaded and the selected text column is an AD or a Dubbing file
- Grey if not enable – Hover the mouse pointer over the Record Button to see why it is greyed out.
-
- If the script file is ‘read only’ or ‘comments only’ editing mode
- If the selected text file is not an AD or Dubbing file format (esf, srtad, srtdub or ttal)
- If Stellar is in Rehearse Mode
- You can only record in Edit Mode – select Edit mode (F9)
- In a multi user dubbing session the button will be grey unless the user is selected as the Master and a user is selected as the Recorder
- See the Session Controller Widget for more details.
- Red if enabled
- Red and flashing during recoding with different test:
- Abort – Clicking will stop the recording and not save the Take
- Stop – Clicking will stop the recording and store a new Take
- Loop Record – Alt+ Shift+ Click will start a loop recording of the selected title or the time set by the Markers
- Endless Record – Alt+ Click will record from the start point and keep recording for a configured maximum time or until the Record button is clicked (Stop).
Role Selector
- Only visible if the Audio Recorder Widget is loaded, the column is selected and there are more than one Role is specified.
- Select which role to Record, or All Roles
- If a specific Role is selected then the lines for that role will be shown on the top line of the Rythmoband (if enabled).
- Only Lines for the selected Role will be recorded.
Settings
Right click on the record button or go to the Audio Recorder settings in the Widget settings.
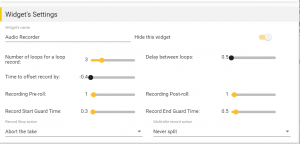
- Hide this widget – Normally enabled
- If turned off an engineering display will show in the main display area.
- Number of Loops – Set how many loops should be recorded in a Loop Record
- Default 3
- You can always stop sooner by clicking the Record button in Stop mode or pressing Esc.
- Delay Between Loops – Set the delay time in seconds between loop recordings
- Time to Offset record by – Sets the offset to where the Take is placed on the timeline
- Recording Pre-roll – the time for the video to play before recording.
- This sets the time the video plays for before the voice artist starts speaking.
- Recording Post-roll – the post-roll time for the video after the record end point
- This sets the time the video continues to play after the voice artist should stop speaking.
- Record Start and End Guard Times – Sets the extra record time before and after the expected record time
- This allows for audio that starts early or ends late
- The guard band will be auto trimmed off but is not deleted and can be revealed by dragging the end trim points on the Take.
- Record Stop Action – Sets what happens when you stop a recording short, instead of letting it finish automatically.
- Abort the Take – No new Take will be recoded
- Keep only new Take – A new Take, that stops short, will be kept and the old take muted.
- Merge on Timeline with existing Take(s) – the new, short, recording ‘punches in’ on the timeline with all existing Takes.
- Existing Takes are trimmed to fit in the new Take, but no audio is lost as you can always retrim any of the Takes.
- NOTE: Doesn’t apply to Endless Record mode.
- Multi Title Record Action – When an Endless Recording is done the audio Take may overlap more than one Title
- If not Split a single audio Take will be shown:
- Splitting will make copies of the Take and assign one to each Title covered by the recording.

- Once Split each Take can be moved and trimmed on the timeline.
- Select from
- Always Split
- Never Split
- Ask – A dialog will pop up asking if you want to Split
- If not Split a single audio Take will be shown:

Fade Settings
- Fade settings apply to how the Fade levels are set for each Take
- This is normally only used for AD and some VO recordings where the program audio needs to be faded down during AD audio or the voice replacement audio.
- AD Fade Mode – Sets Auto or Manual mode
- Default – Auto
- If Auto then as a Take is recorded, moved or trimmed the default settings will be applied
- If Manual then the default settings will only be applied on record.
- Default Fade – sets the level to fade the program audio down by, in dB.
- Fade Duration – how long the face from zero to the set fade level should take – in seconds
- The same fade time is applied to both the fade down and the fade up.
- Fade Offset – Sets the offset from the start (or end) of the audio and the low points of the fade – The offset can be positive or negative.
-
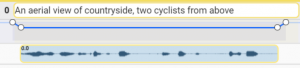
-
If Fade Duration = 0.12 (3 frames) and Fade Offset = 0, then the fades will be ‘outside’ the audio.
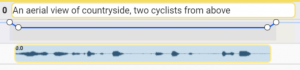
-
If Fade Duration = 0.12 (3 frames) and Fade Offset = 0.06, then the fades will centred around the ends of the audio.
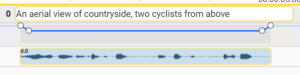
-
If Fade Duration = 0.12 (3 frames) and Fade Offset = 0.12, then the fades will be INSIDE the audio (against the ends).
-
Hotkeys
- F12 or Ctrl+D – Record one title
- F12 while recording will keep a partial take once recording has started – will abort if still in pre-roll
- Alt+F12 – Endless Record
- Record the current title and then keep going until stopped (F12 to keep recording, Esc to abandon)
- Max timeout 4 minutes
- Alt+Shift+ F12 – Loop Record
- Multiple recordings for the current title
- Number of loops set in the recorder widget settings
- Esc – Abandon current recording
- Any completed loop recordings will be kept.
Mouse Controls
- Click on record button – Start recording
- Record just the selected Title,
- Abort or Stop recording – depending on mode
- Alt+ Shift+ Click on record button – Loop Record
- Start recording the selected Title multiple times in a Loop
- Alt+ Click on record button – Endless record
- Start recording at the current marked location (Red markers) and continue recording until Stop is clicked.
- Max timeout 4 minutes
- Right Click on record button – Open Audio Recorder settings dialog.
Volume Manager
The Volume manager Widget adds a set of volume controls that allow control of all the different audio levels in a single widget.
If the Volume Manager Widget is loaded you will see the speaker Icon in the top row.

If not then add the Volume Manager Widget to your Layout, if not already loaded. – How to load Widgets.
The Volume Manager Widget can be used in two different modes:
- Hidden – the controls will pop up when you click on the Speaker Icon in the top bar and close when you click again or press Esc.
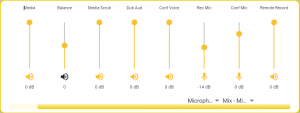
- Fixed widget – the controls are always visible and can be positioned anywhere on the screen. (You can still use the pop up version too)
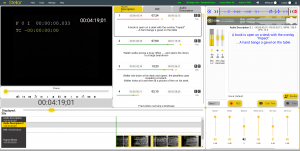
- If the Speaker Icon is Red it indicates an error with one of the audio inputs.

- Select from the available microphones by using the drop down selection below the Recording and Intercom faders (if present).
Each slider has a mute button below to mute that output or input.
Microphone inputs, if present, each has a source selection dropdown.
-
- Note: Microphone selections are stored as a personal preference on your copy of Stellar and are not part of a Layout.
- This means that you only need to make the selection once, unless you change the microphones available on your Mac or PC.
- If no valid input is selected the associated slider will turn Red.
-
- Note: the Recording microphone for recording AD and dubbing audio must be set for 48kHz sample rate.
- Any other rate will give an error.
- See Here for instructions on how to configure the microphone inputs on PC or Mac.
The number and type of volume controls displayed is determined by the other widgets selected.
- Master Volume – always preset. Sets the overall output volume, has no impact on input (microphone) levels.
- Media Controller Widget
- Media – sets the level for the program audio in Play mode
- Media Scrub – sets the level of the scrub audio when single stepping the video.
- Audio Recorder Widget
- Dub Audio – sets the level of the playback and scrubbing (if enabled) of the recorded audio (AD, Voice Over or Dubbing)
- Dub Audio – sets the level of the recorded audio playback during preview.
- IMPORTANT – the Dub Audio level only sets the level during playback within Stellar. To get a realistic representation of the final output mix set the Media Level and the Dub Audio level to the same setting.
- Foldback – sets the level of program audio, and any other audios enabled, you will hear (if enabled) during a recording. This would normally be the level you hear in your headphones as you record.
- Record Mic – sets the input microphone gain with associated microphone source selection.
- Note – in a multi-user recording session this control will set the gain of the recording microphone on whichever user is set to record.
- The record gain level for that user is stored on the local machine.
- Remote Record – When recording with a remote user this control sets the level you will hear in real time. Does not effect the level of the audio actually recorded and is used only to set the audio balance for your local workstation.
- Collaboration Widget
- Intercom – sets the level of the intercom audio
- Intercom Mic – and associated input selection – sets the sensitivity of the local intercom microphone.
Settings:
- To select which mode to display set the ‘Hide this widget’ switch on the Configuration screen
Context Menu:
Right click in the video area to show the context menu:
- Widget Help – Open a new tab with the help section for this widget
- Settings – Open the settings dialog for this widget
Mouse Actions:
Right Click in widget area – Open widget specific context menu.
Alt+ Right click in widget area – Open widget specific Settings dialogue.
Collaboration and Intercom Widget
The Collaboration Tool and Intercom Widget provides a set of controls to allow collaborative working between two or more users to record audio for Dubbing, Voice Over and AD.
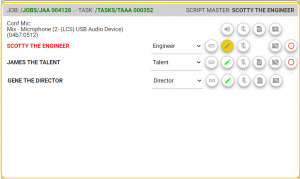
The users can be in remote locations in or in the same recording studio and still collaborate, share and edit a script, talk over the intercom and record, review and re-record audio clips.
Setting up a Session
- Before you can use the intercom or collaboration features all the users must join the same Session. This is defined by the Task name as selected in the Task List.
- Users are defined as Engineer, Director, Talent, Adapter or Viewer with different levels of privileges and different controls.
- Each user’s name is displayed in the Session widget, these names can be edited by each user and by the Engineer or Director.
- Your name will always be the one on the top row.
- The Project for the Session will include all the media, the Script and possibly any audio that has already been recorded.
- The Script may contain all the parts (characters) for the media, if more than one.
- Once the Session has started and all the Users have joined you’re ready to start recording.
Leaving a Session
- To leave a Session either:
Session and Intercom Controls.
Group controls
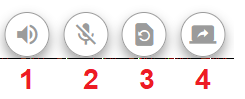
- 1. Intercom Mute Button
- Mutes the intercom audio on this machine.
- Note: when a recording is in progress all intercom audio is muted automatically.
- 2. Master microphone Mute Button
- Allows any Users (except a Visitor) to mute all intercom microphones.
- 3. Master Screen Refresh Button
- Allows the Engineer and Director to refresh all users’ screens.
- This is useful to put all machines into a know state.
User Controls
Each current User in the Session is listed with a number of controls.
The controls visible will depend on the Users’ type: Engineer, Director, Talent, Adapter or Viewer .
- User name – a text name that will be seen by all users in the Session.
- All Users can edit their own name and the Engineer or Director can edit all names.
- Each users’ own name will be on the top row and highlighted red in their workstation.
- User Type – Set to either Engineer, Director, Talent, Adaptor or Viewer. Only an Engineer or Director can change these settings.
- Link Button

- The Link Button has three modes.
- White – Click to select – This user is part of the Session and is ready to participate. The Master User will control this machine.
- Yellow – Click to select – This user is the master User and control all other machines with a Green Link. Only a Director or Engineer can become the Master User.
- White Link with bar – Click and hold to select – This user has opted out of control by the Master User but is still in the Session.
- The Master can not take control of this machine but the User can still talk on the intercom.
- This is a useful mode if for example the script Adapter wanted to make text edits while the other users continued to record.
- The Master can not take control of this machine but the User can still talk on the intercom.
- Script edit Button

- The Scrip Edit button allows any User (except a Viewer or Talent) to take control of editing the Script.
- Only one user at a time can edit the Script.
- Click take control of editing, any user currently with control will no longer have control.
- The button will turn Yellow.
- Click to relinquish control.
- Click take control of editing, any user currently with control will no longer have control.
- All script edits will be synchronised between all users.
- Intercom microphone Button

- The Intercom Button controls the local microphone.
- Click to mute or un-mute your own microphone.
- When muted there will be a line through the microphone icon.
- A Director or Engineer can control other users microphones.
- When recording the intercom function is automatically muted.
- Click to mute or un-mute your own microphone.
- Browser Refresh Button

- The Browser Refresh button allows user to refresh their own browser and for the Director or Engineer to force a refresh for other users.
- This feature can be useful as a quick fix on remote machines.
- Share Screen Button

- The Share Screen Button allows the Director or Engineer to request a Screen share from other Users.
- Once clicked for a User that User will see a Request Dialog, if they accept then their screen will be shared in a new browser tab.
- This feature can be useful for diagnosing problems on remote machines.
- Enable Recording Button

- The Enable Recording button allows the Engineer or Director to select which Talent (if more than one) to do the next recording.
- Only one user can be set to Record at any one time.
- Only Talent and Engineers can be set to record.

- When selected the centre of the circle will be red.
Context Menu:
Right click in the video area to show the context menu:
- Widget Help – Open a new tab with the help section for this widget
- Settings – Open the settings dialog for this widget
Mouse Actions:
Right Click in widget area – Open widget specific context menu.
Alt+ Right click in widget area – Open widget specific Settings dialogue.
Settings:

Widget Settings:
Hide this Widget:- if set the user controls are hidden but the Conference functions are still active.
- This is useful for simplified Layouts for Talent and non technical users.
- The basic intercom functions can still be accessed via the Intercom Overlay – see below.
Session Settings:
Group Server connection:- This is the address of the server running the Nebula Conference Process.
- This should be configured for you, if in doubt check with your IT team.
Collaborative Settings:
Select Default Role:- set the user type for this Layout. This value can be changed in the Conference controls
Select Intercom Microphone:- set the local microphone to be use for the intercom.
- This can be the same as the record microphone on a recording (Talen) workstation, but can be different.
Remote recording delay:- Used to compensate for the network communication delay between workstations in the same Session.
- Adjusting this will adjust the timings between pressing Play on one machine and the start of playback on remote machines.
- It won’t have any impact on the quality or timing of audio recorded.
Intercom Overlay Settings:
Select Position:- select the position in the Video Widget to display the simple intercom controls.
Audio Tools Plugin
The Audio Tools plugin Widget adds new entries to the Tools menu on the top bar.
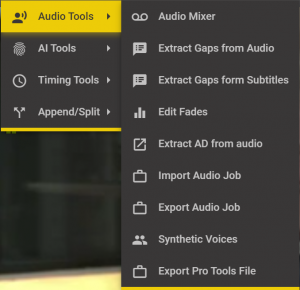
This Plugin adds a range of new tools to help with AD and Dubbing workflows
- Audio Mixing
- Open the Audio Mixing dialog.
- Create output mixes in various formats directly from within Stellar.
- Extract Gaps
- Open the Extract Gaps dialog
- Create a blank AD script file by either:
- From the program Audio – Use Automatic Speech Recognition services (ASR) to analyse the program audio and work out where there are gaps in the dialog
- From a Subtitle file – analysing an existing subtitle file to look for gaps in the dialog.
- By detecting the gaps in the dialog it is possible to find space for the AD narration.
- Create a blank AD script file by either:
- Open the Extract Gaps dialog
- Edit Fades
- Open the Edit Fades dialog to make changes to some or all of the AD fade levels and times.
- Extract AD from Audio
- Open the Extract AD from Audio dialog.
- Recreate an AD file (ESF or srtad) from an AD audio track by detecting silence between audio segments.
- The audio track must be AD voice only without program audio
- Creates an AD file (srtad) with no text but with timing, pan and fade settings and individual wav files
- Used to recreate and then edit AD files where the original AD source files have been lost.
- Open the Extract AD from Audio dialog.
- Import Audio Job
- Open the Import Audio Job dialog to allow you to select an Audio Job zip file and add it to the current Project
- Export Audio Job
- Open the Export Audio Job dialog to allow you to select an AD or Dubbing file in the current Project and export it as an Audio Job zip file.
- Synthetic Voices
- Open the Synthetic Voices selection and configuration dialog to set the synthetic voice preferences for the current Project.
- Export Pro Tools file
- Open the Pro Tools Export dialog to save the AD, VO or Dubbing script and all audio recordings from the current Project as a Pro Tools project
- This can be opened directly in Pro Tools.
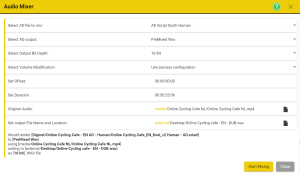
Settings.
- Select AD or Dubbing File to mix
- Use the drop-down to select one of the currently loaded AD or Dubbing files
- Select Audio Output type
- Use the drop-down to select which output format you want to create.
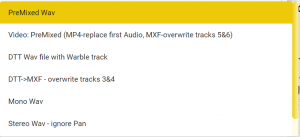
- Premixed Wav – An audio Wav file for the whole program containing the original program audio plus the AD audio mixed together and using the Fade levels set for each audio clip.
- Video: Premixed – Adds AD or Dubbing audio mixed in to the program audio to either an .mp4 or .mxf video file. In an mxf file the audio replaces any audio currently on tracks 5&6.
- DTT Wav file with Warble track -An audio Wav file for the whole program containing just the AD audio in the format used for the UK DTT broadcast services. This consists on a mono audio track containing just the AD audio and a separate control (warble) track created using the Fade and Pan levels set for each audio clip.
- DTT->MXF – Updates an MXF file with an additional pair of audios on tracks 5&6 containing just the AD audio in the format used for the UK DTT broadcast services. This consists on a mono audio track containing just the AD audio and a separate control (warble) track created using the Fade and Pan levels set for each audio clip.
- Mono Wav – An audio Wav file for the whole program containing just the AD or Dubbing audio. Any Fade or Pan settings will not be used in this format.
- Stereo Wav – Ignoring Pan – An audio Wav file for the whole program containing just the AD or Dubbing audio with the same signal on both tracks of the stereo pair. Any Fade or Pan settings will not be used in this format.
- Stereo Wav – With Pan – An audio Wav file for the whole program containing just the AD or Dubbing audio taking into account any Pan settings. Any Fade settings will not be used in this format.
- Select Output Bit Depth
- 16 or 24 bit
- Select Volume Modification
- The overall AD volume can be modified on output. select the change, or none from the drop-down.
- Set Offset
- Set an offset if you want to start from any position other than the start of the file.
- Default: 00:00:00:00
- Set Duration
- Set a duration if you want to mix less than the full program length
- Default: program length
- Original Audio
- If you are creating a program mix output, as opposed to AD audio only, you need to specify the source program audio file.
- This must be a PCM Wav file in either 16 or 24 bit.
- The file must be located in the …stellar\media folder or a subfolder.
- If a video file is specified then the audio track will be extracted to create a WAV file
- If the output type selected is MP4 Video then you must specify the original video file and the AD audio will be mixed in to a new copy of the video file.
- If you are creating AD audio only outputs, (I.E. no program audio) then this field will not be shown.
Once you have set all the parameters press the yellow Start Mixing button.
The Start Mixing button will be replaced by an Abor Mixing button in case you want to stop the mixing process for any reason.
The mixing progress will be shown below the Mixing button.
All settings will be retained for future use within the current Project.
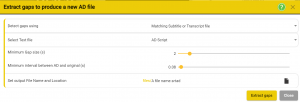
Settings
- Detect Gaps using:

- Select one of:
- Automatic Speech Recognition (ASR)
- Use this option to use the ASR service to look for dialog in the program audio.
- Matching Subtitle or Transcript file.
- Use this option to use an existing timed dialog file (subtitle or transcript)
- The source file must already be part of the current Project.
- Use this option to use an existing timed dialog file (subtitle or transcript)
- Automatic Speech Recognition (ASR)
-
ASR Option
- Select the source audio language
-
Text file option
- Select Text File
- Select a source subtitle file as the input
- The subtitle file must be loaded as part of the current Project
- See Here for adding files to a Project
- Min Gap size
- Set the minimum gap in the subtitle files to be detected
- Default: 2 seconds
- Minimum Interval between AD and original.
- Set how big a gap to allow between the end of dialog and the start of AD audio.
- Default 0.08 seconds
- Set output file name and location
- Set up the details for the new AD file
- Note: Only AD file formats are supported as outputs (srtad)
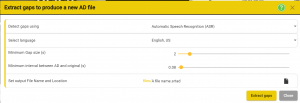
Click on the Create new file button to create the new blank AD file
A new file will be added to the Project with the name ad_ prefixed to the current subtitle file name and will be visible in the text columns. There will be no text in the new file but the in and out times for each gap will be set. These new blank text items can be edited, split, merged or deleted as required.
If you use the ASR option it may take some time to process the file so this will run as a background Process. See here on how to monitor background processes and how to add the new file to the Project when the process has finished.
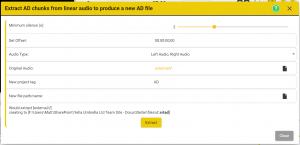
Settings
- Minimum silence
- Sets the minimum time in seconds that will be detected as a separate audio segment.
- Set offset
- Set the start timecode for the audio
- Default: 00:00:00:00
- Audio Type
- Select from the drop-down the type of audio input file to be processed
- Original Audio
- Set the path and filename for the input audio file to be processed
- The file must be located in the …stellar\media folder or a subfolder.
- If a video file is specified then the audio track will be extracted to create a WAV file
- New file path/name
- Set the location and file name for the output AD file and wav files
- The all AD files (esf or srtad) MUST be located in their own subfolder of the …stellar\files folder to keep all the wav files together and separate from other AD tasks.
Click on the yellow Extract button to process the file.
A new srtad file will be created and added to the current Project. This will contain timing information and audio segments but no text.
Synthetic Voice Plugin Widget
The Voice Render Widget adds a new entry to the Tools menu on the top bar called – Voice Render,
Or you can access the settings dialog by right clicking on the Synthetic Voice control on the media control widget.
![]()
Voice Render
This control allows the selection and configuration of synthetic voices to be used to speak the text for AD, VO or Dubbing. Over 400 voices in more than 25 languages are available.
Select the Voice Render option on the Tools menu to pop up the control dialogue.
Before you can use a synthetic voice you need to select it and configure the render settings.
- Select AD File – select one of the text files contained in the current Project – there may only be one.
- Select the language for the voice – Normally you will select the language to match the text language although it is possible to select a different language to have an accented speaker. EG. Select a French voice for English text to hear it spoken with a French accent.
- Select default voice – select one of the listed voices, the selected language voices will be at the top of the list and all other voices listed below.
- Select voice rate – select between 50% and 150% – some voices speak faster than others, experiment to get the best default speaking rate.
- Set pitch modification – select between 50% and 150% – some voice engines support pitch modification, experiment to get the result you want.
- Rate Control – provides additional speaking rate controls:
- None – the voice will always speak at the rate set in the Voice Rate control, this may cause the audio to exceed the timing constraints for the text element.
- Re-render if over length – if the audio is too long for the duration set for the text then it will be re-rendered at a faster speaking rate to make it fit. This may make it unacceptably fast so you need to check.
- Re-render to match length – all speech sections will be rendered at a rate to fit the text duration.
- Set Volume scheme:
- None – there will be no changes to the volume as shown in the AD widget.
- Normalise – select between 0 and – 21 dFBS peak
- Adjust – select between -9 and +9 dBFS
Once the configurations have been set there are three options to render the voice.
- Render ALL Titles – This will render all the text elements in the selected AD file with the new voice. Any existing audio will be lost
- Render those without audio – This will render all the text elements in the selected AD file which don’t currently have any audio with the new voice. Any existing audio will be preserved.
- Close the widget. – this will not render any new audio but the settings will be preserved. You can then use these settings to render individual text elements by using the Synth Voice button
 in the Media Controller – See item 20.
Troubleshooting
If you don’t see all four voice suppliers listed see the Troubleshooting section for more information;
Automatic Speech to Text (ASR) Tools Plugin
ASR = Automatic Speech Recognition
By adding an ASR Plugin to your Layout you can access a range of tools to automatically convert spoken audio into text or to align an existing script to the spoken audio track.
See Selecting Widgets for more details on how to do this.
The ASR services are provided by external suppliers and you have a choice as to which one to use. These are charged for services so make sure you are aware of the costs as these will be deducted from your Yella account. For more cost information see the associated Nebula Process .
Once you have added the ASR Plugin, or selected a Layout that already has this plugin loaded, you will see some some new options on the Tools menu.
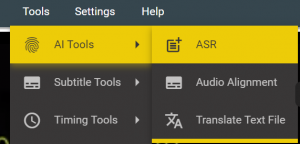
Under the AI (Artificial Intelligence) option there are two new ASR based tools.
- ASR – Converts audio directly to an SRT subtitle file
- No ASR processes are 100% accurate so you will need to decide how much editing is required
- Audio Alignment – Takes an existing text script file and creates an SRT subtitle file with correct timing.
- If the script file is correct then the resulting subtitle file will be too, but you may wish to review the subtitle splitting decisions taken by the AI.
You can also access the ASR dialog by right clicking in the video window and selecting ASR
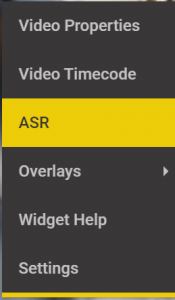
ASR Controls
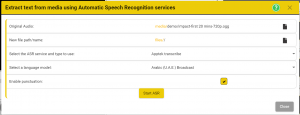
To create an SRT subtitle file directly from the audio:
- Original Audio
- Use the green browse button to select the source media file that contains the audio to used.
- This can be a video or audio file.
- The first audio track in a video file will be used, if more than one is present.
- New file
- Set the name and location of the new SRT subtitle file.
- Select which external ASR service to use
- Select the supplier
- In some cases the supplier offers more than one service type
- Select the language model
- Some suppliers offer different language and audio quality models
- It’s important you select the right language to match the spoken language in the source audio.
- Enable Punctuation.
- Some suppliers offer the option to add punctuation
- Enable or disable this here.
To start the process click on the large Start ASR button.
This will start the external process. Depending on the length of the media and how fast the external services processes you job this may take some time. You don’t have to wait for it to complete as the process runs in the background, so you can close the ASR screen with the Close button.
The progress of all external services is shown in the top menu bar. See Here for more information on monitoring external service progress.
Audio Alignment Controls
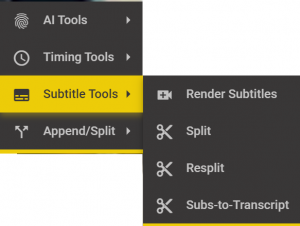
To align an existing Script file (text without any timing information) to the spoken audio and convert to split the text into subtitles in an SRT subtitle file:
- Original Audio
- Use the browse button to select the source media file that contains the audio to used.
- This will default to the source file used to create the Project – if still accesible.
- This can be a video or audio file.
- The first audio track in a video file will be used, if more than one is present.
- Use the browse button to select the source media file that contains the audio to used.
- Original Text for alignment
- Use the browse button to select the script file containing the untimed text.
- This must be a .txt file.
- This must be a plain text file with the words in the correct sequence
- Use the browse button to select the script file containing the untimed text.
- New file
- Set the name and location of the new SRT subtitle file.
- This file must be in the folder /Stellar/Files or a sub folder
- This file must be an SRT file.
- Set the name and location of the new SRT subtitle file.
- Select which external ASR service to use
- Select the supplier
- In some cases the supplier offers more than one service type.
- Select the language model
- Some suppliers offer different language and audio quality models
- It’s important you select the right language to match the spoken language in the source audio.
- Chars per Sec – Set the Characters per second rate to be used when calculating subtitle durations.
- Max Chars per Line – Set the maximum number of text character per line that should be used when calculating the text layout.
- Min Line Time – Set the minimum time allowed for a single line subtitle to be on screen, in milliseconds.
- Max Subtitle Duration – set the maximum amount of time a subtitle should be visible on screen, in milliseconds.
- Minimum Interval – set the minimum time for the interval (gap) between two subtitles, in milliseconds.
- Average Pop Delay – set the average time a subtitle should stay visible after the text has been spoken.
- Maximum lines per Subtitle – set the maximum number of lines to be used when calculating how to split the text into subtitles.
- Min silence before “…” added – Set the minimum time between words before ellipses “…” are added.
- These are added if the ASR engine has calculated that there is a pause in speech but not then end of a sentence.
- In this case ellipses will be added to the end of the first subtitle and the beginning of the next, to indicate a continuation.
To start the process click on the large Start ASR button.
This will start the external process. Depending on the length of the media and how fast the external services processes you job this may take some time. You don’t have to wait for it to complete as the process runs in the background, so you can close the ASR screen with the Close button.
The progress of all external services is shown in the top menu bar. See Here for more information on monitoring external service progress.
Loading the finished SRT file.
Once the conversion process has finished the status display will change to give you a number of options.
To see the Status display at any time Right Click on the Status in the top menu bar
The Process Status screen will list all external processes, both those ongoing and those that have completed.
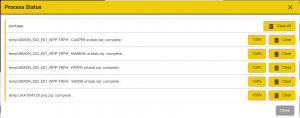
For ASR processes, once completed, there will be two blue buttons:
- + Project
- Click this to add the new SRT file to the current Project.
- Locate
- Click this to open your file browser and locate the file on disk
- This is useful if you want to move the file to a new location or share it with someone.
Clear and Clear all just clear the results from the status page. No files are deleted.
Find and Replace
![]()
To Find and Replace text in any text file either:
- Click on the Find icon in the top bar
- Press Ctrl+ F to Find
- Press Ctrl+ H to find and replace
Find
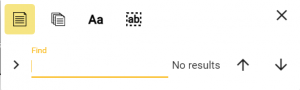
- Enter text to find
- Any highlighted text will automatically be entered as the Find text.
- Any text found in any visible subtitle or script box will be highlighted
-
-
- Step through multiple instance of the search text by:
- using the up and down arrows on the keyboard
- by clicking the up and down arrows on the find dialog
- by pressing Enter on the keyboard
-
Find Options

- Find only in the current Text file
- Only text in the currently selected text file will be searched.

- Find text in all Text files
- Search in all the Text files in this Project.

- Match Case when searching

- Only match whole words
Replace
-
- To show the Replace options either:
- Press Ctrl+ H on the keyboard
- Click on the > symbol in the Find dialog.
- Press the Tab key on the keyboard
- Enter the Replacement text
- To replace a single occurrence
- click on the single tick icon
- Press Enter on the keyboard
- To replace all occurrences In one or all files as selected using the icons above)
- Click on the double tick icon
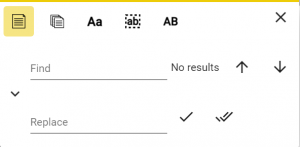
Replace Options – Future Feature
- In addition to the Find options above when replacing you can

- Preserve the capitalisation of the original (replaced) text.
OCR – Optical Character Recognition – Extracting text from video – Beta Release
Note: The OCR Process must be running for this option to be available.
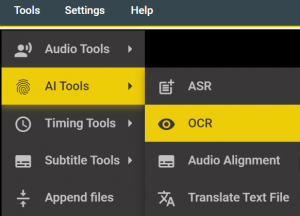
The OCR process looks for any text visible in the video. Any words found are then extracted and turned into editable text in a new Text file in the current Project.
Optionally a new image track is created showing the filtered video image of the text.
Extracting text from video has many uses:
- Translating the text for overlays.
- Detecting text to help position subtitles to avoid banners.
- QC of text vertical positioning.
- Media metadata capture.
Select the OCR option from the Tools, AI Tools menu
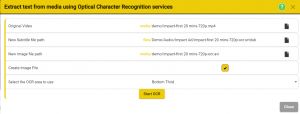
- Original Media File
- This is the source video that will be processed to find any text.
- It should be the high resolution original video, not the lower resolution browse copy using within Stellar
- Where possible Stellar will default to the original source file, if it is accessible from Stellar.
- New Subtitle File
- Set the name and location of the file to contain the Text
- The default is the media name with ‘OCR’ appended
- New Image file
- Set the name and location of the optional image file
- The default is the media name with ‘OCR’ appended
- Create image file
- Select if you want the image file to be created
- Select the OCR Area
- Select which area of the video is to be searched.
- The larger the area the slower the process will be.
- Lower Third is the default.
- Click Start OCR to trigger the process.
- Depending on the search area selected the length of the media this process may take some time
- The process runs as a background process.
Subtitle Tools Widget
The Subtitle Tools Widget adds a new set of options to the Tools menu.
Renderer Subtitles
Rendering subtitles is the process of taking text, plus some style information, and creating an output that combines video, audio and subtitles in a single file.
There are many different formats used to deliver subtitles with media and the Subtitle Render tool supports many of these.
- Select the Render Subtitles option from the Tools – Subtitle Tools menu.
-
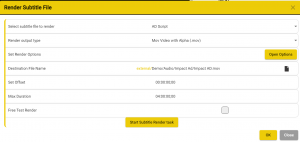
- Select subtitle file to render
- Select which file in the current Project contains the text to be added to the output.
- Render output type
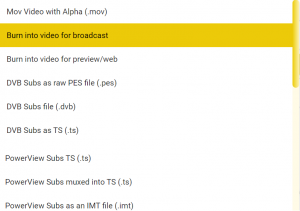
- Select one of the available types
- Mov video file containing subtitles with clear backgrounds, used for overlaying in professional video editing tools
- Subtitles burnt-in to the video for Broadcast – uses full resolution original video media -most video formats supported
- Subtitles burnt-in to the video for preview or web – uses lower resolution media and only supports .mp4 format
- Program Stream File : DVB Bitmap subtitles as raw PES packets, suitable for muxing into DVB TS using various muxing tools
- DVB Stream File: DVB Bitmap subtitles as a .dvb file, suitable for muxing into DVB TS using various muxing tools.
- Transport Stream File – Subtitles only: DVB Bitmap subtitles as a .ts file, suitable for muxing into DVB TS using various muxing tools.
- Transport Stream File – Full stream : DVB Bitmap subtitles as a .ts file, suitable multiplexed into DVB TS ( TS input file required)
- Powerview subs – A transport stream fiel containing only subtitles
- Powerview subs muxed into TS – subtitles added to an existing transport stream file containing video and audio ( TS input file required).
- Powerview subs as an IMT file – subtitles only in the IMT file format.
- Set the render options
- Opens a dialog to set the render parameters.
- Source Media File – if required
- If burning in to video media or multiplexing into a transport stream you need to select the source file.
- Browse to select the source file
- Destination file name
- Set the location and name of the final output file
- Set Offset
- If required set a timecode offset to be added to the subtitle start times
- Max Duration
- Set to a short time if you want to do a test render of the first few minutes rather than the whole program.
- Free test render
- If selected the output will be free of charge but spoiler graphics will be added along with the text.
- Opens a dialog to set the render parameters.
- Select subtitle file to render
- Click Start Subtitle Render Task
- Depending on the output type and the length of the media this process may take some time
- The process runs as a background process.
-
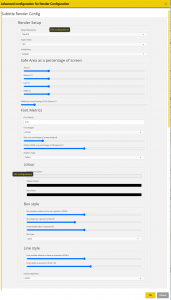
Transcript to Subs – Split a Transcript into Subtitles
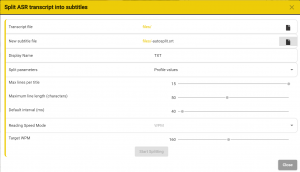
The Split tool takes an existing timed word list (transcript), for example from a speech to text service (ASR) and splits the text into a set of subtitles, based on some splitting and timing rules.
- Transcript File – Select the source transcript (ASR) file
- This must be in the Yella Timed Wordlist JSON format.
- This is the format created by all the ASR services supported in Stellar.
- This must be in the Yella Timed Wordlist JSON format.
- New subtitle file
- Use the browse button to set the filename and location of the new subtitle or script file
- This can be any Stellar internal format
- Select a Profile for the new file, this determines the splitting and timing parameters to be used.
- Use the browse button to set the filename and location of the new subtitle or script file
- Display Name – the name that will be used for the new file on the timeline row and text column.
- Split Parameters – select how the splitting and timing parameters will be set
- Profile Values – set by the Profile selected for the new file – Default option
- Custom – you can set the values directly in the dialog.
- Parameters
- If Profile Values has been selected these controls are grey and will show the values set in the Profile selected.
- If Custom is selected these controls are enabled and values can be set here.
ReSplit a Subtitle File
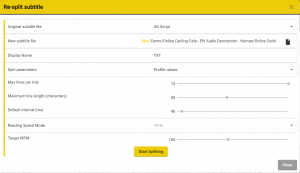
The Split tool takes an existing subtitle file and resplits the text into a new set of subtitles, based a different set of splitting and timing rules.
- For example to convert from a 37 characters per line, three row Teletext subtitle file to one suitable a streaming service with 42 characters per line and 2 row subtitles.
- Original subtitle file
- Select one of the files already in the current Project
- Load the file if not already in the Project
- Select one of the files already in the current Project
- New subtitle file
- Use the browse button to set the filename and location of the new subtitle or script file
- This can be any Stellar internal format
- Select a Profile for the new file, this determines the splitting and timing parameters to be used.
- Use the browse button to set the filename and location of the new subtitle or script file
- Display Name – the name that will be used for the new file on the timeline row and text column.
- Split Parameters – select how the splitting and timing parameters will be set
- Profile Values – set by the Profile selected for the new file – Default option
- Custom – you can set the values directly in the dialog.
- Parameters
- If Profile Values has been selected these controls are grey and will show the values set in the Profile selected.
- If Custom is selected these controls are enabled and values can be set here.
Subs to Transcript – Turn a Subtitle file into a Transcript file.
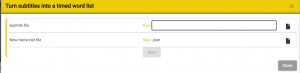 The Subs to Transcript option allows a subtitle file to be converted to a timed word list.
- Subtitle File – select the subtitle file to be converted
- New transcript file – set the location and filename for the new transcript file.
- The output will be in the Yella Timed Wordlist JSON format.
The process will use the subtitle timings, word lengths and calculated reading speed to estimate a time for each word.
Web Search Widget
Adding the Web Search Widget to a Layout enables a number of shortcuts to make it easier to search the web for text in you subtitle or script file.
Search Google – Alt+ G
- Any selected text in a subtitle or script box will be used as the input for a Google search.
- Google will open in a new browser tab.
Search Wikipedia – Alt+ W
- Any selected text in a subtitle or script box will be used as the input for a Wikipedia lookup.
- Wikipedia will open in a new browser tab.
Translate text using Google Translate – Alt+ Shift+ T
- Any selected text in a subtitle or script box will be used as the input for a Google Translate.
- The output language of the translation will be set by you Google preferences.
- Google Translate will open in a new browser tab.
- This feature is in addition to the other Translation options within Stellar
External Widget Container
The External Widget Container provides a way of adding custom widgets that are not part of Stellar as standard.
External Widgets are loaded using the Config screen for the External Widget Container and multiple different custom widgets can be loaded. External Widgets are useful for custom applications such as interfaces to job management and work scheduling systems.
To learn more about creating your own custom widget or having one created for you please contact ‘Sales at Yellaumbrella.tv’.
Trouble Shooting and FAQ
If you have problems running Stellar check through this list of common problems first.
For more technical troubleshooting help see the Stellar and Nebula FAQ pages.
First things to try:
Try each of these fixes in order. If number 1 doesn’t fix the problem try number 2 and so on.
- Refresh the browser page
- Either click on the refresh control in the browser top bar or press F5.
- Do a Hard refresh by pressing Shift+ F5
- Do a Soft Restart on the Nebula Device:
- Open the Device page
- In Windows click on the Yell Umbrella icon in the tool tray

- For Mac click on the Status item on the top bar.

- This will open the Device page in a new browser tab.
- Click on the Soft Restart on the Control tab
- Wait for 60 seconds and see if the Stellar button reappears on the Launch Tab.
- Open the Device page
- Do a Hard Reset on the Nebula Device
- Close the Stellar Tab
- Click on Hard Restart on the Control Tab
- Close the Nebula Device tab in Chrome
- Wait 60 seconds and start the Nebula Device again
- Open the Nebula Device page and see if you can start Stellar
- If the device hard-restart does not solve the issue, you should perform an Empty Cash and Hard Reload in Chrome.
- In the tab where you have Stellar open. Press Ctrl + Shift + i – this will open the console.
- Go to the refresh icon -> right click on it -> Empty Cache and Hard Reload.
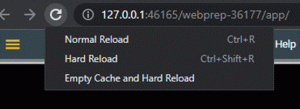
- Restart your Mac or PC and try starting Stellar as normal.
- If you still can’t get Stellar to run then contact ‘support at yellaumbrella.tv’
Also have a look at the Stellar and Nebula FAQ pages
Advertisement Blockers
It is possible, under some circumstances, for Ad Blockers on you computer to intercept parts of Stellar. Some Ad blockers see any references to AD (Audio Description) as an advert!
Either turn off your Ad blocker or make the Stellar address a safe location for your Ad blocker.
- Depending on your Ad blocker this will either be just the local address 127.0.0.1
- Or the full link to your copy of Stellar. Copy the link in full from the Chrome address bar when the Stellar Tab is open.

- Note: The numbers after the base address (127.0.0.1) will be different for your copy of Stellar.
Windows App restrictions
Windows can be set up to stop applications being loaded from anywhere except the Microsoft Apps store. To use Stellar you will need to change this restriction.
NOTE: Windows machines only.
- Open the Start menu and click on the gear icon to open Settings
- Click on the Apps option
- Check to see if the option ‘Choose where to get apps’ is set to ‘Microsoft Store only’.
-
- If it is, click on the selector and choose any of the other three options.
- Close the Settings box.
- You should now be able to run your nebula Device.
The Hot Keys stop working?
- In the Chrome Browser if you press the Alt key, but then don’t press any other key, Chrome moves the focus to its setting icon (three dots in the top right corner). This stops any Hot Keys working!
- Pressing Esc will always return focus to Stellar and start the Hot Keys Working.
Are you running Stellar in a Chrome Browser?
- You must use Chrome when opening Stellar.
- Either – make chrome you default browser – Recommended
- Or – Open Chrome and copy the URL from your default browser into Chrome
- Hint: Make a shortcut in Chrome (Bookmark) to make it easier to start Stellar each time.
Is the Nebula Device running on your machine?
- On a PC – Look in the Tool tray (normally) in the bottom right corner
- Click on the up arrow
-
- and see if there is a Yella Umbrella icon
- Click on the up arrow
- For Mac click look for the Status item on the top bar.
- If your Device isn’t running you need to start it.
- On a PC – look for the Start Device Icon on the desktop
- On a Mac look for the Device in your Dock.
Is Stellar Running on the Nebula Device?
- Even if you Nebula Device is running you may still need to start the Stellar Application
- On a PC – find the Yella Umbrella icon in the tool tray and click on it.
- On a Mac – find the Status item in the top bar and click on it.
- This will open up the Device control page:
- Click on the Stellar xxxx button to start Stellar – The number is different for each copy of Stellar.
- If the Stellar button is not shown then the Stellar process isn’t running on this Device.
- Try a Soft or Hard restart of the Device as described above.
Stellar is running slowly.
- Close as many other tabs on your browser as possible
- Close other applications on your Mac or PC
- Make sure you are using a browse version of video, not a full resolution copy.
- If you are using screen sharing on a conference (Zoom etc) call then this often slows down the screen updates.
Can’t find Files or Projects.
- Read the Files Locations section.
- Check the File paths settings in Nebula for your copy of Stellar:
Synthetic Voice services not visible
- When using the Synthetic Voice process you should see voices from at least four suppliers; Google, Amazon, Cereproc and Acapela.
- If you don’t see all four it may be because your IT department have blocked the external URL (addresses) for these services.
- Check, if necessary enable, access to these addresses:
- https://texttospeech.googleapis.com
- https://vaas.acapela-group.com
- https://www.acapela-cloud.com
- https://cerevoice.com
- polly.eu-west-1.amazonaws.com – possibly *. amazonaws.com
- You may also need to set some Environment Variables – HTTP_PROXY, HTTPS_PROXY and NO_PROXY.
- Contact Yella support for more information on configuring firewalls and proxy servers.
Demo Videos
Registering to use Stellar and Nebula
Using multi-columns in Stellar