![]()
by

Help Page – How To
This How To help section of the Stellar Help Pages provides all the information you need to do specific tasks. Please use this in conjunction with the detailed Help Pages as these contain full details on settings and configuration. The How To section is designed to give quick answers to specific workflow questions.
-
General
-
Projects and Files
-
How do I create a Project from a media (video) file?
-
How do I open a Stellar Project I’ve been sent?
-
How do I add an existing AD or Dubbing Script or Subtitle file to the current Project?
-
How do I create a new AD or Dubbing Script or Subtitle file and add it to the current Project?
-
How to work with just an AD or Dubbing Script or Subtitle file without a media (video) file
-
How do I convert a subtitle file format (STR, STL etc.) into an AD script file format?
-
How do I protect my files from accidental edits?
-
-
Timecodes
-
Navigating through a Project
-
The Task List – WARNING: The Task functions are in Alpha Release and subject to change
-
Text editing – Scripts and Subtitles
-
Subtitling
-
Audio Description
-
Dubbing
-
My Account
Version 5.2 – 14th September 2021
How to start Stellar.
To start up on our PC or Mac you just need to run the Device, this was downloaded from the link in the email you received, and only needs to be downloaded once.
- Just run the Device .exe, it will probably be in your Downloads folder and look something like this (the name and number will be different).

- Once it has run once it will move itself to a
- For Windows users A number of Shortcuts will be placed on the Desktop:
- See: Desktop Shortcuts.
- Once this is running follow the instructions here to run Stellar ,
- When you have Stellar running make sure you download the demo files as this will give you something to try out.
- Try out Stellar
- For AD users
- Open the Impact-Short-AD Project from the Demo folder as a good example.
- For Subtitlers
- Open the Impact-short-single Project from the Demo folder as a good example.
- For AD users
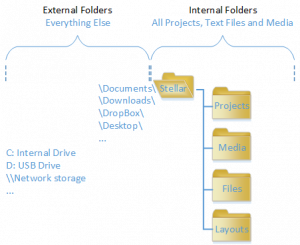
How to find your files.
- All the files that make up a Stellar Project must be located in the Stellar Internal Folders.
- The default configuration for the Stellar Folders in as a sub folder of your Documents folder.
- Once Stellar has been run for the first time it will create a ~/Documents/Stellar sub folder – this will be the same on PC or Mac.
- Under this Stellar folder will be a range of sub folders to help keep your files organised, such as Projects, Media, Files, Config.
- Any time you want to add files to a Project or create new files within a Project they can ONLY be located in the Stellar folder or subfolders.
- For text files (subtitles, captions or AD scripts) to be opened in Stellar then they must be located in the Stellar/files folder, or a subfolder.
- For Media files they must be in the Stellar/Media folder, or a subfolder.
- You can Import some file types from outside the Stellar Folders using the External Folder path.
- This is set in the Stellar Process configurations and by Default is the User area on your PC or Mac so you will be able to find files in Downloads and Dropbox folders, for example.
- Once imported these files will be inside the Stellar Folders.
See more detail and instructions on how to change the default paths here.
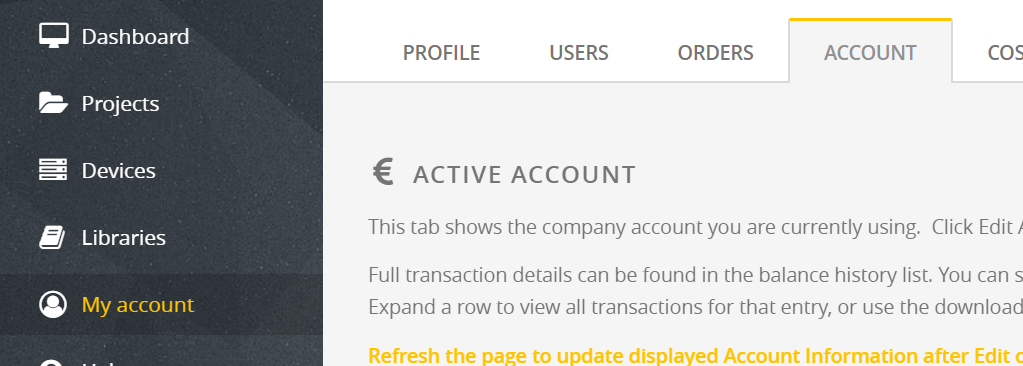
How do I check and top up my account?
If you are working for a company that is supplying you with Stellar, you don’t need to do anything.
However if you are working as an independent then you will have your own account in the Nebula system (that controls Stellar and all the tools you use form Yella Umbrella).
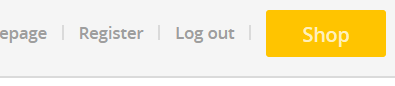
This can be topped up via PayPal or a credit/debit card using our Shop.
- First you need to log into Nebula, go to nebula.yella.tv and log in with the account details you were sent in your introduction email.
- If you can’t remember them you can use your email address as the user name and recover the password using the Forgotten Password link.
- Click on My Account and the Account Tab, now you can see the state of your account and all your historic usage, per month.
- Click on the blue Show Details button on a monthly total to see the fine detail.
- To add credit to your account
- Click on the Shop Button at the top of the page
- Select one or more value vouchers to reach the total value you want to add
- Click Add to Basket
- Then Go to checkout and follow the payment instructions
- The credit will immediate be added to your account.

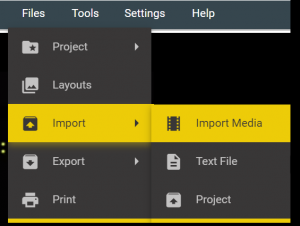
How to create a Project from a media (video) file.
- Import a media file and auto create a new Project using the Files, Import, Import Media menu option
- Wait for the import to finish -see the progress on the top status bar.
- Open the Project
- You now have a project containing all the Media files you selected (Video, Shot Changes, Audio Scrubbing and Audio Waveform)
How to add an existing AD, Dubbing or Subtitle file to the current Project.
You already have an AD or Subtitle file and you want to add it to the current Project
- First open the Files, Project, Properties screen
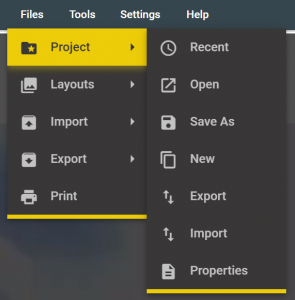
- Select the Text tab on the left hand side (if not already selected) to show only the Text files in the Project.
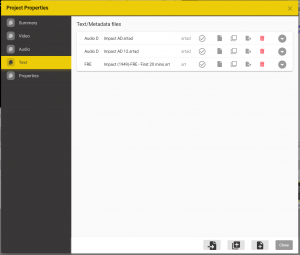
- Click on the Add Existing File button at the bottom of the screen
- This will open up a browser screen to show you the files and folders contained in the ~/Documents/Stellar/Files folder. This is the default location for all your subtitle and AD Files. You MUST put all your work in this folder or in a subfolder of it.
- For AD Script Files
-
- You can filter the files shown to only show AD Script file types ESF and SRTAD by using the Filter Displayed by control:
- Make sure you select either an ESF or SRT AD file type as these are the only ones that support AD audio clips
- It’s important to know what you need to deliver.
- ESF files are the industry standard and if you are delivering either a script only or a script plus wav files for use in other systems then you will probably be asked for ESF.
- IMPORTANT: ESF files do not support multiple Takes and have restrictions on the fade times and the lengths of audio Takes.
- Stellar allows you to use multiple Takes when working with an ESF file but active audios will be saved as a single mixed audio in the ESF file each time you make a change.
- Once you close Stellar all muted Takes and multiple active Takes will be lost when working with an ESF file.
- IMPORTANT: ESF files do not support multiple Takes and have restrictions on the fade times and the lengths of audio Takes.
- SRTAD files are more comprehensive and easy to use file format, they can support multiple takes for each text element and also settings for synthetic voices.
- If you are delivering a finished audio track or mix or are doing all your work within the Stellar and Nebula tools, then SRTAD is a better choice.
- ESF files are the industry standard and if you are delivering either a script only or a script plus wav files for use in other systems then you will probably be asked for ESF.
- It’s important to know what you need to deliver.
- Make sure you select either an ESF or SRT AD file type as these are the only ones that support AD audio clips
- Once you have selected the file to add, click OK
- Then click Save to add the new file to the Project and close the Project Properties screen
-
- For Subtitle Files
-
- You can filter the files shown to only show only subtitle file types by using the Filter Displayed by control
- Once you have selected the file to add, click OK
- Then click Save to add the new file to the Project and close the Project Properties screen
-
- For Dubbing Scripts
-
- You can filter the files shown to only show only dubbing file types by using the Filter Displayed by control
- Once you have selected the file to add, click OK
- Then click Save to add the new file to the Project and close the Project Properties screen
-


How to create a new AD or Dubbing Script or Subtitle file and add it to the current Project.
- First open the Files, Project, Properties screen.
- Select the Text tab on the left hand side (if not already selected) to show only the Text files in the Project.
- Click on the Add New File button at the bottom of the screen
- This will open up a browser screen to show you the files and folders contained in the ~/Documents/Stellar/Files folder. This is the default location for all your subtitle and AD Files.
- You MUST put all your work in this folder or in a subfolder of it.
- You can create new sub folders using the New Folder button.

- For AD Script Files
- Select the Type of AD file you want to create by the Create File As control at the bottom of the screen.
- Make sure you select either an ESF or SRT AD file type as these are the only ones that support AD audio clips
- It’s important to know what you need to deliver.
- ESF files are the industry standard and if you are delivering either a script only or a script plus wav files for use in other systems then you will probably be asked for ESF.
- IMPORTANT: ESF files do not support multiple Takes and have restrictions on the fade times and the lengths of audio Takes.
- Stellar allows you to use multiple Takes when working with an ESF file but active audios will be saved as a single mixed audio in the ESF file each time you make a chnge.
- Once you close Stellar all muted Takes and multiple active Takes will be lost when working with an ESF file.
- SRTAD files are more comprehensive and easy to use file format, they can support multiple takes for each text element and also settings for synthetic voices.
- If you are delivering a finished audio track or mix or are doing all your work within the Stellar and Nebula tools, then SRTAD is a better choice.
- Enter a valid filename and click OK
- Each AD file MUST be in it’s own subfolder.
- Thies will keep all the audio files in a single folder with the AD file (ESF or SRTAD) and avoid mixing audio files between projects.
- Then click Save to add the new file to the Project and close the Project Properties screen.
- Select the Type of AD file you want to create by the Create File As control at the bottom of the screen.
- For Subtitle Files
- Select the type of Subtitle file you want t0 create using the Create File As control at the bottom of the screen.
- Enter a valid filename and click OK.
- Then click Save to add the new file to the Project and close the Project Properties screen.
- For Dubbing Script Files
- Select the SRTAD – Dubbing Script option in the Create File As control at the bottom of the screen.
- Enter a valid filename and click OK.
- Then click Save to add the new file to the Project and close the Project Properties screen.
How to work with just an AD, Dubbing or Subtitle file, without a media (video) file
Sometimes you will need to work on an AD, Dubbing or Subtitle file when you don’t have the video media. Because Stellar always works on Projects you need to create a blank Project and add the AD or subtitle file to it.
Did you know, you can record and review AD audio without the video media? Just use a blank Project as described here.
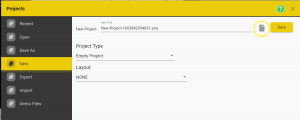
- Use the Files Project Load/Save menu item to open the Project screen
- Select the New tab on the left hand side
- Enter a Project name and Press Save
- Leave Project Type as Empty Project
- Optionally select a Layout for this Project.
- If you do this then the same Layout will be loaded whenever you load the Project.
- You can use the Browse button to set a new subfolder location if you want to set different subfolders for different groups of Projects.
- Click Save
- You now have a blank Project. Follow the instructions in How to add an existing file to the current Project.
How to open a Stellar Project you have been sent.
You may be sent a complete Stellar Project to work on. This will be a .ZIP file and be delivered by whatever file delivery mechanism your supplier chooses, just download it in the normal way.
- Select Files, Import, Import Project from the top menu.
- Click on the browse button to open the file browser screen,
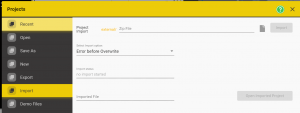
- By default this will show all the User area on your computer including downloads, dropbox etc.
- We call this the External file area because it is external to the Stellar file area. To learn more about file locations see How Do I find my files.
- You can change the default External file path. Learn more here.
- Once you have selected the Project to Import click OK
- Click on Import
- Once the import is Complete the Open Imported Project button will be enabled.
- Either:
- Click on the Open Imported Project button to open the Project now.
- or
- Click on close to stay in the current Project, you can always go and Open the new Project later.
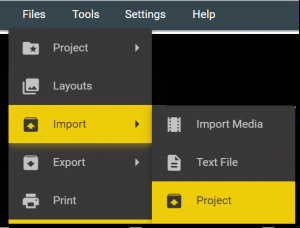
How to get the timecode in Stellar to match the video timecode.
Making sure the timecodes are correct can be complex and confusing.
The first step is to make sure you know what output type and timecode you need.
Stellar will try and make sure that the video timecode and frame rate (FPS) is recognised and the selected automatically.
Stellar will also try and find any Slate or pre-roll section in the file if it can.
Stellar will then set the Video Offsets accordingly.
By default the video start timecode will be either:
Zero 00:00:00:00
or
The timecode found in the video file, with the possibility of a Slate or pre-roll section being recognised and taken into account.
Unless you’ve been told otherwise you should work with the timecode of the video file.
If you know Stellar is not showing the timecode you need you can set the start timecode yourself.
What timecode should I set?
You can either:
Assume the first frame of video should be a specific time, normally 00:00:00:00 or 10:00:00:00
Or
Use any burnt in timecode in the video picture to set the first frame.
The main help section on setting the Video Timecode is here
Quick Method:
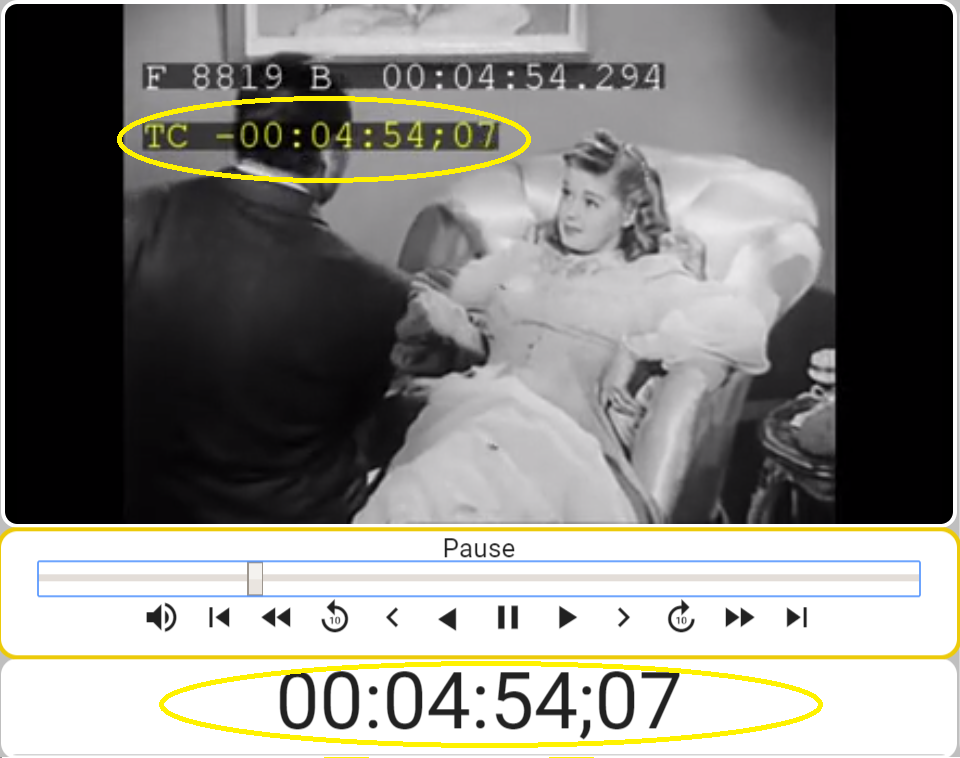
- Move the video show it displays the first active frame. This would normally be either the very first frame, or the first frame after any pre-roll, colour bars etc.
- If there is a burnt in timecode it will probably show 00:00:00:0 or 10:00:00:00 or possibly 01:00:00:00
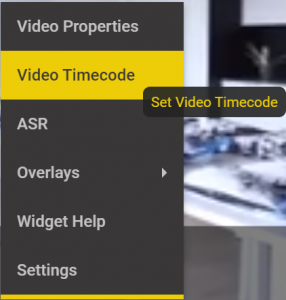
- Right click in the video area and select Video Timecode
- Select the correct timecode for this frame
- Click Set
- Now the burnt in timecode should match the Stellar timecode
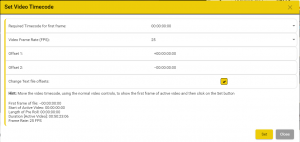
You can check the current settings for the video file by:
- Right click in the video window and select Properties
- Or
- Go to Files, Project, Properties
- Select the Video Tab
- Click on the video file to see its properties

- The two important entries are FPS and Offset
- FPS
- This is the frame rate or Frames Per Second that Stellar has detected for this video file.
- You can change it, but don’t if you’re not sure!
- Offset
- This is the control you should change to get the displayed timecode to match the burnt-in timecode
- This sets a simple offset between the file start time and the displayed Timecode in Stellar
- Here it has been set to minus one to correct a one frame offset between the start of the file and the burnt-in timecode of the video.
- Offset 2 works in addition to the main offset and is used by Stellar when a Slate or Pre Roll is detected.
- FPS
- Click out of the offset value, if you’ve changed it,
- Click Save.
Other Common Timecode Problems:
- The timecode is right at the begin of the video but drifts out as the media plays.
- This will be because the FPS (frame rate) set is wrong.
- Find out what the frame rate of the video is.
- Set the FPS value as shown above to the correct setting.
- Check again.
- The video starts at 00:00:00:00 but I’ve been told the subtitles need to start at 10:00:00:00
- This is the same problem as making sure the video time has the correct start time but you need to set the Video timecode offset to +10:00:00:00.
- Now any timecodes captured will have the correct timecode.
How to get the right timecodes in my Subtitle File (or any other type of text file) to match the video timecode – Recutting
Making sure the timecodes are correct can be complex and confusing.
The first step is to make sure you know what output type and timecode you need.
Stellar will try and make sure that the video timecode and frame rate (FPS) is recognised and the selected automatically.
However the subtitle (or other text file) you are working with may not match the timecode of the video. There are many reasons why this can happen, a common one is the slates or bumpers have been added or removed from the video since the subtitle file was created.
This type of problem creates a fixed offset between the video timecode and the times in the subtitle file.
Stellar allows you to change all the times in the subtitle file by a fixed amount, this is referred to as Recutting.
- Recutting is different from Offsetting
- Offset:
- A time offset is applied inside Stellar to make the timecodes displayed match up.
- No timecodes in the subtitle or AD files are changed
- Recut:
- Some or all timecodes in the subtitle or AD file is modified
- Offset:
How to recut your subtitle file.
- Open or create a Project with the correct video and the subtitle file.
- Work out what the offset is, if you don’t already know.
- The simplest way to do this is find the first subtitle that contains dialog, ignore subtitle zero and any title translations for example.
- Jump the video to the start time of this subtitle (Double click on the subtitle number or do Ctrl+ Shift+J.
- Now shuttle the video to find the timecode where this dialog starts.
- The difference between the subtitle in cue and the current timecode is the offset you need. Remember this could be negative or positive.
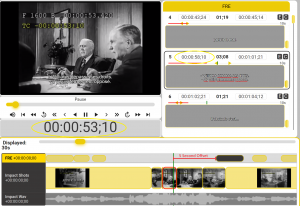
- Now you can Recut the file
- Either:
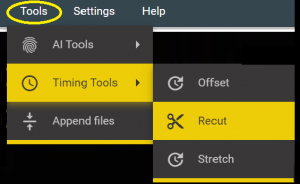
- Select Tools, Timing Tools, Recut
- Or
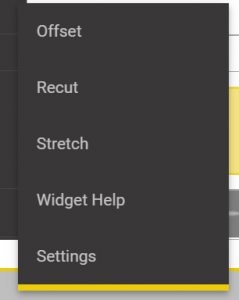
- Right Click anywhere in the Timeline display and select Recut
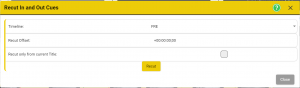
- This will open the Recut dialog.
- Change the timecode either by entering a value, by using the arrow keys or with the mouse wheel.
- You can either recut the whole file or just subtitles after a specific time.
- To do this click on the ‘Recut only from current Title’ flag
- This will default to the current subtitle but you can change this here.
- Click Recut
You have now recut you subtitle file.
You can also make the change by dragging the subtitle blocks on the timeline. See More Help for details.
How to scroll through the subtitles (or script) file.
The subtitles (or script titles) are shown in a vertical column.
The second title from the top is the Current Title (unless you are at the beginning and then it’s the top title. You can only edit the Current title.
There are lots of ways to scroll through the list of titles:
- Page up and page down keys.
- Click in a title – any line except line 2 and this will become the current title.
- Move the mouse pointer over the text column and use the scroll wheel.
- Use the vertical slider on the right of the text column.
- Press Ctrl+ G and enter a subtitle number to jump directly to that title.
If you want the video to track the new title then try one of these:
- Hold down the Alt key (Opt on a Mac) and Page up or down.
- Hold down the Alt key (Opt on a Mac) and use the scroll wheel over the text column.
- Hold down the Alt key (Opt on a Mac) and click and left/right anywhere in the timeline area.
- Double click on the title number in the corner of the text box.
- Double click on a title block in the timeline.
- Scroll to a title and then press Alt+ J to jump the video to the in time of that title.
How to move through the video
There are lots of options for moving through the video, either by playing of jumping:
- Playing or stepping the video
-
-
- Use the media control buttons to play or step
- You can play forwards or reverse
- Step backwards or forwards in three step sizes
- Play forwards or backwards at speeds between x0.25 to x1000
- Jump to the beginning or end
- Hover the mouse pointer over a control for a tip on what it does

- Drag the video slider in the media controls
- Use the hotkeys – See Here for a full list of Hotkeys
- Alt+ Arrow Keys – Left and right to play, up and down to step
- Alt+ Page up and down to step through titles with video
- Alt+ Home and End to jump to the start or end of Video
- If there is no text cursor then the spacebar is a play pause control
- Shift spacebar is play in reverse
- Click in the video window
- Shift + click in the video window for reverse play
- Use the mouse scroll wheel – the mouse pointer can be anywhere except over the text column
- Shift + scroll for medium size steps
- Ctrl+ scroll for large steps
- Click and drag left/right anywhere in the timeline area
- Click in the master timecode display and use up and down arrows, the scroll wheel or type in a new timecode
- Hint: Alt+ S will take the focus to the seconds section of the master timecode display
-
- Jump to a new point in the video
- Press Ctrl+ J and enter a timecode to jump directly to that time.
- Double click in the timecode track at the top of the timeline
- Click at a new point on the video slider
- Press Ctrl+ J and enter a timecode to jump directly to that time.


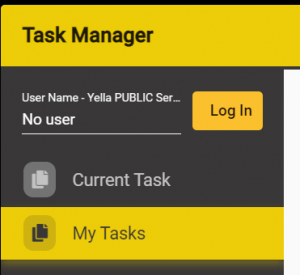
How to open the Task List. – WARNING: The Task functions are in Alpha Release and subject to change
This Section describes the use of the Task screen within Stellar.
Note: The Task screen is only available if you have loaded a layout that contains the Task Manager Widget
You can either use the Yella PUBLIC Task Server to share Tasks with other users (both inside and outside your organisation) or you may have been given access to a specific Company’s Task Server
If you expect this to work for you and you experience problems please contact your in house IT support team first.
Opening the Task Screen

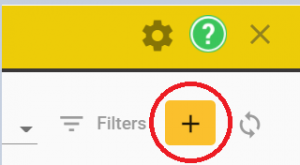
- Click on the Task option on the top menu in Stellar.
- This will pop up the Task Screen
- If the Task option is not visible you need to Add the Task Widget to your Layout.
Signing In.
Before you can load any Tasks you must first Log In to the Task server.
-
- Click on the Log In button on the Task manager dialog.

- Select the Server you want to log into from the dropdown list
- The servers are run by the company or companies that you are working for and used to assign tasks to you.
- You may also have access to the Yella PUBLIC Task Server
- There may only be one server or you may have access to more than one.
- Enter you User name.
- Enter you password, Google Chrome will store this automatically if you allow it to.
- This is the Nebula login you received when you first registered to use nebula and Stellar from Yella Umbrella or where registered by your company.
- Click Login.
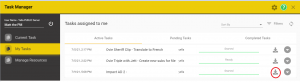
- Once you login any tasks assigned to you will appear on one of the Task Screen tabs, Active Tasks, Pending Tasks or Completed Tasks
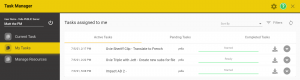 .
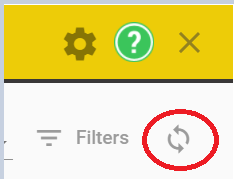
.- You can always click on the Refresh button to reload the list of Tasks to make sure it’s up to date.
- Any Tasks assigned to you will pop up on this screen.
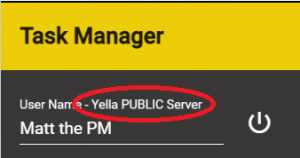
You can see which Task Server you are currently signed into on the top line of the title:
Second Factor Authentication.
In some cases you may need to use Second Factor Authentication (2FA) before you can load a Task.
This is an additional level of security and is set by the owner of the Task Server you are accessing.
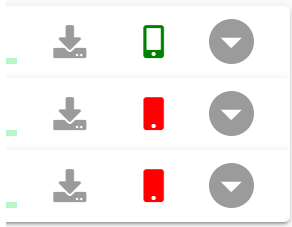
- Next to each task there may be a small Smart Phone Icon.
- No Icon – this means that the task doesn’t need any additional security

- A Red Icon – This means the task requires 2FA and is still locked

- A Green Icon – This means the task requires 2FA and has already been unlocked.
When you try and download a Task with a Red icon you will see a screen asking you to Select how you want to receive Authentication Link; the either via an SMS text message or via email.
The email address or phone number must already be set in the workflow system of the company assigning you work. If this has not been done you need to contact the company supplying you with the Tasks.
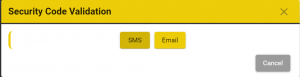
- Click on either SMS or email
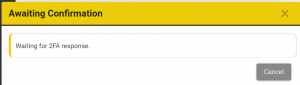
- The Awaiting Confirmation dialog will be shown.
- At this point check you email or SMS texts for the message.
- This will consist of a link, just click on the Link
- This will show a simple web page with Accept and Reject buttons
- Click on Accept
- The Awaiting Confirmation dialog will close and the Icon will change to Green.
- Now you can download the Task
- If the SMS or email doesn’t arrive:
- Close the Awaiting Confirmation dialog and try again
- If you continue to have problems contact the company providing you with the Tasks to check they have the correct email and Phone numbers for you.
How to load a Task
- Before you can work on a Task you must download it.
- On the Active Tasks tab select the task you want and click on the corresponding Download button.
- You will be asked if you want to download the required files – Click Yes
- You may be asked if you want to download additional media files. Unless you know you already have these on your machine click Yes.
- You will be asked if you want to open the Project for the selected Task.
- Click Yes to start work immediately
- Click No if you’re just downloading the files for later use.
- Note: A Project within Stellar is the collection of media, script and audio files for a single Task.
How to work on a Task
- Once a Task is in the state Ready you can start working on it.
- Depending on the Task this can be editing the script, translating, adapting, recording, reviewing or mixing.
- First load the Task
- This will load all the Project containing all the files you need to do the task and may include video, additional audios, shot change list, script file(s) and other settings.
- Now you can use Stellar in the same was as for any other Project.
- Full instructions on all controls in Stellar can be found Here.
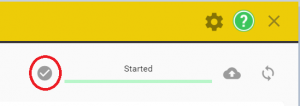
How to Save a Task part way through
- At any point when working on a Task you can stop and resume later.
- All changes you make are stored automatically, there’s no Save button in Stellar.
- Provided you are connected to the Internet and Upload Mode is set to Automatic all changes will be saved as you do them.
- You can, optionally, click on the Publish button on the Current Task tab.
- This will force a synchronization with the server.
How to Complete a Task.
- Some Task types, like Recording, will track the progress of the Task as you tick off parts as completed.
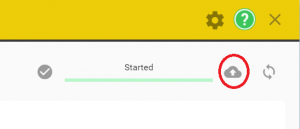
- You can change the Status of a Task by clicking on the Tick button in the Current Task tab.
- This will advance the Status by one step:
- From Preparing to Ready
- From Ready to Started – can also update automatically
- From Started to Completed
- From Completed to Checked
- If you are working as part of a collaborative group on the same Task only One person, normally the Engineer, needs to Publish the Task.
How to Create a New Task.
- To create a New Task you must have Manager or Admin level access for the Company you want to create a Task for.
- There are two ways to create a New Task
- From media stored on your local PC or Mac
- Use this option for simple tasks where the media files only apply to one Task
- From media already stored on the Server
- Use this option if you need to create multiple tasks using the same media as it saves storage space and upload time.
- From media stored on your local PC or Mac
- If you have this level of Access you will see the Manage Recourses option on the Task
- Click on Tasks
- Select the Tasks option under manage Resources
- Click on the New Task button
- There are two ways to create a New Task
- Create a normal Stellar Project with the media and any existing subtitle or script files
- Upload the whole se to the server as a single Task
- Create a Task based o media already on the server.
- You can then optionally download the Task and add additional subtitle or script files
- These will be automatically published to the server.
- You can then optionally download the Task and add additional subtitle or script files
- Create a normal Stellar Project with the media and any existing subtitle or script files
- Either use the default Tab ‘From Local Project’ tab to create the Task from an existing Project.
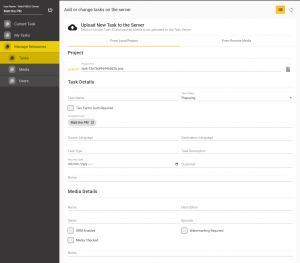
- Project
- This defaults to the current Project
- You can select a different Project by clicking on the document icon
- This defaults to the current Project
- Task Details
- Enter as many details as you want, most entries are for information only.
- Task Name – Required
- Task Status – Default is Preparing
- Two Factor Authentication – If selected all users will have to authenticate by email or SMS when downloading this Task
- Assigned users – The current user is added by default – Click in the blank area to select users from all available
- Start typing to see a filtered list of users
- You can assign any User who has been added to your Companies user list.
- Notes – enter free form text instructions for this Task
- Media Details
- Enter a name for the new Media associated with the Project
- This Media then be available on the Server and could be assigned to other Tasks
- DRM Enabled
- Forces DRM encoding of the media prior to uploading
- Watermarking Required
- Forces watermarking of the media prior to uploading
- Media Checked
- Used to indicate that the Media has been checked and is correct for this Task.
- Notes – enter free text notes for this media item.
- Enter a name for the new Media associated with the Project
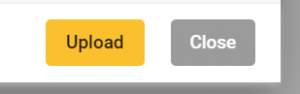
- Click on the Upload button to create the new task.
- Or select the ‘From Remote Media’ tab create a Task based on media that is already on the Server.
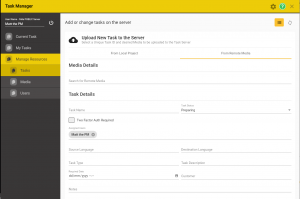
- Media Details
- Click in the Search for Remote Media area and you will see a list of all available media
- Start typing to get a filtered list
- Click in the Search for Remote Media area and you will see a list of all available media
- Task Details
- Task Name – Required
- Task Status – Default is Preparing
- Two Factor Authentication – If selected all users will have to authenticate by email or SMS when downloading this Task
- Assigned users – The current user is added by default – Click in the blank area to select users from all available
- Start typing to see a filtered list of users
- You can assign any User who has been added to your Companies user list.
- Notes – enter free form text instructions for this Task
- Click on the Upload button to create the new task.
- Hint: To add subtitle or script files to the Task Download it and add the new files.
- Changes will be uploaded automatically.
How to add a new User
- To add a New User you must have Admin level access for the Company you want to create a Task for.
- New Users must already have access to Stellar
- Users can either be:
- Members of your own company and already have a nebula login
- Free lancers with their own Nebula account
- You must use the same email address as that used for the nebula account.
- This is the unique identifier for that user within the Nebula system.
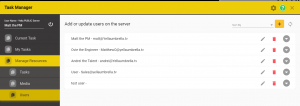
- If you have Admin access you will see the Users tab under Manage Resources on the Task dialog
- Click on Users
- Users can either be:
-
- Click on the New User button
- This will show the new User options
- Enter the Email address for the new User
- If this is a valid emails in Nebula the User Name will be filled in automatically.
- If it is not valid a warning will pop up.
- User Type – Helps you organise users – Optional
- Preferred Layout – Sets the default Stellar Layout for this User – Optional.
- Manager permissions – Set if you want this user to be able to add new Tasks and Media
- Admin Permission – Set if you want this user to be ale to add new Users
- Send email notifications – Set if you want this user to receive emails when a Task is assigned to them.
- Notes – enter free form text instructions for this User
- If this is a valid emails in Nebula the User Name will be filled in automatically.
- Click on Create
- Click on the New User button
How to upload a media file.
- To upload a media file you must have Manager or Admin level access for the Company you want to add the media for.
- By Uploading a media file you are making it available to any other user in the same company via the Task Server.
- Uploading a media file will automatically trigger the creation of shot change, proxy video and audio files and audio waveform files.
- Click on the Manage Resources – Media tab
- Click on the Add new media button
- This will show the New Media controls:
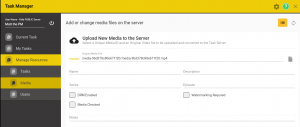
- Select the Original media File
- Use the document browse button to find the media file you want to upload

- By default the currently loaded media file is selected.
- Use the document browse button to find the media file you want to upload
- Enter the Media Name – this is used for sorting and searching
- Enter text for the description, series and episode.
- These are used for information only
- Optionally
- Mark the media for DRM
- This will cause the media to be encrypted with Widevine DRM and will require second factor authentication by each user that downloads a Task containing this media.
- Default – Off
- Mark the media for Watermarking
- This will cause the media to be watermarked
- Default = Off
- Mark the media as Checked
- This is used to indicate that the media has been checked for quality and timing and is ready to be used
- This flag can be set at a later date
- Default = Off
- This is used to indicate that the media has been checked for quality and timing and is ready to be used
- Mark the media for DRM
- Notes – enter free form text instructions for this media file
How to edit or change the Status of a Task
-
- To upload a media file you must have Manager or Admin level access for the Company you want to change the Status of a Task not assigned to you..
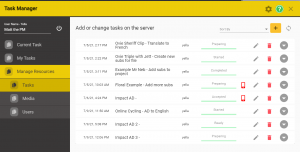
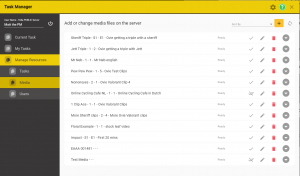
- Click on the Manage Resources – Tasks Tab
- Scroll to find the Task you want to change
- To Edit the Task
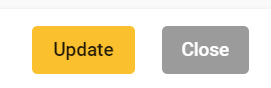
- Click on the Pencil Button
- You can now edit all the Task settings
- Click Update to save
- To quickly change the Status
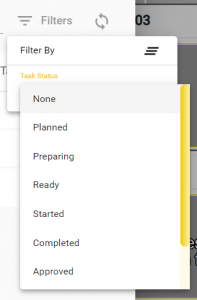
- Click directly on the Status text above the green progress bar,
- This will show a dropdown of the available Statuses.
- Click on the new Status
- This will be saved automatically
How to Delete a Task
-
- To Delete a Task you must have Manager or Admin level access for the Company you want to delete the task from.
-
- Click on the Manage Resources – Tasks tab
- Find the Task you want to delete
- Click on the red Bin button for that Task
- The Task will be marked as Deleted and won’t show in the Task list.
- The actual files won’t be deleted until the next scheduled Clean-up process
- Media Files won’t be deleted
- See the Media tab for Delete Media controls
- Click on the Manage Resources – Tasks tab
-
- To Delete a Task you must have Manager or Admin level access for the Company you want to delete the task from.

How to add a new Title (Subtitle, AD description or dubbing Lines) in a text file.
Once you have added a new subtitle or script file to your Project you can start adding subtitles, descriptions or script text or Titles.
Each Title has an in and an out time referenced to the video media, so the first step is to move the video to where you want to insert the new Title. See How to move through the video.
- The video time set will be the In time of the new Title.
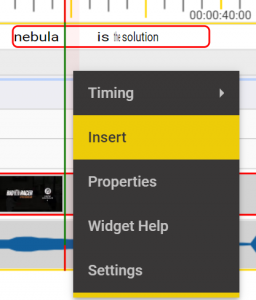
Once you have the correct point in the video use one of the Insert options:
- Mouse actions:
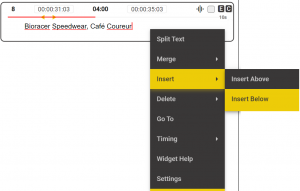
- Right Click on the Text track on the timeline and select Insert
- Right click in an existing text box and select Insert Below to insert After this box.
- If the video time is before the title you clicked in then you can’t insert after it.
- If the video time is over the title you clicked in the new title will be inserted immediately after it, if there is space.
- If there is no space after the title you clicked in you will see a warning message.
- Right Click on the Text track on the timeline and select Insert
- Hot Keys
- PC
- Alt+ Enter
- Ctrl+ Enter
- Ctrl+ Insert
- Numeric pad Enter
- Mac
- Opt+ Enter
- Ctrl+ Enter
- Ctrl+ Insert
- Numeric pad Enter
- PC
All of these methods will add a new blank Title of the default length (duration) on the timeline:

- To add text
- If the new box was created while the focus was on the text window (yellow outline) then there will already be a cursor in the box, just start typing.
- If the new box was created while the focus was on the timeline do either:
- Press Tab
- Click in the new box
How to change the times of a Title (subtitle or description).
Once you have added a Title and added text in to it you may want to edit the times.
You can:
- Adjust the in and out (start and end) times by
- In the Text Editor using the mouse or Hot Keys.
-

- In the text box either click on the times for that Title or press Tab to cycle between the text, the in time and the out time..
- Hint: Use the TAB key to move between the text and the in and out times.
- Once in the time window you can use the arrow keys to increase or decrease the time or to move left and right between the sections.
- You can’t enter an invalid time – EG overlapping a neighbouring title or breaking the minimum gap setting.
- Or use the mouse wheel to change the times
-
- On the Timeline using the mouse.
- Use Shift Drag on the ends of the text box to change the in and out times

- Hint: Hold down the Shift key and move the mouse – the pointer will change when you can start Drag so Click and drag at this point.
- Use Shift Drag on the ends of the text box to change the in and out times
- Using Hot Keys
- Adjust the video so to the point where you want to change the In or out time to.
- This can be inside, before or after the title but not overlapping another title.
- To set the in time press Alt+ the +/= button OR press the + (plus) button on the numeric keypad.
- To set the out time press Alt+ the – (minus) OR press the – (minus) button on the numeric keypad.
- Adjust the video so to the point where you want to change the In or out time to.
- In the Text Editor using the mouse or Hot Keys.
- Move the whole Title on the timeline
- Move the mouse pointer to the middle of the text box on the timeline and use Shift Drag to move it left and right

- Hint: Hold down the Shift key and move the mouse – the pointer will change when you can start Drag so Click and drag at this point.
- You can’t overlap or swap title order on the timeline.
- Move the mouse pointer to the middle of the text box on the timeline and use Shift Drag to move it left and right
How to set up Stellar for Subtitling
When you first start Stellar you will get a default Layout loaded. The layout sets how the screen looks and what controls and tools you have available. Because Stellar can be used for a wide rant of work it’s important that you load a suitable layout and a number of default Layouts have been provided.
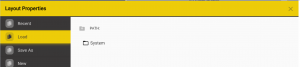
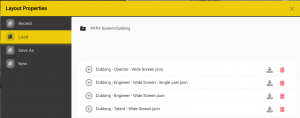
Use the Files menu to select Layouts > Load
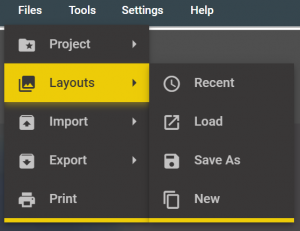
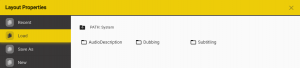
- You will see file browse controls to select one of the supplied Layouts
- Select System
- and then Subtitling
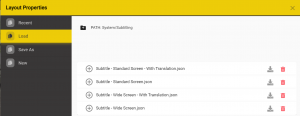
- You will see a list of available Layouts – the details of the list may vary as we add new Layouts
- Decide which Layout you want to try and click on the Load button on that row.
- You can swap between layouts at any time and you can create your own Layouts and save them for future use.
- Select System

More Information.
How to set up Stellar for Dubbing
When you first start Stellar you will get a default Layout loaded. The layout sets how the screen looks and what controls and tools you have available. Because Stellar can be used for a wide rant of work it’s important that you load a suitable layout and a number of default Layouts have been provided.
Use the Files menu to select Layouts > Load
- You will see file browse controls to select one of the supplied Layouts
- Select System
- and then Dubbing
- You will see a list of available Layouts – the details of the list may vary as we add new Layouts
- Decide which Layout you want to try and click on the Load button on that row.
- You can swap between layouts at any time and you can create your own Layouts and save them for future use.
- Select System
More Information.
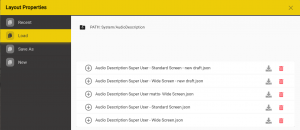
How to set up Stellar for Audio Description
When you first start Stellar you will get a default Layout loaded. The layout sets how the screen looks and what controls and tools you have available. Because Stellar can be used for a wide rant of work it’s important that you load a suitable layout and a number of default Layouts have been provided.
Use the Files menu to select Layouts > Load
- You will see file browse controls to select one of the supplied Layouts
- Select System
- and then Audio Description
- You will see a list of available Layouts – the details of the list may vary as we add new Layouts
- Decide which Layout you want to try and click on the Load button on that row.
- You can swap between layouts at any time and you can create your own Layouts and save them for future use.
- Select System
More Information.
How to convert a subtitle file format (STR, STL etc.) into an AD script file format
You may have been sent an AD script in a subtitle file format (SRT, STL etc.) but need to make an AD recording.
These subtitle formats do not support the association of audio WAV files so can’t be used directly to record AD.
In Stellar you can convert most subtitle file formats to one of the AD formats (SRTAD or ESF).
You can do this in one of two ways:
- Import and convert the subtitle file into the Project
- This will give you a Project with just the new AD file
- Add the subtitle file to the Project then Duplicate and convert it
- This will give you a Project with both the original subtitle file and the new AD file in the Project
Option 1 – Import
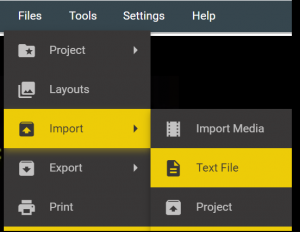
- Open or create a new Project
- Select Files, Import, Text File
-
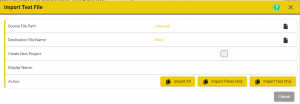
- Click on the Browse button to find the subtitle file
- The Subtitle file must be located on you PC or Mac in a folder accessible to the External Files setting in Stellar – See Here
- Click the second Browse button to set the destination file name and location
- Note:- For AD or Dubbing files this MUST be in a separate sub directory to keep all the audio (WAV) files in a separate folder.
- Set the Create File as Type to be srtad or ESF
- Click Save
- You can create a New Project here if you haven’t already done so.
- Click Import All
Option 2 – Duplicate
- Add the Subtitle file to the Project
- In the Files, Project, Properties screen select the Text Tab (you will already be on this tab if you’ve just added the subtitle file).
- Click on the Duplicate button for the Subtitle file
- This will open the Duplicate File Screen
- Click on the Browse button
- Set the File Type you are duplicating to, SRTAD or ESF, using the Save File As control at the bottom of the screen.
- Make sure you select either an ESF or SRT AD file type as these are the only ones that support AD audio clips
- It’s important to know what you need to deliver.
- ESF files are the industry standard and if you are delivering either a script only or a script plus wav files for use in other systems then you will probably be asked for ESF.
- IMPORTANT: ESF files do not support multiple Takes and have restrictions on the fade times and the lengths of audio Takes.
- Stellar allows you to use multiple Takes when working with an ESF file but active audios will be saved as a single mixed audio in the ESF file each time you make a chnge.
- Once you close Stellar all muted Takes and multiple active Takes will be lost when working with an ESF file.
- SRTAD files are more comprehensive and easy to use file format, they can support multiple takes for each text element and also settings for synthetic voices.
- If you are delivering a finished audio track or mix or are doing all your work within the Stellar and Nebula tools, then SRTAD is a better choice.
- Select a folder to create the new file in. The default is the same folder as the source file but it is strongly recommended you create a subfolder for AD files as this is where the many WAV audio files will also be stored. Putting them in a subfolder keeps things much more organised!
- Enter an new file name, the default is the same as the source file
- Click OK
- It’s important to know what you need to deliver.
- You can edit the Display name, this is the name that appears at the top of the text column.
- Click the yellow Duplicate All Button
- Click OK on the pop up message box
- Click Save to save the changes to the Project
- You now have a Project with both the subtitle and the AD file in two text columns.
- Note: You can only record Audio when the AD column is selected.
- To find out how to remove the Subtitle file from the Project see more here.
- Click on the Duplicate button for the Subtitle file

How to protect your files from accidental edits?
How do I protect by text from accidental changes
- There are many instances where you may want to protect a subtitle or script file from accidental changes:
- You have an original language Template from which to translate
- You Want to translate into a new language file without changing any timecodes by accident
- You are recording an AD script and want to protect the text and times from accidental changes
- You want to pass a file to a client to add comments, but want to prevent them making changes to the text and times.
- You may also want to make text changes occasionally, but protect against accidental changes the rest of the time
Stellar supports a system of configurable Editability and an addition Protect Text mode.
Full details here Editability and here Protect Text.
Select one of the Editable modes to give the level of protection you need:
To allow editing of text only by a deliberate action set the Protect Text mode on in the File Status page.

How to make the Stellar display fit your monitor – especially for smaller monitors and laptop screens.
What you see in Stellar is set by which Layout you load, there are different layouts for subtitling, AD etc. See Here
When you first run Stellar you may find that the controls don’t all fit on you monitor.
- Click on the Zoom button on the top bar
- This will zoom the display to fit all the Stellar controls into you screen.
- You may find that the layout needs adjusting because of the aspect ration of your screen
- See Positioning Widgets for more information on how to change the Layout

You can zoom in and out by using simple browser controls and you can also set up your own customized Layouts that best fit your needs and your screen size.
- Make sure your Browser is zoomed to 100& to get the best possible display of Stellar:
- Use the Browser control menu
- Click on the three dot control in the top right corner of your Browser and then click on the Zoom controls
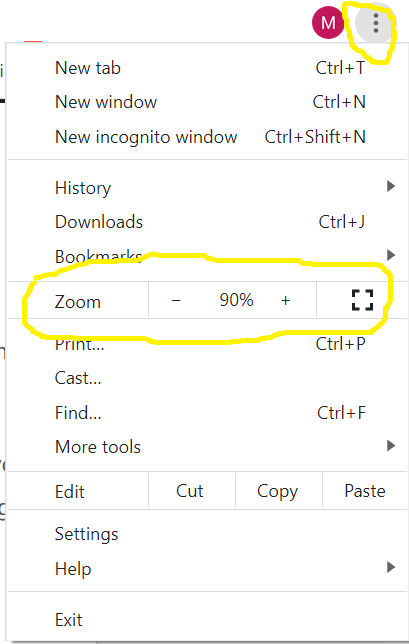
- Set the Zoom to 100%
- Click on the three dot control in the top right corner of your Browser and then click on the Zoom controls
- Use the Browser control menu
Full Screen Mode
- The Chrome Browser supports a full screen mode that removes the browser tabs and menu and leaves more space for Stellar.
- Just press F11 to enter or leave full screen mode.
New AD tools from V4.1 – see the changes.
From Stellar V4.1 (May 2021) the way AD recording is done has changed.
The previous AD Recorder Widget has been removed and all the functions previously found in the Widget have moved to other locations.
This section explains the changes:
AD Script Text Display
- The text to read for each title is now shown in the video display.
- You can configure this to be either over or under the video image.
- See the Audio Text Overlay Widget for full configuration details.
- You can set up the countdown indicator as either a pie chart or a digital display.
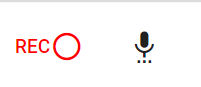
Record Button
- The Record button has moved to the media control bar, along with al the other control buttons.
- The button will be Red if recording is enabled
- To enable recording make sure you have a Title selected and the script file is not Read only.
- You can also use Alt+D or F12 to start and stop recording
View of recoded audio.
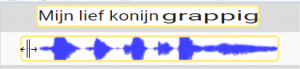
- Every audio you record is now displayed on the Timeline
- It is possible to Hide and Reveal the audios for an AD file on the timeline. See the Timeline Widget for full details.
-

- You can record more than one Take for each Title and these will be stacked below the Title on the timeline.
- Each Take can be Muted, Unmuted or Deleted
- Hover over the waveform with the mouse point to see pop up controls
- Right click on the waveform to see more options
- Each Take can be Muted, Unmuted or Deleted
Trim or Move an audio Take.
- Each Take can be trimmed and moved on the timeline.
- All times are relative to the Title (text) box.
- If you more the tTitle box, all audios will move with it.

- Use Shift + drag on the middle part of a waveform to move it left or right on the timeline
- Use Shift+ Drag on either end to trim the audio Take.
- Note: When the audio is recorded there is a bit of’ extra’ audio on each end that you can reveal by moving the end trim.
- Hint: You will hear an audio scrub of the audio as you trim the ends, this helps align the trim marks correctly
Edit Fade settings for a Take
- The Fade waveform has moved to the Timeline
- Each Title (text) box has an associated Fade waveform.
- Use Shift+ Drag on one of the handles to set the fade points and fade level.
- Hover over the Title box to see the Set Default Fade control
- Right click on the Fade waveform for more options.
Use a Synthetic Voice
- The Synthetic Voice button has moved to the media control area, along with all the other media control buttons.

- Right Click on the control to select the voice and set the voice parameters.
- Now doing a Ctrl+ Click on the button will create a new audio Take with the synthetic voice for the selected Title
- Hint: To speak more than one Title at a time right click on the button and use the Render All or Render missing titles options.
- See the Synthetic Voice Plugin for more details.
How to set up your microphone and record AD audio.
Once you have a Project loaded and have added an AD script file in ESF, SRTAD or TTAL format you’re ready to start recording.
First you’ll need to make sure the microphone and audio inputs are correctly configured. Follow the instructions here.
Make sure you have a Recording microphone selected as the input. See the Volume Manager section on how to select a microphone.
- Make sure you have an AD Layout loaded and that the AD Recorder Widget is visible.
- You can tell this when a Record button is visible on the media control bar:
- The Record button will be Red unless recording is disabled. EG the script file is set to read only
- You can tell this when a Record button is visible on the media control bar:
To set up the recording and silence levels.
To get the best results set the correct microphone level you should use a volume control external to the computer, this could be a control on the microphone itself or on an external sound mixer.
- You can use the internal Mic level control but this is not ideal as it changes the level after the conversion to digital and so can result in a lower audio resolution.
- Click on the Microphone icon next to the record button to run the microphone setup wizard.
Step 1 – Options
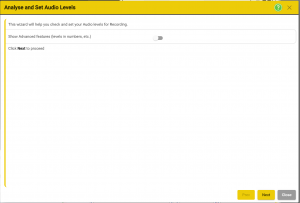
- Show advanced features – will show levels in dB and other information. – Optional.
- Click Next
Step 2 – Select recording microphone and internal gain
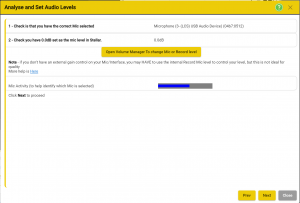
- Check the first two entries are correct
- The microphone selected is the one you will use for recording
- The internal microphone gain is set to zero dB.
- If not Click on the Open Volume Manager button to set these.
- The Mic Activity meter will help you identify the correct microphone if you have more than one.
- Check the first two entries are correct
- Click Next
Step 3 – Set external recording microphone gain.
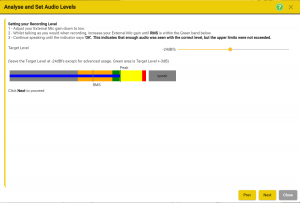
- Read the instructions on the page
- Target level – sets the input level required – leave as -24dB unless you have a specific requirement for a different recording level.
- Set up the recording level
- Adjust you external microphone gain down low.
- Set your microphone up as it will be for recording
- Position yourself as you will be when recording
- Start speaking as you will during a recording – it might be a good idea to use a script when doing this.
- Adjust the microphone level up until the RMS level is mostly in the green – the box will change from Speak to green and Continue and then to OK
- Remember this level setting on your external controls
- If you change these you can always re-run the setup wizard to check the levels
- There is a level indicator in the video window for a quick mic check
- There is a level indicator in the video window for a quick mic check
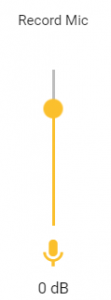
- If you don’t have any external microphone gain controls:
- By far the best option is to buy a microphone with a gain control!
- As a last resort you can use the internal microphone gain control.
- While in the Recording Level page of the Wizard
-
-
- Click on the speaker icon on the top bar
- This will open up the Volume Manager
- Adjust the level while speaking into the microphone as above.
- Note: the volume manager window is still active while you have the Microphone Setup Wizard open.
-
- While in the Recording Level page of the Wizard
- Click next

Step 4 – Silence detection and configuration.
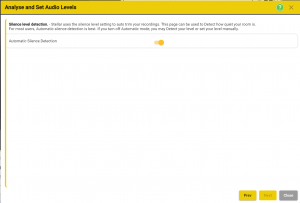
- The silence setting is mostly applicable to AD recording and is only used when the Auto Trim option is enabled – See Audio Recorder settings for more information
- Stellar uses the silence level setting to auto trim your recordings.
- This page can be used to Detect how quiet your room is.
- For most users, Automatic silence detection is best. If you turn off Automatic mode, you may Detect your level or set your level manually.
- To set the silence level manually turn off the Automatic Detection switch
- Otherwise click Close to finish.
Step 5 – Manual Silence Setup – Optional
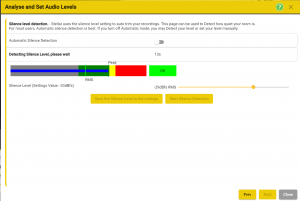
- With the Automatic Detection switch turned off a new set of controls will be displayed.
- Level meter – shows the RMS and Peak silence levels
- You should aim to get this level as low as possible – there are lots of tips on the internet!
- Silence level setting – the current stored value is shown in brackets
- Slider – shows the last calculated silence level
- Either
- Set the silence level you want on the slider
- Or
- Click on the Start silence level detection
- This will start a 15 second countdown.
- Keep quite and let Stellar measure the background noise level
- After 15s the new silence level will be set on the slider
- Click on the Start silence level detection
- You can repeat the test as many times as you need
- Once you have you best silence level click on the Save Silence Level button.
- Click Close to exit the wizard screen.
To Record an audio clip (Take)
- Select the first AD Text element by clicking in the first text box in the script
- This will show the text in the video window with a count down timer, either digital or analogue.
- Click Record (REC) and start speaking!
- Alt+ D is the shortcut key
- A colour wipe will move across the text to show the correct reading speed.
- The recording will stop automatically at the end of the time window or you can click the Record/Stop button again to stop early.
- The Audio is now displayed as a blue waveform below the text on the timeline
- Hover the mouse over the waveform to reveal controls

- Play button – Play just the AD audio clip
- Mute – Mute this Take only.
- If muted a Take won’t be heard when you play the media and won’t be included in any output mix.
- Delete button – Delete this clip
- You can edit the trim and the timing of the audio:
- To move the whole audio in time – Shift drag on the middle section of the waveform
- To trim the end points – Shift and drag on the end sections of the waveform
- When the audio is recorded a configurable extra section of audio is recorded on the beginning and end.
- This allows you to reveal extra audio if you started speaking a bit too early.
- To trim to fit the text box in and out time – click on the scissor button on the pop up controls.
- You can play the video with the AD audio by playing the video as normal.
- Only unmuted Takes will be audible.
- You can now either re-record or move on the next text element.
- Additional Takes will be displayed on the Timeline with the most recent, unmuted Take at the top.
- Try using Page Up and Page Down to scroll through the text elements
- Or Alt+ Page Up and Down to do the same with the video tracking too.

See also: How to Deliver a finished AD Project.
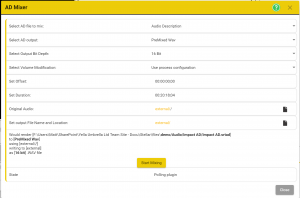
How mix an AD output audio.
Once you have recorded your AD Audio and are happy with the result you can mix the individual AD clips to create a single output file.
- There are several output formats available:
- A single audio file containing just the AD Audio
- A single audio file containing the program audio mixed with the AD audio
- An MP4 video file with the program audio and AD audio mixed together.
- A single audio file containing just the AD audio and a control track suitable for use on the UK Digital Terrestrial TV services (DTT)
- Load the Project containing your recorded AD audio
- Make sure you have the right audio Takes selected (only applies to sdtad file type)
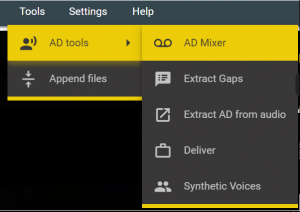
- On the Tools menu Select
- This will open the AD Mixer dialog:
- For full details on all the options see here: AD Mixer
- Once you have set the options and file locations click on Start Mixing.
- Depending on the length of the program this will take from a few seconds to a few minutes.
- You can check on the progress of the mix by looking in the Active Processes dialog.
More Help
How to set the Fade levels for your AD recording.
In AD recording the Fade level is used to control the background (programme) audio.
- If you are delivering either a premixed output (AD ad Programme audio) or an Audio Job (Script file plus wav files) you need to make sure the fade levels are set correctly.
- If you are delivering an unmixed (mono or stereo) wav file of AD audio only then the Fade settings are not used.
- NOTE: you can hide the Fade track if you don’t need it by Right Clicking on the left hand end of the Fade Track and selecting Hide.
When you record AD audio a default setting for the Fade will be applied and very often this will be all that is required.
- To set the default Fade settings go to the Audio Recorder Settings
- Right Click on the Record button to jump to the settings page.
If you want to adjust the Fade settings for a single recording you can do this on the Fade waveform visible under the Text box on the timeline:
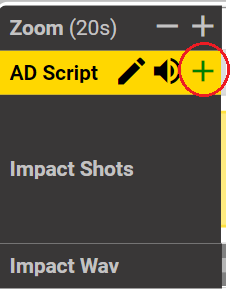
- Click on the + control on the AD text track
- This will open to display the Fade control track and any recorded audio clip(s)
- Hint: If the + control is green that indicates there are audio recordings in the visible section of the timeline.
- The Fade track shows a simple waveform representing the fade levels for each text title.
- When you create the Title the default fade level will be applied.
- If you want to adjust this you can:
- Using the mouse you can move any of the four points on the waveform.
- White circles represent the start of a fade, yellow ones the end point.
- Each Title has two fades; fade down and fade up, each with it’s own start and end points.
- Shift+ Drag over any of the four fade points will move the selected circle and the waveform will follow.
- The first and last points can only be moved horizontally, as they are always at a 0dB level
- The middle two can be moved both up and down (fade level) and side to side (fade timing).
- As you drag a fade point a small pop up will show the time and level:
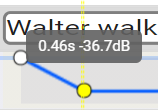
- The time in seconds is relative to the start of the Title
- The level is in dB with 0dB representing no fade of the program audio.
- A vertical yellow line will show the position of the fade point in relation to other elements on the timeline.
- This is useful for aligning with the ends of the Tile.
- Using the mouse you can move any of the four points on the waveform.
- Any changes to the Fade timing and levels is stored automatically in the AD file.
- NOTE: the Fade times are set per Title. If there is more than one audio Take then the fade will be applied to whichever Take is active.
The settings for the default Fade levels and times is in the Record Widget settings .
- Right click on the Record button to see these settings:
-
if Fade Duration = 0.12 (3 frames) and Fade Offset = 0, then the fades will be ‘outside’ the audio.
-
if Fade Duration = 0.12 (3 frames) and Fade Offset = 0.06, then the fades will centred around the ends of the audio.
-
if Fade Duration = 0.12 (3 frames) and Fade Offset = 0.12, then the fades will be INSIDE the audio (against the ends).
-
Note:
The Default settings are only used when:
- You create a new Title
- You use the Right Click > Reset Fade control
- You use the Right click > Edit Fade dialog and use the Set to Default Values button
The fade times on the timeline (but not the depth or the slope) change when
-
- You record audio
- Trim audio
- Move audio
- Un mute an audio
The depth and slope only change if you drag them manually.
Editing the defaults in settings won’t change any existing fades, only new or edited ones in the future.
Opening or duplicating an existing AD file will not change the current fades (times, slope and depth) in that file.
More Information
How to Deliver a completed AD Project.
Once you have recorded and checked your AD Project you will want to deliver the results in some format.
There are three main options:
-
- Export a Stellar Project with some or all all the elements of the Project.
- This option will create a Zip with the AD script file, all the Wav files, any other text files and optionally the media files from the Project
- Another user will then be able to Import this Project into their copy of Stellar and start working straight away.
- Export an Audio Job – Create a ZIP file containing the AD file and associated WAV files.
- This option will create a Zip file with just the AD script and WAV files in it. No other parts of the project will be included.
- Another user can use this in Stellar or other AD systems (if you used the industry standard ESF file format)
- Mix the audio output yourself.
- Stellar provides tools that allow the mixing of AD output in a wide range of formats.
- These files will be in standard WAV or MP4 formats and can be used in all media editing tools (Pro Tools etc.)
- See also: How to mix an AD audio output
- Export a Stellar Project with some or all all the elements of the Project.
How to work with ESF Files.
ESF Files are an existing AD file format that has been in use for many years. You can create, open, edit and export ESF files directly in Stellar. However there are certain technical limitations with the ESF format that you should be aware of. If you don’t HAVE to use the ESF file format we would recommend you always use the srtad format. This is a much more comprehensive and flexible format as it allows you to store multiple Takes, trim audio Takes and has fewer timing restrictions.
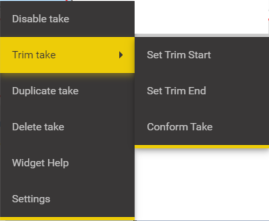
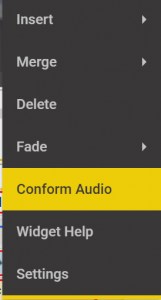
The ESF file format only supports a single audio for each text block and the audio has to be trimmed to the exact end points. To create a single audio file from one or more Takes, each possibly with different Trim points you must Conform the audio for each text block. You can do this by Right clicking on either the audio Take or the Text box.
-
- Any audio Take in an ESF file will be shown in Red if it needs to be Conformed or it is positioned in a way that is not supported in the ESF file format.
- A Text warning message is displayed if you hover over the audio waveform or the Text block showing what the error is.
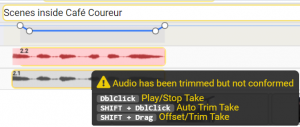
Possible errors are:
- Audio starts before Text box.
- Audio has been trimmed but not conformed.
- Audio gain has been changed but not conformed.
- There is more than one active audio for this Title and it hasn’t been conformed
When setting or editing the Fade for an AD title you can drag the four points on the Fade waveform to get the fade slope and depth you need.
-
- In and ESF file it is not possible to set the start and end points of the Fade outside of the associated Text block.
- On a timeline track for an ESF file, you can’t move the fade outside of the text box. (This is not a limitation for srtad files).
- Extending the size of the text block, or the size of the audio Take will allow the fade point to be moved.
You can always convert between file formats so even if you work in an srtad format you can export as an ESF file for delivery and Stellar will impose the limits for you automatically.
Stellar will show an ESF file on the timeline and will warn you if
How to edit a dubbing script
This section describes how to create or edit a Dubbing Script but not how to do the Adaptation.
For how to Adapt the word timings of a Dubbing Script see here.
A dubbing Script contains:
- The Lines or Dialog
- Role or Character name
- The timing of the Lines
- Any special instructions or comments
Dubbing Scripts are SRTDUB files in Stellar and contain all these elements in a single file. Once you start recording the information about the audio clips are stored in the same file.
- You can either create the Script from scratch or open an existing SRTDUB file and edit the Script.
- To add a blank Script file to a Project follow the instructions for adding a new file and select the SRTDUB file type.
- To add an existing file follow the instructions here.
- Once you have a Project with a Dubbing Script you can start creating or editing the contents.
- Similar to subtitles each Line for a Role is split into a separate block of text. There is no limit on how long a Line can be but it’s easier to handle and subsequently to Adapt if you keep the Line shorter then 10 seconds in duration.
- A full set of tools to insert, split, merge and delete Lines is provided. See the details of the Text editor here for full details. ??????
- The timing of Lines against the video media can be edited either in the text editor or on the Timeline.
- You can view or edit any Comments for a Line by clicking on the
 icon in the text editor next to each Line.
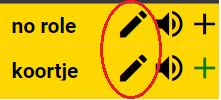
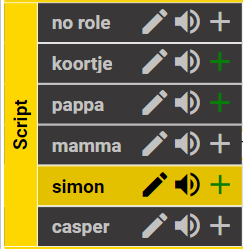
 - To Assign a Line to a Role (Character) use the drop down menu in the corner of the Lines box in the Text Editor:
- This will open a selection box for the Roles
- Here you can
- Select a Role for this Line
- Use the + button to add a Role
- Use the x button to remove any Role from the Line
- Here you can
- On the Timeline there will be a separate track (row) for each Role so you can easily see how the the Lines for different Roles relate to each other.
How to Adapt a Dubbing Script
Once you have a Dubbing Script with all the Lines, Roles and basic timing you may need to do detailed Adaptation for lip-sync timing.
Adaptation is done on the Timeline using drag handles at the beginning and end of each word.
- Each separate Role (Character) is represented on a separate track (row) on the timeline.
- On each track for a Role there is an edit control
- Clicking on the pencil button for a Role enables Adaptation editing for that Role
- There is a Handle for the start and end of each work
- The first and last word are fixed to the end of the text box times
- You can edit the start and end points of the text box either by editing the times in the text editor
- or by using Shift and Drag over then ends of the text block on the Timeline.
- Green Handles are unfixed and will move as you make other adjustments.
- Red Handles are fixed and won’t move as you make adjustments
- The first and last word are fixed to the end of the text box times
- To move a Handle drag it with the mouse.
- The word timing will change as you move the Handle
- If the Handle is Green it will turn Red and the timing of that handle will be fixed.
- As you drag the Handle you will see a green limit line above the Handle showing how far you can move it.
- To unfix a Red Handle Shift click on it and it will turn Green.
- Any changes you make will be saved automatically.
- Click on the Edit Pencil icon to turn off Adaptation editing for a Role.
How to record dubbing audio.
Once you have a Project with the media and the Script loaded and you have done any Adaptation required you are ready to start recording.
In Stellar you have two options:
- Single User Recording
- You are in complete control of all the settings and you control the recording.
- This is ideal for home recording by a voice artist or for use in a studio with an engineer and talent working together.
- Multi user remote recording
- Two or more people can each use Stellar to collaborate on a recording
- You can all talk on the built in intercom
- Whoever is selected as Master can control the video, the selected Lines and recording for all the other users.
- You can have an Engineer, Director, Talent, Script Editor and others, all working together, all from separate locations.
- All recordings are available to all users in near real time.
Single User Recording
Make sure you have a suitable Single User Dubbing Layout loaded.
- This will give you the controls you need.
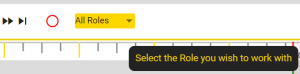
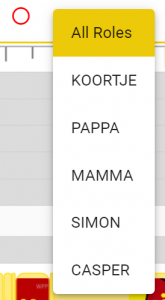
You can select to record All Roles or a specific Role.
-
- On the Media control bar use the Dropdown to select either All Roles or a specific Role
- Or click on the Role on the Timeline
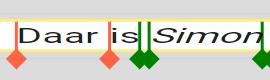
- The selected Role is highlighted in Yellow
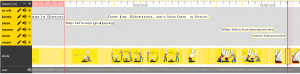
- If a specific Role is selected then only this Role will be shown on the top row of the Rythmoband

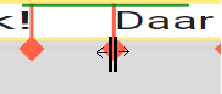
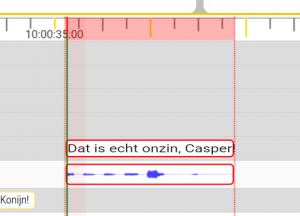
Select which Line you want to record by moving the video or double clicking on the text block on the timeline
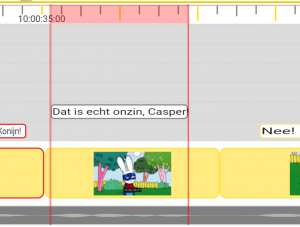
- This will show red in and out record markers
- You are now ready to record
- The Record button will be active (red) provided a Line is selected for the selected Role.
- Click on Record to record the single Line.
- The video will start playing with a (configurable) pre-roll.
- The Rythmoband will start moving and as the text gets to the vertical green line, start speaking.
- After a short post-roll the audio will appear on the timeline below the text (Lines).
- If you record additional Takes these will be added to the Timeline.
- Hover the mouse over a waveform to pop up play, mute and delete controls.
Once you have recoded one or more Lines you can play then video and hear the recordings along with the program audio.
- If you have more than one Take you can select your preferred version by muting and unmuting the Takes
- The unmuted version(s) will move to the top of the list of Takes (waveforms)
Other Recording modes:
- As well as recording a single Line there are two there recoding modes:
- Loop recording – hold down the Ctrl key before you click on the Record button
- This will record the selected Line up to three times in a loop
- You can push Stop (the Record button) at any point
- Endless Record
- Hold down the Alt key before you click on the record button.
- This will start recording at the beginning of the selected Line (red marker) but keep going until you press Stop
- This allows you to record several Lines in one Take
- By default the audio will be split into separate sections for each Line recorded but this can be disabled in Settings
- Hold down the Alt key before you click on the record button.
- Loop recording – hold down the Ctrl key before you click on the Record button
Hint: Hover the mouse over the Record button to see the record options.
Multi User Recording.
Most of the functions and controls for Multi User Recording are similar to those for a single user.
The main difference is the addition of the Collaboration widget:
- The collaboration widget adds controls that allow multiple participants to work together in a single recording session.
- Intercom to talk to participants.
- User assignment, set who is Engineer, Director, Script Editor, Talent and Viewer (guest). Each type has different privaleges.
- Master controller selector to choose who will be in control of the video and the recording actions.
- Selection of who is to record – supporting multiple Talent in the same session if required.
- Technical support tools including built in screen share and browser refresh.
Setting up the Session
-
- Who is included in the session is determined by the workflow management system, used.
- A Task is created and all the users required are assigned to the task.
- When a user downloads a Task they automatically join the recording Session and appear in the list of active users in the Collaboration widget.
- Make sure everyone is present
- Make sure they are assigned the correct type.
- You need at least one Engineer and one Talent.
- Engineers and Directors can control a recording session
- Engineers and Talents can record audio
- Anyone can edit the script
- Use the intercom to talk to all the users. How to use the Intercom.
- Select who is to control the recording by clicking on the Link button for that user:

- If yellow the user is the master controller

- The same user must also have Edit control so click on the pencil button so it too is yellow

- Select who is to record the audio by clicking on the red record selector

- This will then change to have s red centre dot.
- Now follow the steps for a Single User recording.
- When the recording starts the intercom microphones will be muted automatically and then re-enable to their previous settings at the end of the recording.
- The video will start with for all users and you will hear the reordered audio.
- There will be a delay before this starts for all users except the Talent due to network delays.
- At the end of the recording the audio waveform will appear on the timeline for all users.

- You have now done a multi user recording
How to use the Intercom in a Dubbing Session.
When recording in a multi-user Session the Collaboration widget provides a simple voice intercom that works in conjunction with the recoding process.
When the recording starts the intercom microphones will be muted automatically and then re-enable to their previous settings at the end of the recording.
- Each user has an Intercom Microphone Mute button:
- Un Muted

- And Muted

- Any user can mute or unmute their own microphone
- Engineers and Directors can mute and unmute other users microphone.
- Un Muted
- In the top row of controls there is a master intercom microphone mute button
- Engineers and Directors can use this to mute and unmute all users.
- Each user also has an Intercom Mute button

- This mutes the intercom channel on their PC or Mac regardless of other microphone mute settings.
- WARNING: this control doesn’t mute the microphone so other users may still be able to hear you.
- This mutes the intercom channel on their PC or Mac regardless of other microphone mute settings.
- You can also set the Intercom Level and the Intercom Mic level by using the Volume Control Widget.
- Click on the speaker icon on the top menu bar.

- Set the levels or mute by using the two sliders.
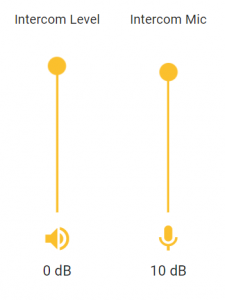
- NOTE: The Slider names can be edited so may be named differently.
- To edit just click on the title text.
- Click on the speaker icon on the top menu bar.
How to record and manage multiple Takes
When you record a Take in Stellar a new audio clip is added to the Project and it is linked to the Script file, the Role and the specific Line(s) recorded.
All Takes are displayed on the Timeline, although they may be hidden depending on the ‘fold’ setting for the Role.
Viewing the Takes
- Each Role on the timeline has a + control.

- If there a recorded audio takes for this Role in the visible section of the timeline the + button will be green
- Click on the + button to see any Active Tales for the Role.
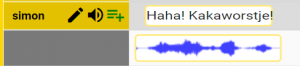
- This will show one or more Active Takes
- An Active take is one that is not muted.
- Click on the + button again to show all Takes
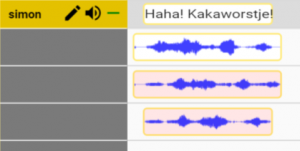
- Inactive or Muted takes will be shown with a slight red background.
- Note: Takes are show with active Takes at the top and inactive Takes below, each in Take number order.
- The central section of the Timeline can be scrolled vertically if there are too many rows to show.
- Use the scroll bar at the right hand end of the Timeline.
- Use the mouse scroll wheel over the left hand title section of the timeline.
- Use Shift Scroll wheel anywhere in the timeline.
How to edit audio Takes
- Hover over a Take to show the controls available

- PLAY – Use the Play button on the left to listen to an individual Take
- AUTO TRIM – trim to fit the text box times
- Click on the Scissors button to trim the audio to match the Lines box times
- MUTE – Use the Speaker button to mute or unmute a Take –
- Note: This will change the display order of the Takes putting active Takes at the top.
- There can be more than one active Take.
- DELETE -Click on the Delete button to delete the Take
- You will be asked to confirm this.
- Hint: Holding down the Ctrl key and clicking on Delete will remove the Take without a confirmation.
- Useful if you are cleaning up a lot of old Takes.
- Hold down the Shift key and hover the mouse over the Take.
- SLIPPING – To move or Slip the audio on the timeline Shift+ Drag over the centre portion of the Take waveform
- You can move the Take on the timeline to adjust the Take audio relative to the video time.
- Hint: Marker lines with In and Out timecodes will be shown as you move the waveform.
- TRIM – To Trim either the in or out point of the Take audio Shift and drag over one end of the waveform.
- You can trim to expose more or less of the recoded take, up to the maximum available.
- Hint: Marker lines with In or Out timecodes will be shown as you move the waveform end point.
- SPLIT – split a waveform at the position of the playhead.
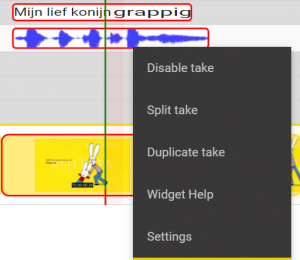
- Move the video position to the point you want to split the audio
- Right click over the Take and select Split take.
- Two copies of the waveform will be created with different trim points set
- No audio is deleted and you can adjust the trims to reveal more of the original Take
- DUPLICATE – make an identical copy of an existing Take
- Right click over the selected Take and click on Duplicate take.
- An identical copy of the Take with the same trim points will be created.
Glossary
Nebula
- Nebula is a system for automatically manipulating subtitle, audio description, dubbing and other media files located on any local or cloud storage. All Nebula functions are automatic and can run on a machine or server anywhere.
Nebula Server
- The Nebula Server is the central server that controls all Nebula and Stellar functions. All Process and Project configurations, all user logins and all metering and billing is done by the Nebula Server.
- No media of other user files are stored on the nebula Server.
Device
- A Device is a mini software server that runs on each machine that is used to run any nebula Processes.
- Each device is unique and there is a different Device type for PC, Mac or Linux machines.
- Only one copy of a specific Device (ID Number) can run at the same time.
Device Template
- A Device Template is a stored configuration for a Device and for any Projects and Processes configured for that Device. Device Templates are used to simplify the deployment of new Devices.
Project
- A Nebula Project (different from a Stellar Project) is a collection of Processes with their configurations and other parameters. A Project is assigned to a specific Device and can have cost codes an support levels assigned to it.
Project Template
- A Project Template is a pre-configured set of Processes and settings that can be quickly reused. Project Templates are used to simplify the deployment of new resources.
Process
- A Process is the key building block in Nebula. All functions provided in Nebula and Stellar are performed by Processes. Only the use of Processes is charged for.
User
- A Nebula User has access to parts of the Nebula system to add, edit or remove Devices, Projects, Processes, Templates, Libraries and Users for the company they are a member of. How much access a user has depends on the access level assigned to them.
Company
- A Company within Nebula has Users, an account and any number of Devices, Projects, Libraries and Processes assigned to it. Users belong to a Company and can only access components associated with that company.
Library
- A Nebula Library is a pre-configured data storage location. Libraries can be local storage on a User’s machine, an area on a company’s server or a cloud storage location. Libraries are configured and used by Users and do not store any data on Yella servers.
Stellar
- Stellar is a manual editing solution for all types of timed text and additional audios, this can include subtitles, captions, AD, voice over, transcripts and dubbing.
Device
- A Device is a mini software server that runs on each machine that is used to run any nebula Processes.
- Each device is unique and there is a different Device type for PC, Mac or Linux machines.
- Only one copy of a specific Device (ID Number) can run at the same time.
Project
- A Stellar project (different from a Nebula Project) is a collection of files and attributes that have been gathered together for a specific job.
- A single Project file references media, subtitle, script and other metadata files into a single collection.
Task
- A Stellar Task is a Project that has been uploaded to a central Task Server and assigned to a User.
- Tasks can be downloaded by any Stellar user who has been assigned the task
- Tasks are stored centrally and all changes are updated automatically.
Files
- Files are all the parts that make up a Project and include video file, subtitle or script files, shot change and other data files and any associated audio files.
- All files are stored on either your local drive or a specified location.
- Files may be copied automatically to a Task server if that is how your Stellar is configured.
Layout
- A Stellar layout is a collection of Widget configurations that set up how Stellar will look and operate. Different Layouts are available for subtitling, audio description and dubbing.
- Users can create, edit and save Layouts to set their own preferences.
User
- A Nebula User who has been added to the Task System.
Widget
- A Stellar Widget is a sub component of the Stellar software and can be enables, disabled and configured to provide a specific function within Stellar. EG Speech to Text interface. Which Widgets are active and how they are configured is set by a Layout.
Profile
- A Stellar Profile is a set of style and QC Layers (containing Rules) that are applied to a specific subtitle or script file. This may be the number of characters per row, the maximum number of lines and the font style for a subtitle file, or the default fade levels for an Audio Description file.
- Profiles are stored centrally per Company and can be accessed by any user with suitable privileges.
- There are a set of Read-Only System Profiles that users can use directly or copy to make custom versions.
- Profile settings can also be overridden on a specific Project or Task to allow for special cases.
Layers
- Layers define a set of Rules for how text files (Subtitles, Captions, Scripts or Transcripts) should be created. There are Layers for Reading Speed, Timing, Text Style, Editing restrictions, Audio Settings and QC tests.
- Layers are only used as part of Profiles
- Layers are stored centrally per Company and can be accessed by any user with suitable privileges.
- There are a set of Read-Only System Layers that users can use directly or copy to make custom versions as Company Layers.
Rules
- Rules are the individual settings in Layers that control the style, timing and other settings for a text file (Subtitles, Captions, Scripts or Transcripts).
- Rues are only set in Layers
- Within a Project individual Rules can be overridden just for the specific text file in a single Project.
Settings or Properties
- The Settings for Stellar are stored in a range of ways depending on the setting.
- For example:
- The microphone selected to record Audio Description audio is stored as part of the overall Stellar settings as this is specific to your computer
- The position and size of the widgets on screen, and my of their settings, are stored as part of a Layout. This allows you to swap between different Layouts for different type of work.
- Subtitle style settings, line length, positioning rules, are stored as part of a Profile that sets the rules for a specific file within a Project.
Hotkeys
- Hotkeys are shortcut key combinations to access specific function.
- EG: Alt+ Up Arrow – Video pause and single step forwards
Hotkey Maps
- Hotkey Maps control what Hotkeys are used for each function within Stellar.
- There is a Default Stellar map – See the Hotkeys Help page
- Alternative Hotkey maps are provided to simulate other subtitling software products
- Users can create personal customised Hotkey Maps to set personal preferences.
Import
- Importing in Stellar is the action of bringing in files that are not in the \Stellar\ file system and making them available in Stellar. Importing may, optionally, include format conversion of video or text files.
Export
- Exporting from Stellar is the action of taking in the \Stellar\ file system and saving them in an external location. Exporting may, optionally, include format conversion text files or zipping of audio and script file sets.